Processing Ajax...

Title
Close Dialog

Message

Confirm
Close Dialog

Confirm
Close Dialog

Confirm
Close Dialog

DisplayFusion Installer Options

June 13, 2015

Please note: The MSI Installer has special requirements when being deployed. Please read the MSI Installation section carefully, and as always, make sure to test it thoroughly before deploying it into production.

Note: The DisplayFusion installer requires administrative privileges in order to run successfully. If the installer is run using an account that doesn't have administrative privileges on the system, UAC will request the credentials for an administrative account on the system.

EXE Installation

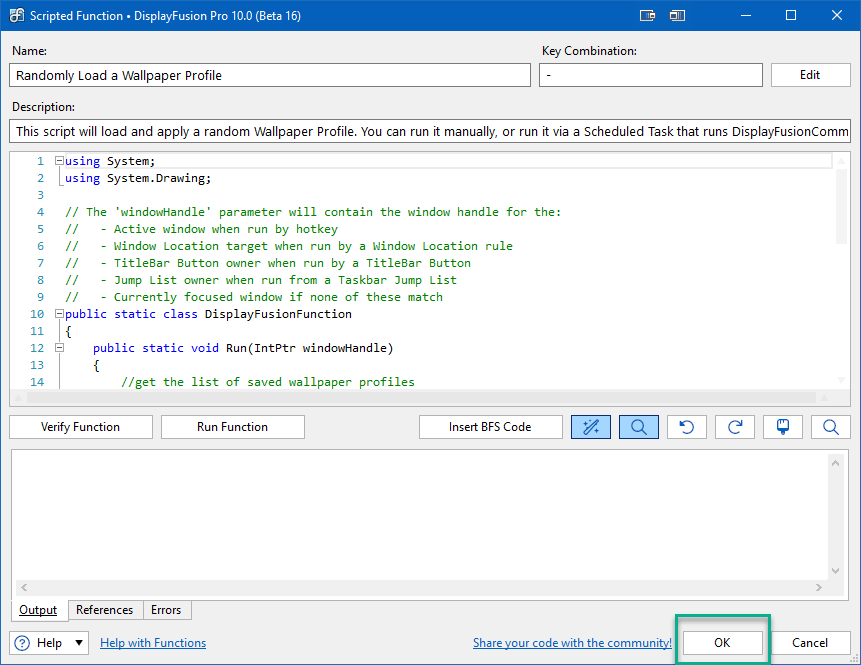
The EXE installer will automatically close DisplayFusion (version 3.2.1+) when being run in silent mode. This is very useful for deployments. For more options, please consult the Inno Setup help file that comes with Inno Setup.


The following parameters are especially useful for deployments.


/SILENT
Enables Silent Install option (shows progress while running)

/VERYSILENT
Enables Silent Install option (does not show progress while running)

/LANG=en
Forces the installation language to English

/DIR="c:\folder"
Sets the default installation folder

/LKEYUSER="license key"
Specifies the license key for the current user (the user running the installation)

/LKEYALL="license key"
Specifies the license key for all users

/LPATHUSER="C:\license.txt"
This parameter can be used instead of /LKEYUSER. Specifies a text file containing the license key for the current user. Also accepts UNC paths.

/LPATHALL="C:\license.txt"
This parameter can be used instead of /LKEYALL. Specifies a text file containing the license key for all users. Also accepts UNC paths.

/STARTUPUSER=1
DisplayFusion will be set to startup with Windows for the current user (the user running the installation)

/STARTUPALL=1
DisplayFusion will be set to startup with Windows for all users

/CONTEXTMENU=0
DisplayFusion will not place entries in the Desktop Context Menu

/LAUNCHAFTER=0
DisplayFusion will not run automatically after setup completes, but will still run on Windows startup unless /STARTUPUSER and /STARTUPALL are set to 0

/NOPREREQS=1
DisplayFusion will not try to install any prerequisites (like the .NET framework, VC++ runtime... etc)

/MERGETASKS="!desktopicon,!desktopicon\common,!desktopicon\user"
Setup will not create a Desktop icons

/MERGETASKS="desktopicon,desktopicon\common,!desktopicon\user"
Setup will create a Desktop icon for all users

/REMOVEALLDATASETTINGS=1
Only used when uninstalling, will remove all DisplayFusion appdata folders and registry keys.


MSI Installation

You can use any of the standard Windows Installer command line options.

To perform a standard silent installation (note that the parameters are case sensitive):

msiexec.exe /i "DisplayFusionSetup.msi" /qn CUSTOM1="/VERYSILENT" LAUNCHAFTER=0 LKEYALL="license key" STARTUPALL=1 STARTUPUSER=0

Important Note:
When deploying via Group Policy Software Installation, you absolutely must use the included MST (transform) file on the Modifications tab, otherwise the installation will never complete.

Since the MSI Installer has changed between DisplayFusion 3.4.1 and 4.0, it is recommended that you choose the "Uninstall the existing package, then install the upgrade package" option if you'll be using Group Policy to upgrade from DisplayFusion 3.4.1 to 4.0 or higher.

The following MSI properties are especially useful for deployments. Any of the properties below can be included in an MST (transform) file if deploying via Group Policy. If you create your own MST file, you must include the CUSTOM1="/VERYSILENT", LAUNCHAFTER=0, STARTUPALL=1, and STARTUPUSER=0 properties for deploying the MSI through Group Policy Software Installation.


PATH="c:\folder"
Sets the default installation folder

LKEYUSER="license key"
Specifies the license key for the current user (the user running the installation)

LKEYALL="license key"
Specifies the license key for all users

LPATHUSER="C:\license.txt"
This parameter can be used instead of /LKEYUSER. Specifies a text file containing the license key for the current user. Also accepts UNC paths.

LPATHALL="C:\license.txt"
This parameter can be used instead of /LKEYALL. Specifies a text file containing the license key for all users. Also accepts UNC paths.

STARTUPUSER=1
DisplayFusion will be set to startup with Windows for the current user (the user running the installation)

STARTUPALL=1
DisplayFusion will be set to startup with Windows for all users

CONTEXTMENU=0
DisplayFusion will not place entries in the Desktop Context Menu

LAUNCHAFTER=0
DisplayFusion will not run automatically after setup completes, but will still run on Windows startup unless /STARTUPUSER and /STARTUPALL are set to 0

TASKS="!desktopicon,!desktopicon\common,!desktopicon\user"
Setup will not create a Desktop icons

TASKS="desktopicon,desktopicon\common,!desktopicon\user"
Setup will create a Desktop icon for all users

The 2015 Summer Sale is Here!

June 11, 2015

Update: The sale is over!

To celebrate the arrival of summer, we're offering up to 25% off DisplayFusion, and 15% off all of our other products!

If you're not familiar with all of our apps, feel free to check them out on our More Apps page.

Have an excellent summer, everyone!

DisplayFusion
DisplayFusion
VoiceBot
VoiceBot
FileSeek
FileSeek
ClipboardFusion
ClipboardFusion
iTunesFusion
iTunesFusion
LogFusion
LogFusion

Working With Window Location Rules

May 21, 2015

Note: Starting with DisplayFusion 8.0, Window Location has been replaced by the more powerful feature, Triggers. You can find out more about Triggers here: https://www.displayfusion.com/Discussions/View/working-with-triggers/?ID=43b31609-4ec6-4478-99f8-a1f11e9793f7

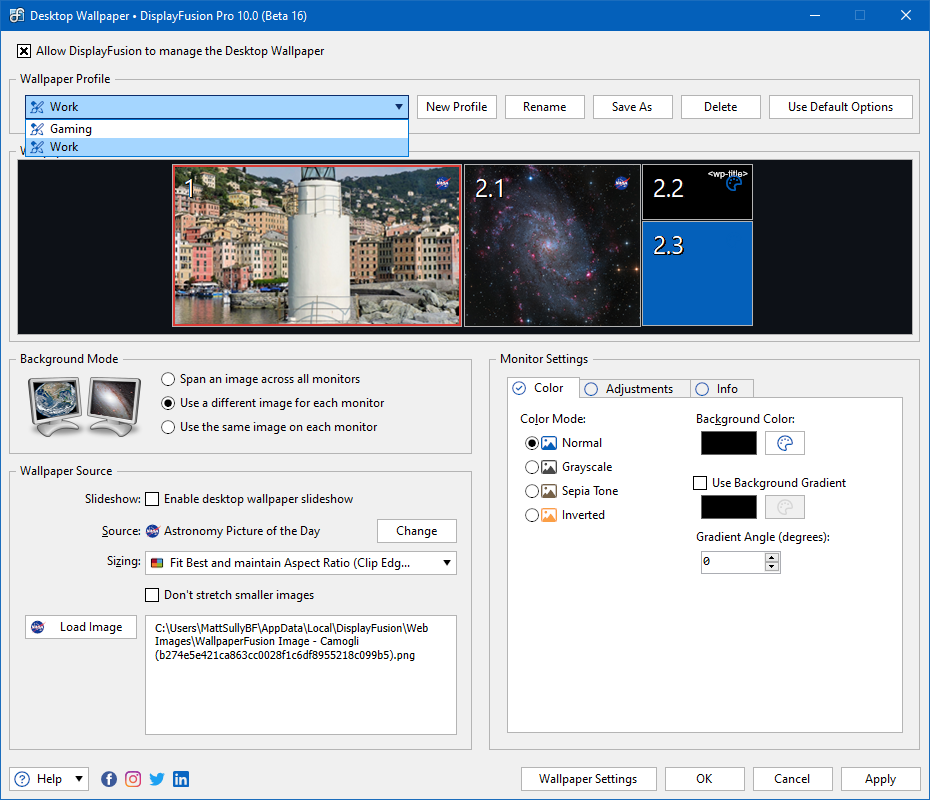
Window Location is a powerful feature that allows you to set the default location of an application's first window only, or the first window as well as subsequent child windows. You can have the application automatically move to a specific monitor and have it centred, maximized, or minimized. If you want to get even fancier, you can have the Window Location rule run any function from the list of functions on the Settings > Functions tab. You can even create a custom function to set the exact location and size in pixels, or you can create a scripted function to do almost anything you like with the window.

Creating a basic Window Location rule

  1. Open the DisplayFusion Settings > Window Location tab.
  2. Make sure the "Enable Window Location" option is enabled.
  3. Click Add.
  4. Click "Select Application." If your application is currently running, it will be listed in the Select Application window. If it's not running, click Browse and locate the program's .exe on the drive.
  5. In the "Move Window" drop-down, choose whether you want the application to start on the current monitor (the monitor that the mouse cursor is on), or move to a specific monitor. If you choose "Move to Selected Monitor," click the monitor in the box below the "Move Window" drop-down.
  6. In the "Window Size" drop-down, choose whether you want the application to be Maximized, Minimized, Centred, or Spanned after it's moved.
  7. In the "Window Location Mode" drop-down, choose whether this rule should apply only to the first window of the application, or all windows. "All windows" includes dialogs and message boxes in addition to regular child windows.
  8. Click OK, then OK again.
A Basic Rule
A Basic Rule

Making a Window Location rule apply to more than one application

If you want a Window Location rule to apply to multiple applications, you can use an asterisk as a wild card, or you can specify multiple programs separated by a pipe. Here are some examples:
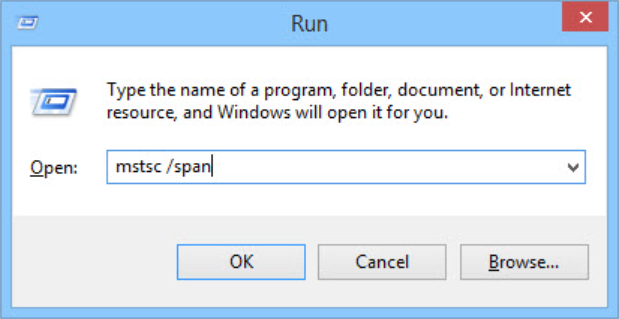
  • If you had a bunch of programs in the same folder, and wanted them to all be moved by the same Window Location rule, you would put the following into the "Application" text box: C:\AllMyPrograms\*
  • If you have a couple of programs both named "notepad.exe" but in different locations on the drive, you would enter: *notepad.exe
  • If you want the Window Location rule to affect both Calculator and Notepad, you would enter: *calc.exe|*notepad.exe
A Wildcard Rule
A Wildcard Rule

Creating a Window Location rule to run a Function

  1. Open the DisplayFusion Settings > Window Location tab.
  2. Make sure the "Enable Window Location" option is enabled.
  3. Click Add.
  4. Click "Select Application." If your application is currently running, it will be listed in the Select Application window. If it's not running, click Browse and locate the program's .exe on the drive.
  5. In the "Move Window" drop-down, choose "Keep on Same Monitor."
  6. In the "Window Size" drop-down, choose "Run Selected Function on Window."
  7. In the "Function" drop-down, choose the Function that you'd like to have DisplayFusion run on the application when it opens.
  8. In the "Window Location Mode" drop-down, choose whether this rule should apply only to the first window of the application, or all windows. "All windows" includes dialogs and message boxes in addition to regular child windows.
  9. Click OK, then OK again.
A Rule that Runs a Function

Creating a Window Location rule to move all new windows to the current monitor

  1. Open the DisplayFusion Settings > Window Location tab.
  2. Make sure the "Enable Window Location" option is enabled.
  3. Click Add.
  4. Click "Select Application." If your application is currently running, it will be listed in the Select Application window. If it's not running, click Browse and locate the program's .exe on the drive.
  5. In the "Move Window" drop-down, choose "Move to Current Monitor."
  6. In the "Window Size" drop-down, choose one of the sizing options.
  7. In the "Window Location Mode" drop-down, choose "All Windows."
  8. Click OK, then OK again.
A Rule to Move All Windows to the Current Monitor

Creating a Window Location rule to run on only a specific window for the application

  1. Open the DisplayFusion Settings > Functions tab.
  2. Click the "Download Scripted" button.
  3. Download the "Move Only a Specific Window of an Application" script.
  4. Edit the script to look for the window title of the window you want it to apply to, and also change the X and Y values for the location. You can also modify the code in the "if" statement to do other things with the window if you like.
  5. Open the DisplayFusion Settings > Window Location tab.
  6. Make sure the "Enable Window Location" option is enabled.
  7. Click Add.
  8. Click "Select Application." If your application is currently running, it will be listed in the Select Application window. If it's not running, click Browse and locate the program's .exe on the drive.
  9. In the "Move Window" drop-down, choose "Keep on Same Monitor."
  10. In the "Window Size" drop-down, choose "Run Selected Function on Window."
  11. In the "Function" drop-down, choose the "Move Only a Specific Window of an Application" Function.
  12. In the "Window Location Mode" drop-down, choose "All windows."
  13. Click OK, then OK again.

Configuring the Google Images Wallpaper Source

May 13, 2015
  • After logging in with your Google Account, click the "Create Project" link on the top-right of the page.
    Create Project
  • You'll be taken to the "Create Project" page. Give the project a name, then click the Create button.
    Name Project
  • The newly-created project will populate the screen. If not, use the "Select a project" dropdown to choose your new project.
  • In the left pane, navigate to APIs & Services > Library.
    APIs and Services - Library
  • Use the search box to search for "Custom Search API" and then select it.
    Custom Search API
  • Click the "Enable" button.
    Custom Search API - Enable
  • Click the menu on the top left and navigate to APIs & Services > Credentials.
    APIs and Services - Credentials
  • Click the "Create Credentials" link and choose "API Key."
    Create API Key
  • Click the copy button on the "API key created" window.
    Copy Key
  • Right-click the DisplayFusion tray icon and click "Desktop Wallpaper." You can also access this via the Options tab in Settings.
    Desktop Wallpaper Menu
  • Click the "Change" button in the "Wallpaper Source" area.
    Change Wallpaper Source
  • Click the "Google Image Search" source option.
    Google Image Search
  • Click "Get Settings."
    Get Settings
  • Paste the Google Project API Key into the "API Key" text field.
    GIS Settings
  • Specify the Search Text to pull in specific images.
  • Click the "Use These Settings" button.

Splitting a Spanned Remote Desktop (RDP) Session

April 13, 2015
In Windows 7, if you want to do a true multi-monitor remote desktop session, both the local and remote machine need to be running Windows 7 Enterprise or Ultimate. If you're using a different version, you can still span the remote desktop session across all of your monitors, but it will be treated as one large display. Using DisplayFusion, you can split that spanned session into smaller virtual monitors.
The steps below assume that you have two monitors of equal screen resolution on your local machine (the machine you're connecting from). If you have more than two monitors of equal screen resolution, just make sure to setup the splits in step 5 appropriately (i.e. 3x1 for 3 monitors).
  1. Install DisplayFusion on the remote machine.
  2. Open Start > Run (or press Win + R) and enter
    mstsc.exe /span
    . Note: The monitors connected to your local machine must all be the same resolution for this command to work.
    Run mstsc
  3. Enter the remote computer name and click "Connect."
  4. Open the DisplayFusion "Monitor Configuration" window, and click the "Splits and Padding" button.
  5. On the remote machine (in your RDP session), click the "Preset Splits" button and choose "2x1."
  6. Preset Splits
  7. Click OK to close the Splits and Padding window, and OK again to close the Monitor Configuration window.
You should now have two virtual monitors inside your spanned remote desktop session.
Split Screen

Randomly Load a Wallpaper Profile

March 13, 2015
When you've created multiple wallpaper profiles, you can associate them with monitor profiles, but you can also apply them randomly. Follow the directions here to have your wallpaper profiles randomly selected.
You will need two or more Wallpaper Profiles for this function to work.
  • Right-click the DisplayFusion tray icon and click "Desktop Wallpaper." You can also access this via the Options tab in Settings.
    Desktop Wallpaper Menu
  • Click the Wallpaper Profile dropdown.
    Wallpaper Profiles
  • If you have two or more Wallpaper Profiles, continue to the directions below. Otherwise, create additional profiles before continuing.
  • Right-click the DisplayFusion icon and click "Settings."
    Tray Menu - Settings
  • Select the Functions tab and click the "Scripted Function" dropdown. Then click "Download Scripted Function."
    Download Scripted Function
  • Double-click the "Randomly Load a Wallpaper Profile" function.
    Downloading the Function
  • The Scripted Function window will open. Click "OK" to complete the download and add it to your Function list.
    Scripted Function Window
  • From the Settings window, click "OK."
  • Download the Scheduled Task XML
  • On your computer, open the Windows Task Scheduler.
    Open Task Scheduler
  • Click "Task Scheduler Library" in the left pane, then "Import Task..." in the right pane.
    Import Task
  • Select the Scheduled Task XML file you downloaded previously, and click "Open."
  • The Create Task dialog window will open. Here you can customize various Triggers, Actions, etc. for the new task.
    Configure Task
  • Once complete, click "OK" to save the Scheduled Task.
To schedule a time or event to apply a specific Wallpaper Profile, see this guide: Scheduling Wallpaper Changes
First Page
Previous Page
1
2
3
4
5
6
7
8
9
10
11
12
13
14
15
16
17
18
19
20
21
22
23
24
25
26
27
28
29
30
31
32
33
34
35
36
37
38
39
40
41
42
43
44
45
46
47
48
49
50
51
52
53
54
Next Page
Last Page