DisplayFusion gives users power and precision over their multi-monitor setup, with automation and customization options to create the perfect displays, every time. This document takes you through DisplayFusion's menus and options to help you get started with the software. For how-to guides on the most popular features in DisplayFusion, check the main help page here:
DisplayFusion Help.
The Free version of DisplayFusion will have access to fewer features.
Upgrade to the Pro Version to get full access to all features listed in this guide.
DisplayFusion offers an array of options for monitor, wallpaper, window, icon, and taskbar management. These include profile, trigger, and function configurations which will automate or more efficiently initiate customized changes to your displays.
DisplayFusion is highly customizable. To make the most of it, approach your setup with the following areas of focus (click each subcategory link to jump to that area of the document):
DisplayFusion is ideal for multi-monitor setups. Configuring your monitor settings and arrangement begins in the Monitor Configuration area of DisplayFusion.
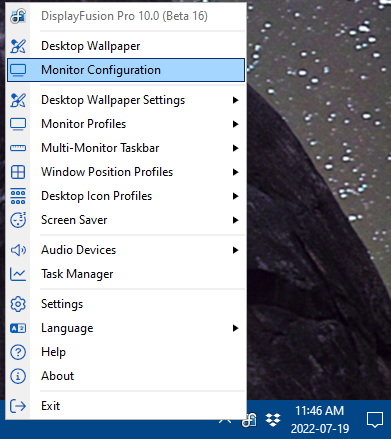
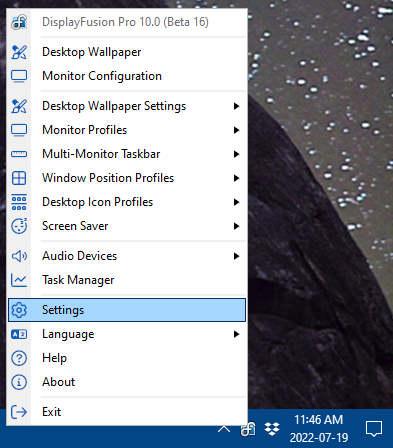
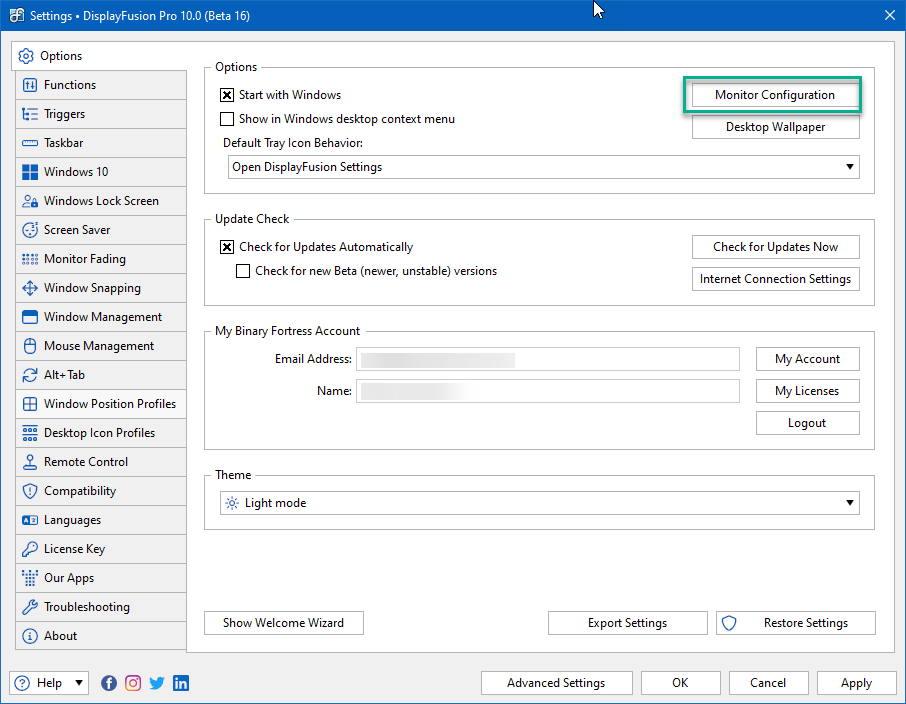
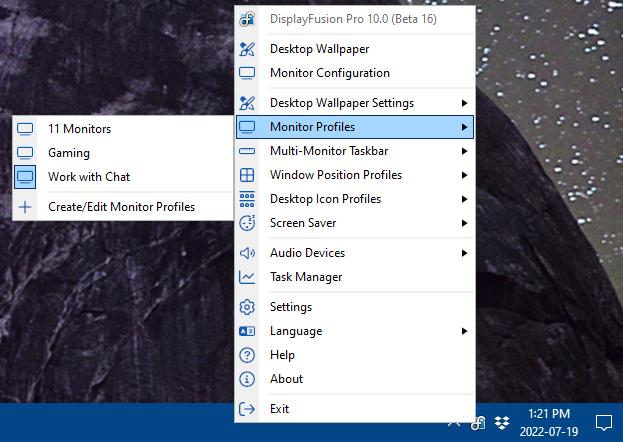
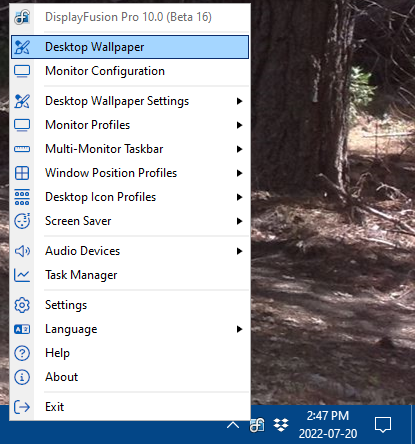
To navigate here, right-click on the DisplayFusion tray icon and click "Monitor Configuration." You can also reach this area via the Settings window by selecting "Settings" and clicking the "Monitor Configuration" button in the "Options" tab.
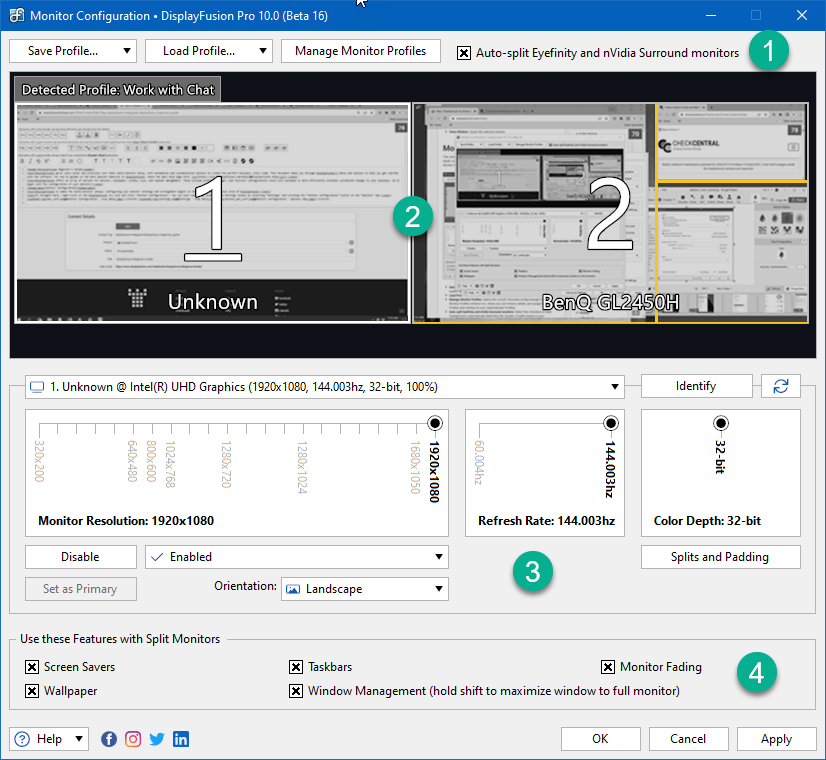
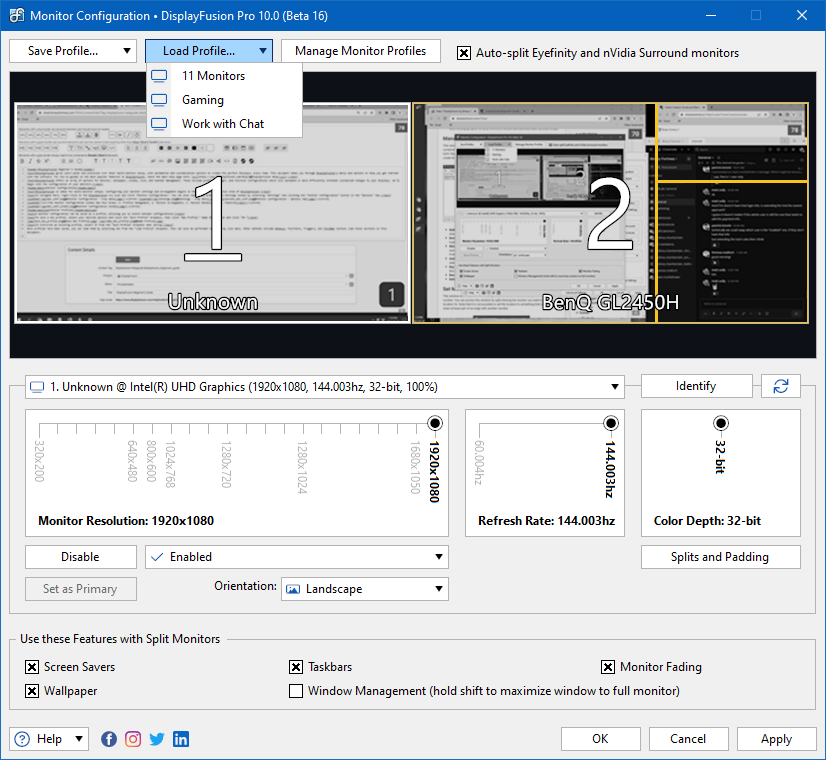
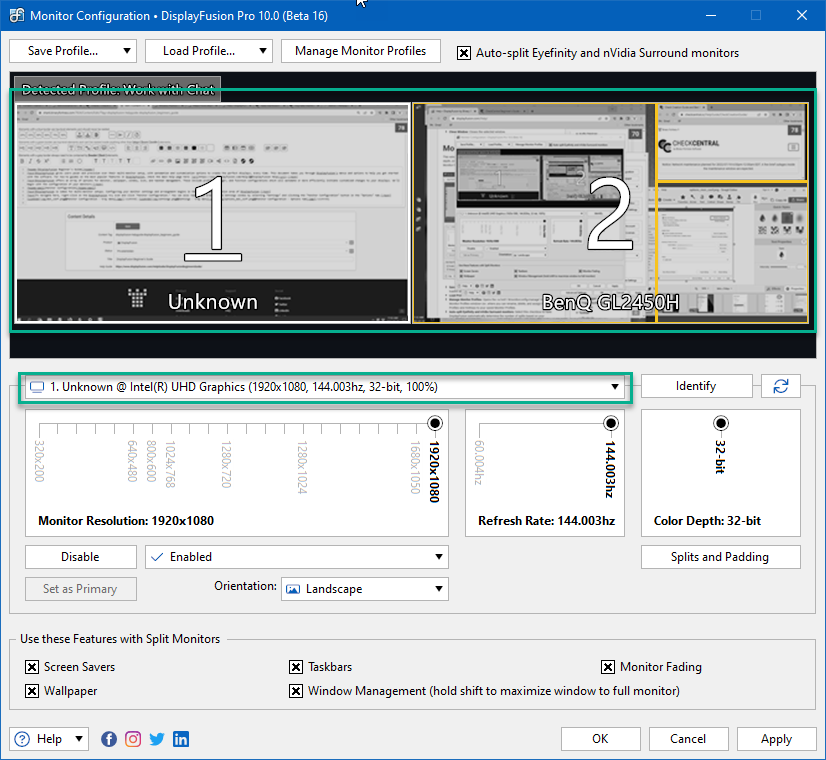
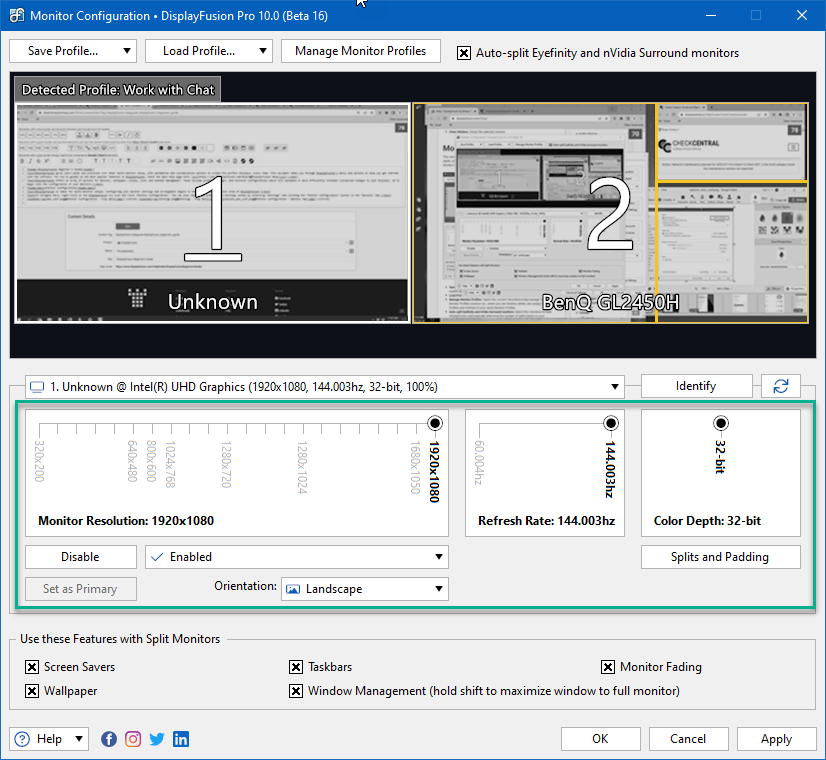
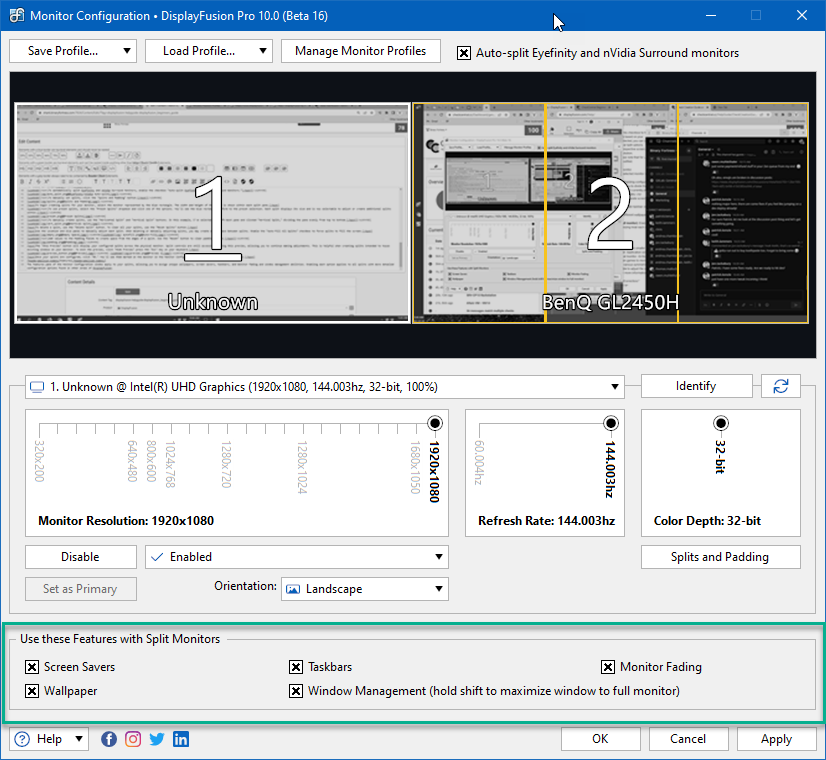
The Monitor Configuration window has four areas: 1. Profile Management, 2. Monitor Arrangement, 3. Monitor Details, and 4. Features.
A monitor configuration can be saved as a profile, allowing you to switch between configurations.
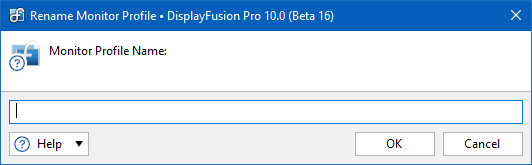
To save a new profile, select your desired options and click the "Save Profile" dropdown, then click "New Profile." Name the profile and click "OK."
To overwrite an existing profile, select it from the "Save Profile" dropdown when saving.
Once profiles have been saved, you can load them by selecting one from the "Load Profile" dropdown. This can also be performed via the tray icon menu. Other methods include
HotKeys,
Functions,
Triggers, and
TitleBar Buttons (click the links to see those sections in this document).
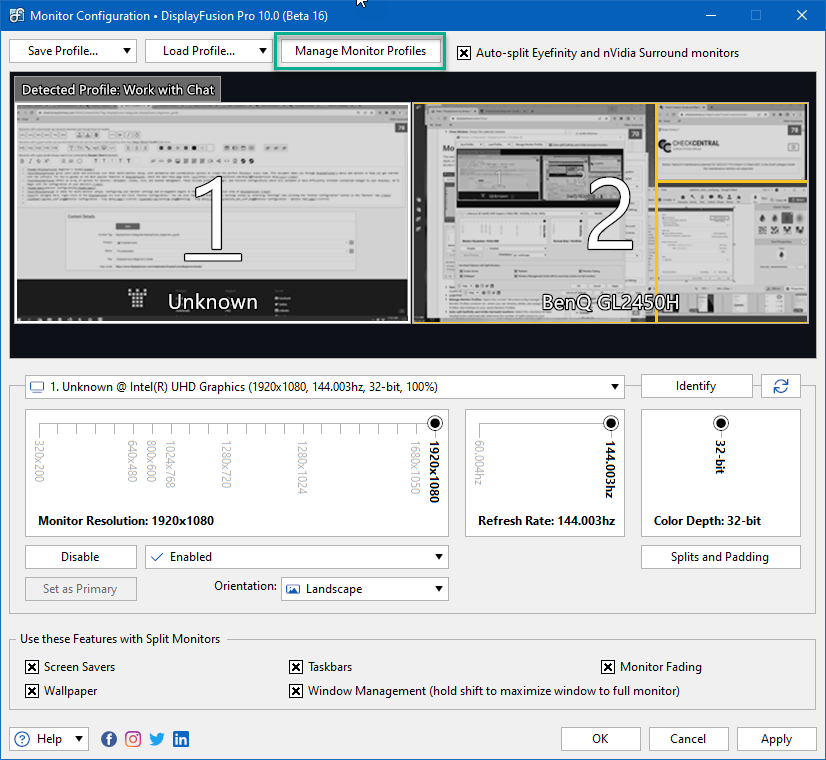
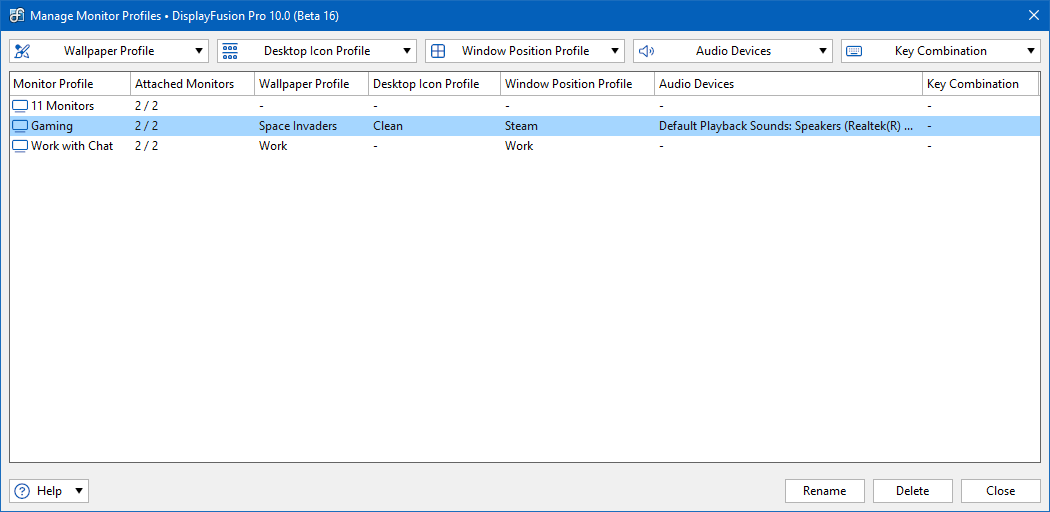
To manage your Monitor Profiles, click the "Manage Monitor Profiles" button.
Monitor Profiles can have other profile configurations attached to them (i.e.
Wallpaper Profiles,
Desktop Icon Profiles, and
Window Position Profiles). Audio Devices (speakers/microphones) can also be attached to each Monitor Profile. Click the links to see their sections in this document.
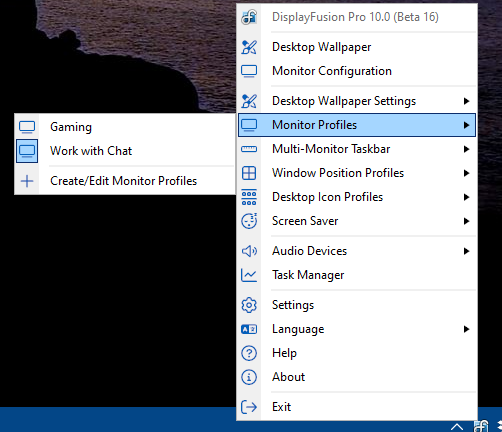
Once attached, loading a Monitor Profile will also load its attachments. To make these attachments, select the Monitor Profile from the list, select the profiles and/or audio devices from their dropdowns, and click "Close."
Example: (see image) The "Gaming" Monitor Profile uses the "Space Invaders" Wallpaper Profile, the "Clean" Desktop Icon Profile, and the "Steam" Window Position Profile with select Audio Devices.
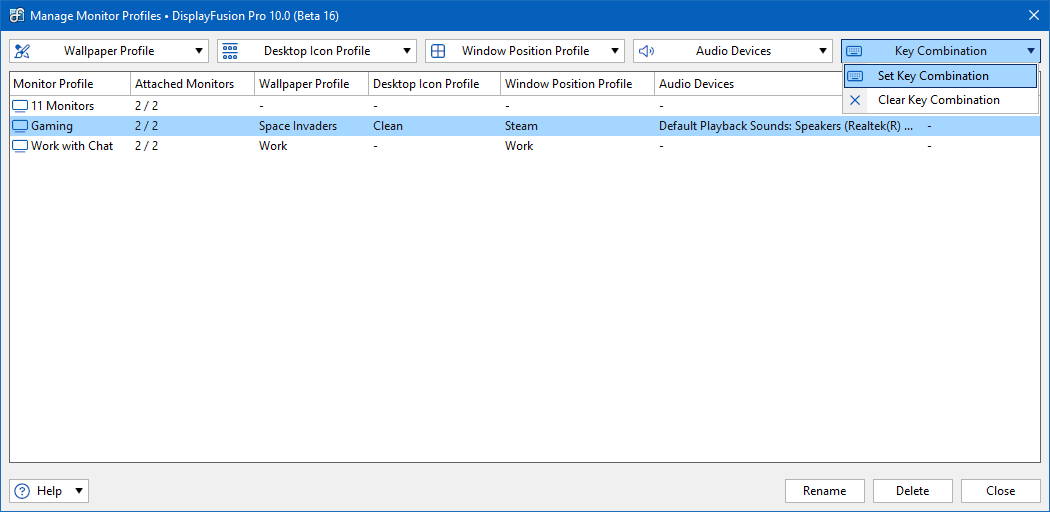
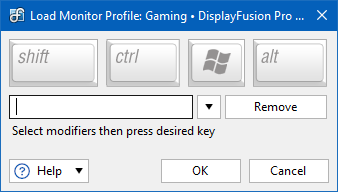
To assign a
HotKey to a Monitor Profile, which allows you to press a combination of keys to load it, select the profile from the list, select the "Key Combination" dropdown, and click "Set Key Combination." From the prompt, select the keyboard key and modifiers and click "OK."
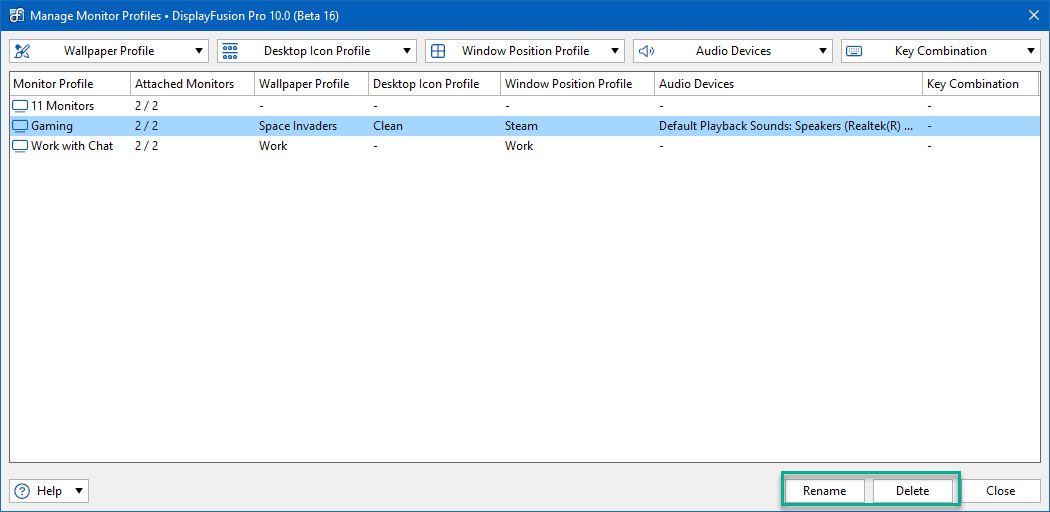
To rename or delete a Monitor Profile, use the buttons at the bottom of the Manage Monitor Profiles window.
For additional detail, integration, and usage options for Monitor Profiles, see
Monitor Profiles.
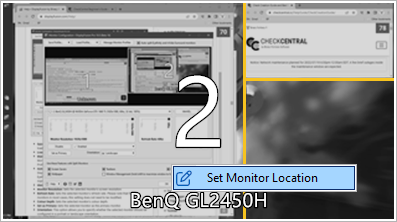
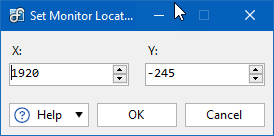
The middle area of the Monitor Configuration window shows the detected monitors. You can move them around for a more accurate representation of their physical position in your space. Right-clicking them allows you to set X and Y values. Choose "Set Monitor Location" from the right-click options, enter your X and Y values and click "OK."
To alter their details, left click a specific monitor and make adjustments in the Monitor Details area below.
Select the monitor by clicking on it in the Monitor Arrangement area or selecting it from the dropdown.
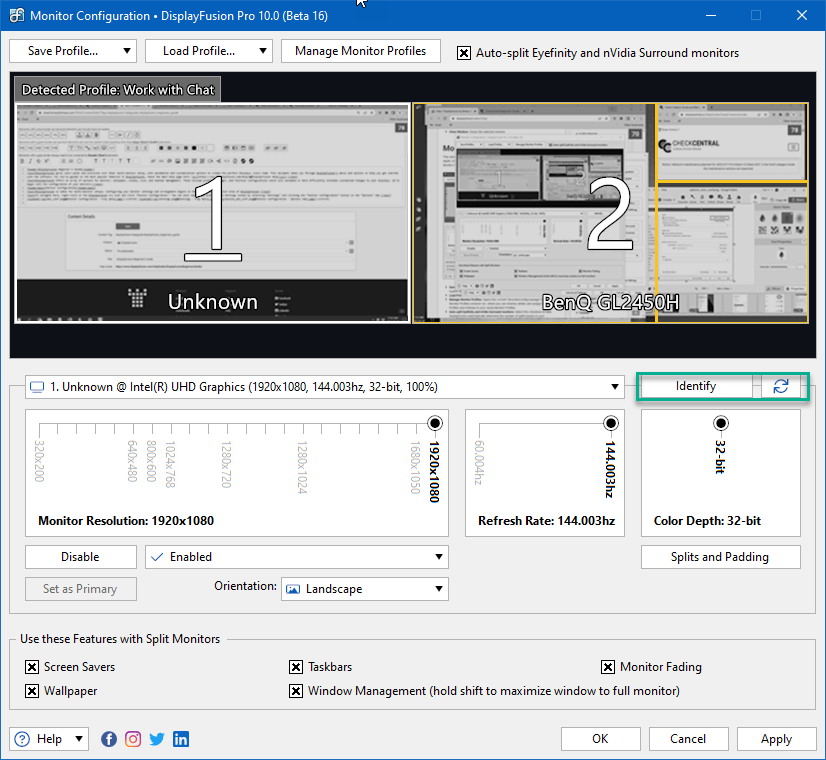
To identify monitors by their number assignment, click "Identify." To refresh for detection of new monitor connections, click the refresh icon.
Use the other options to set resolution, refresh rate, color depth, and orientation. You can also disable, enable, or set any monitor as the primary. In addition, you can adjust a monitor's Splits and Padding.
Splits divide physical monitors into smaller virtual monitors with their own taskbar, wallpaper, and screen saver options. Application windows will also maximize within the virtual constraints.
Note: It's not currently possible to constrain full screen videos or full screen games to monitor splits.
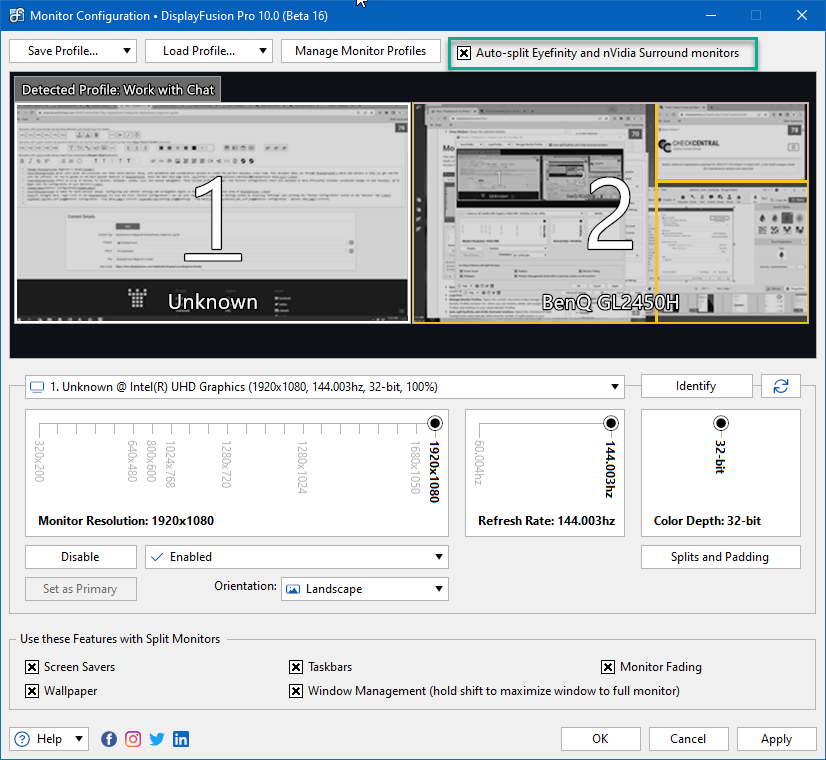
To automatically split Eyefinity and nVidia Surround Monitors, enable the checkbox "Auto-split Eyefinity and nVidia Surround monitors."
Bezel compensation for these monitors requires configuration. See the following guide for more detail:
Monitor Splits for Bezel Correction.
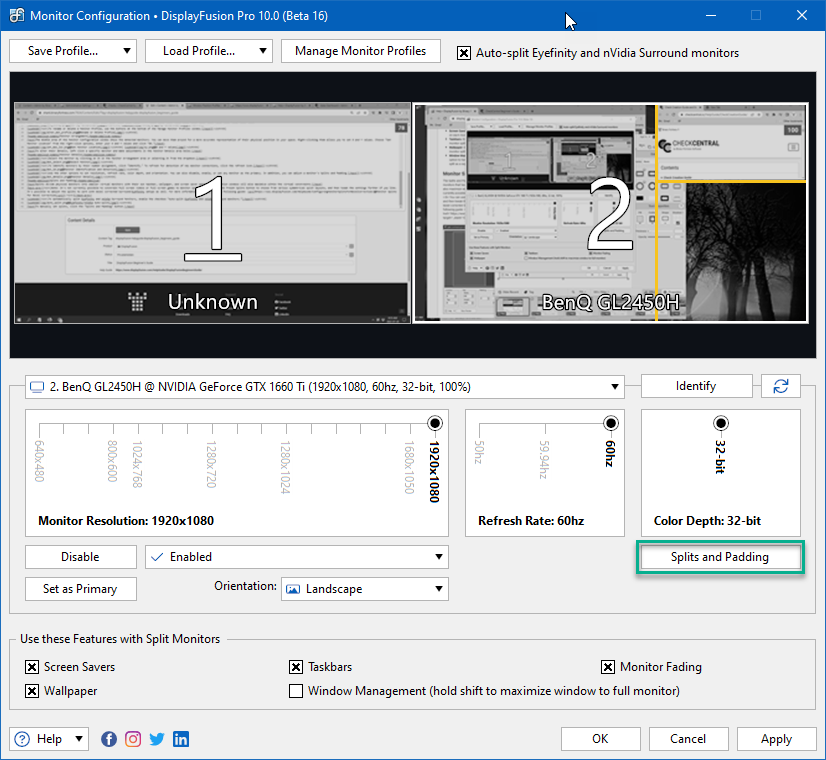
To set splits for other monitors or for more manual control, click the "Splits and Padding" button.
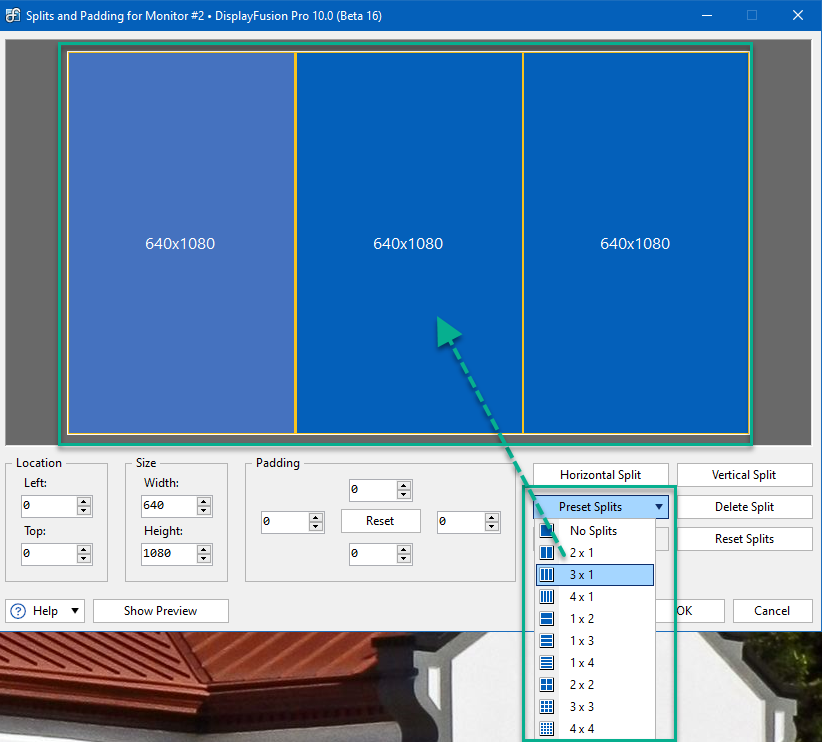
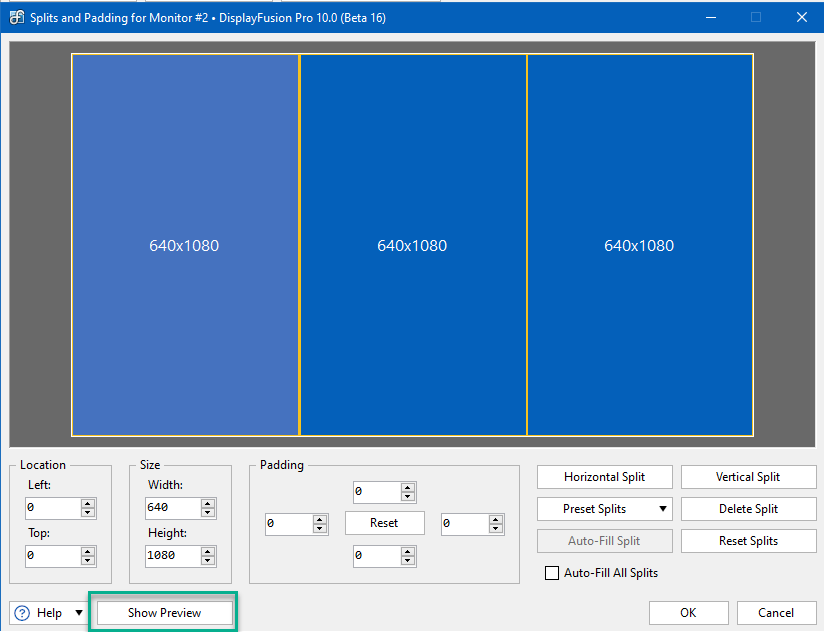
To begin creating splits for your monitor, select the monitor represented by the blue rectangle. The width and height of the shape is shown within each split pane.
To use preset splits, select the "Preset Splits" dropdown and click one of the options. You'll see the blue rectangle conform to the preset selection. Each split displays its size and is now selectable to adjust or create additional splits within.
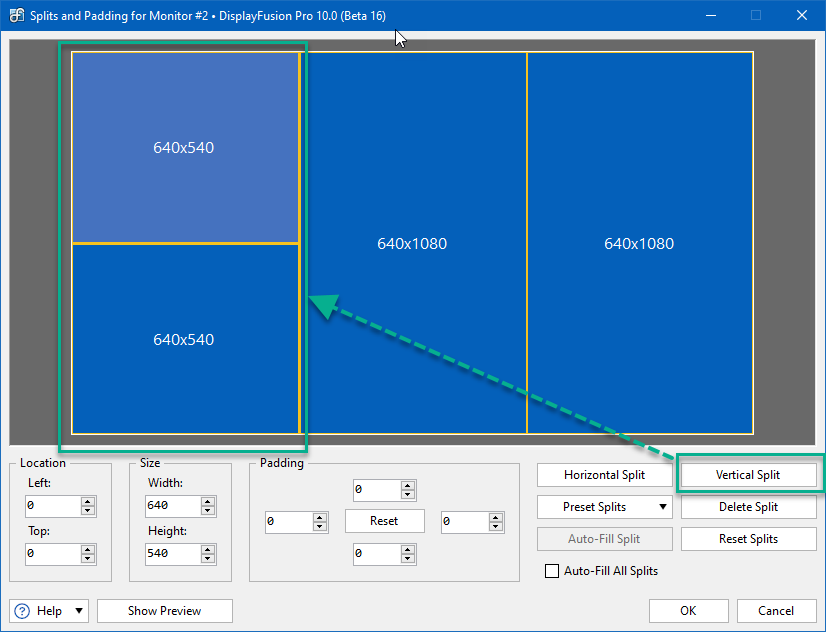
To manually create splits, use the "Horizontal Split" and "Vertical Split" buttons. In this example, I've selected the left-most pane and clicked "Vertical Split," dividing the pane evenly from top to bottom.
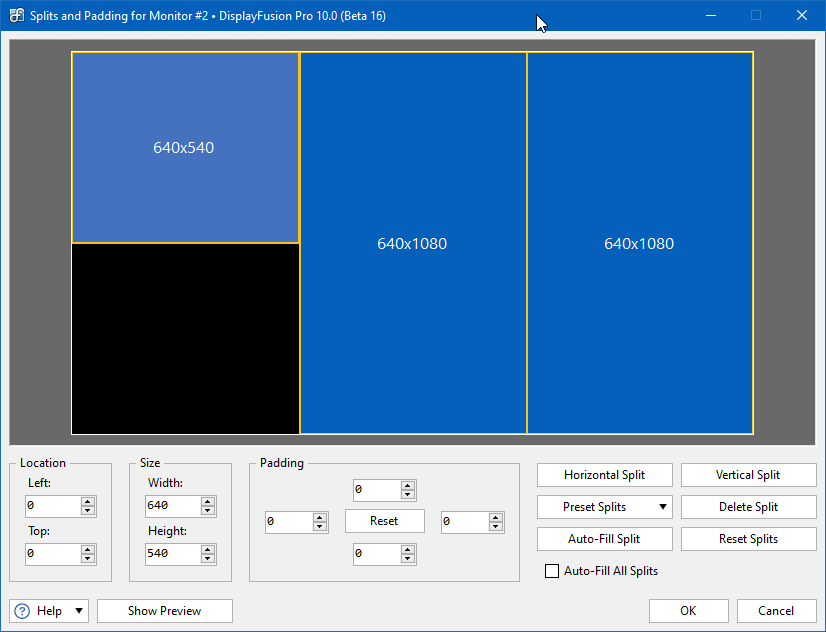
To delete a split, use the "Delete Split" button. To clear all your splits, use the "Reset Splits" button.
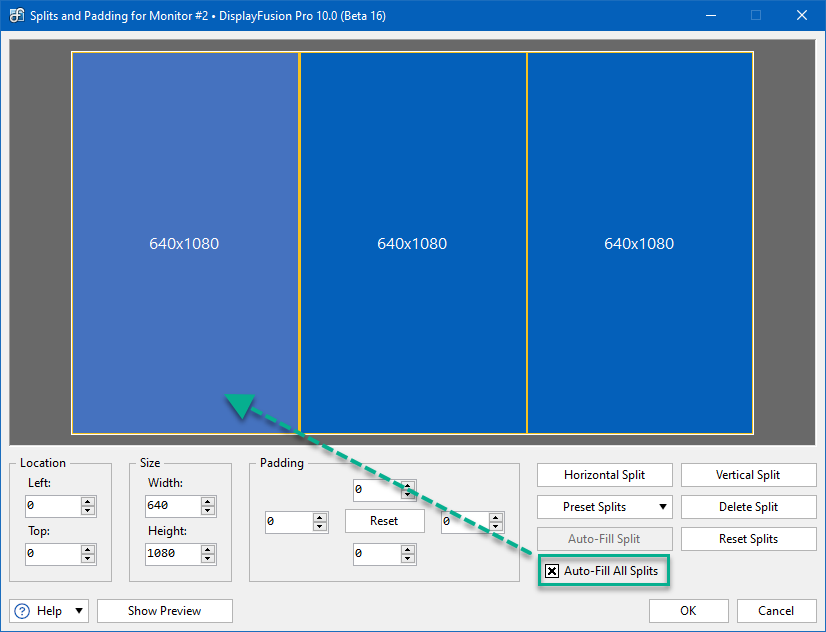
Use the Location and Size panes to manually adjust each split. When deleting or manually adjusting splits, you may create empty space between splits. Enable the "Auto-Fill All Splits" checkbox to force splits to fill the screen.
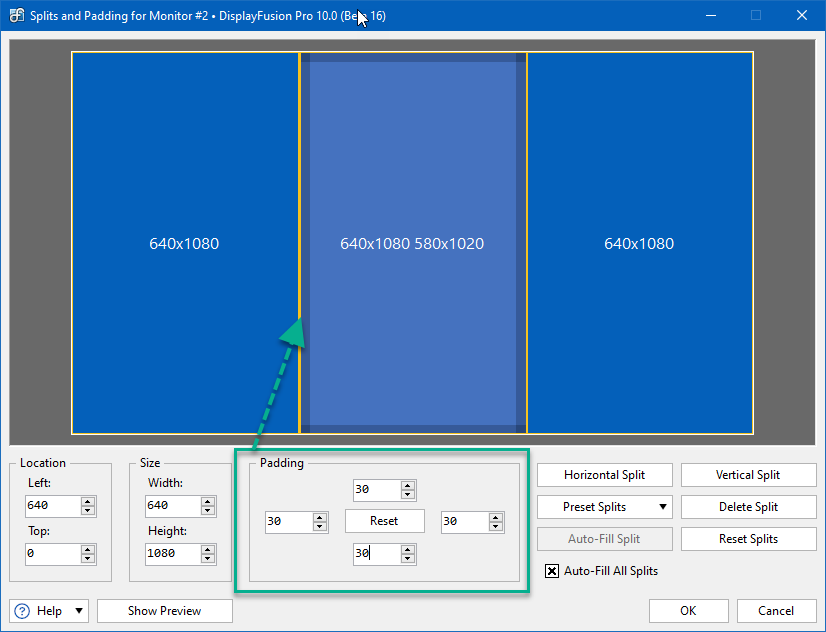
Add values to the Padding fields to create space from the edges of a split. Use the "Reset" button to clear padding values.
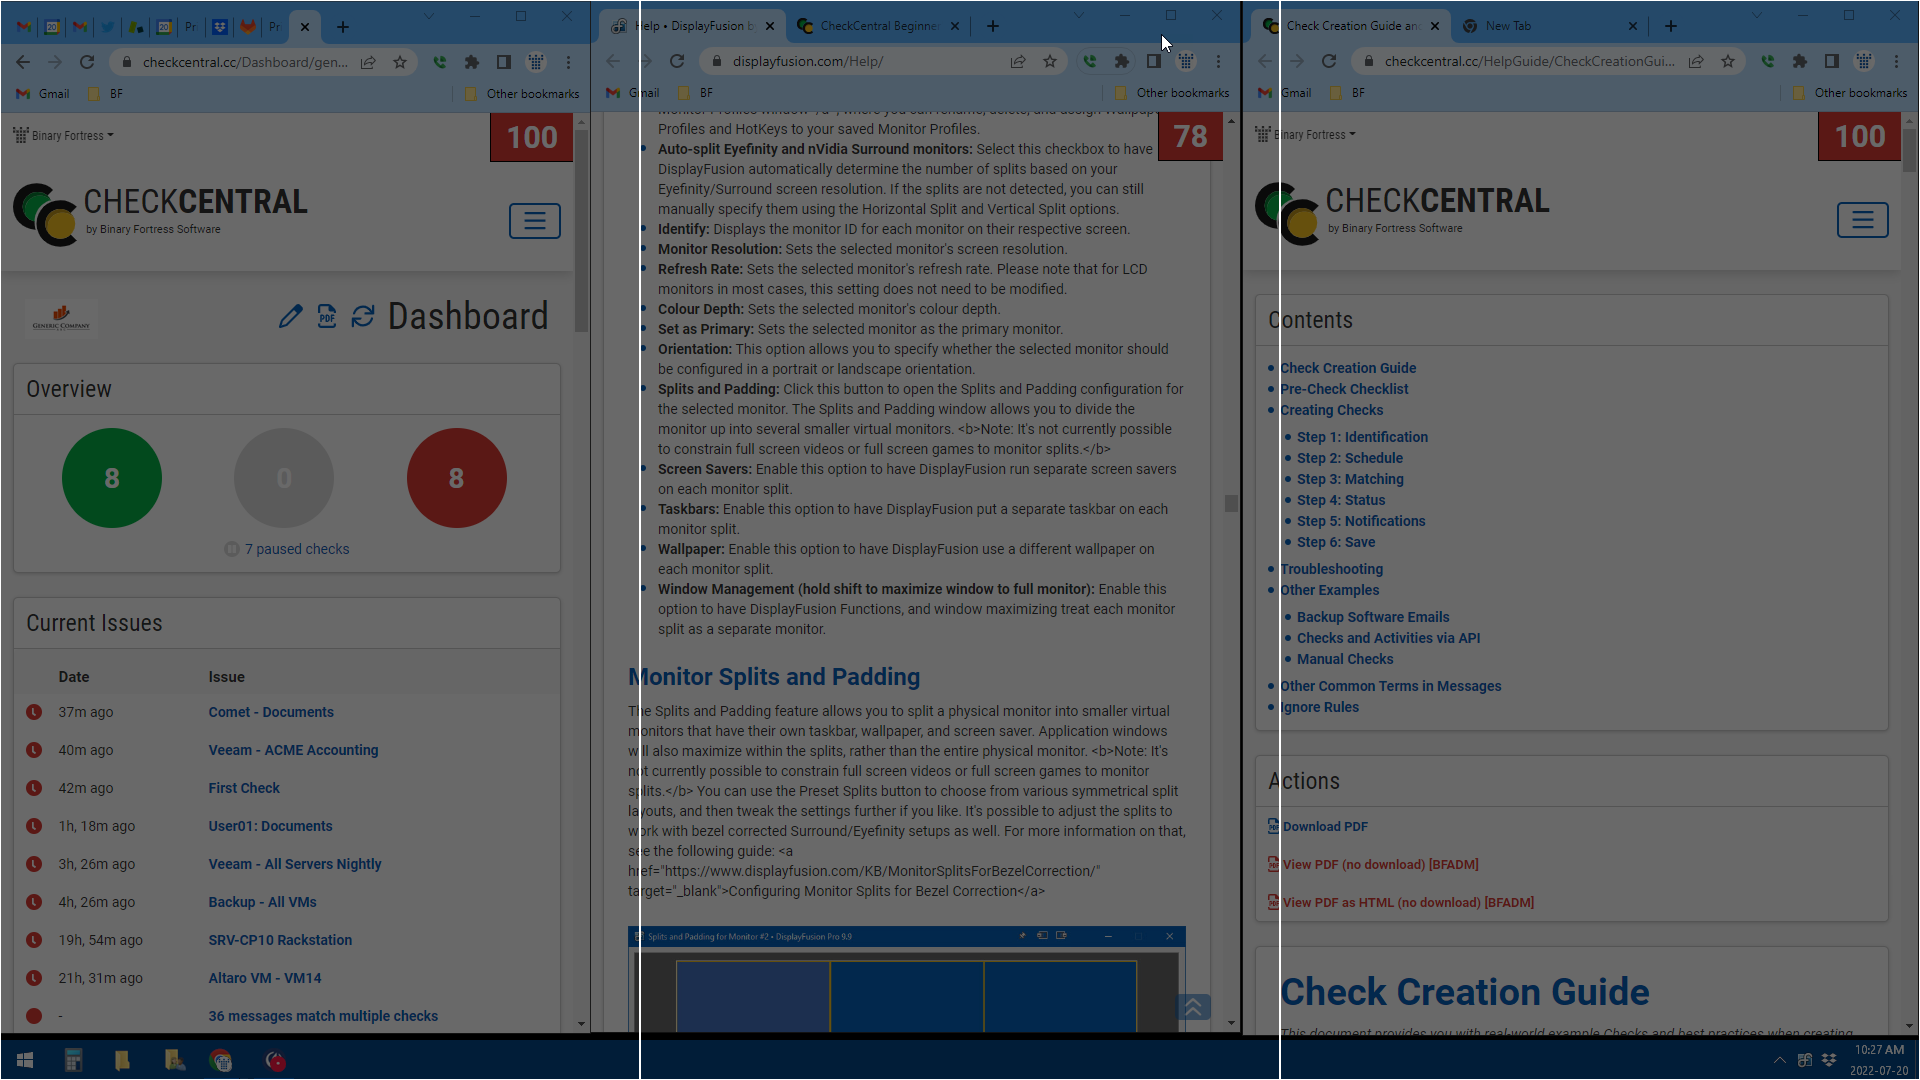
The "Show Preview" button will display your configured splits across the physical monitor. Split controls are still accessible during this preview, allowing you to continue making adjustments. This is helpful when creating splits intended to house existing windows on your monitor. To exit the preview, click "Hide Preview" press the "Esc" key on your keyboard.
Once your splits are configured, click "OK." You'll see them marked on the monitor in the Monitor Configuration window, indicated by yellow lines.
For more explanation and examples of splits, see
Monitor Splits.
The Features pane of the Monitor Configuration window apply to your splits, allowing you to assign unique wallpapers, screen savers, taskbars, and monitor fading and window management abilities. Enabling each option applies to all splits with more detailed configuration options found in other areas of DisplayFusion.
When finished with monitor configurations, click "Apply" or "OK" to save your changes.
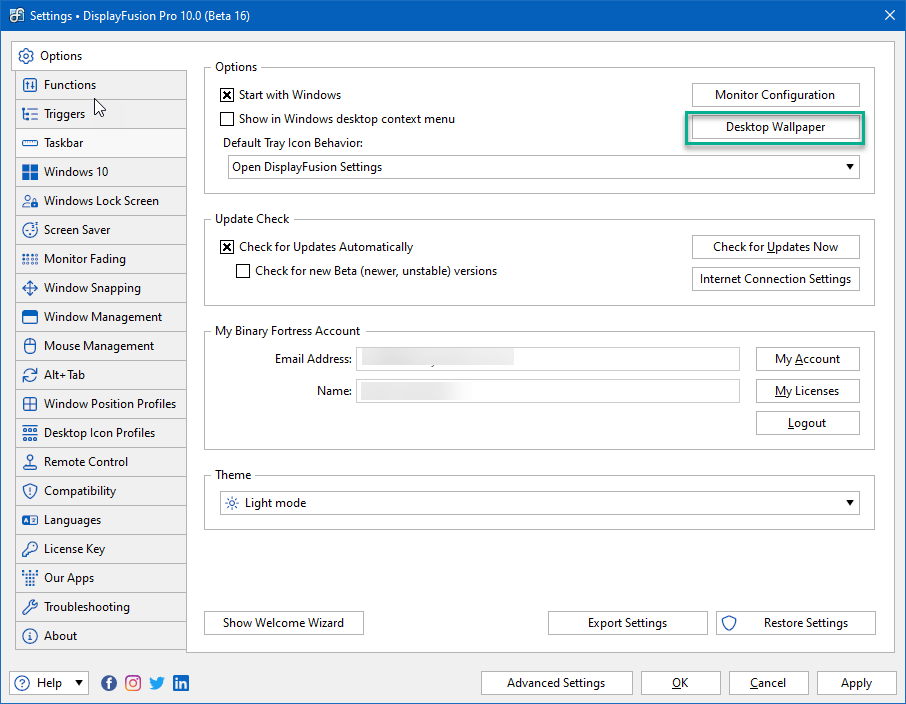
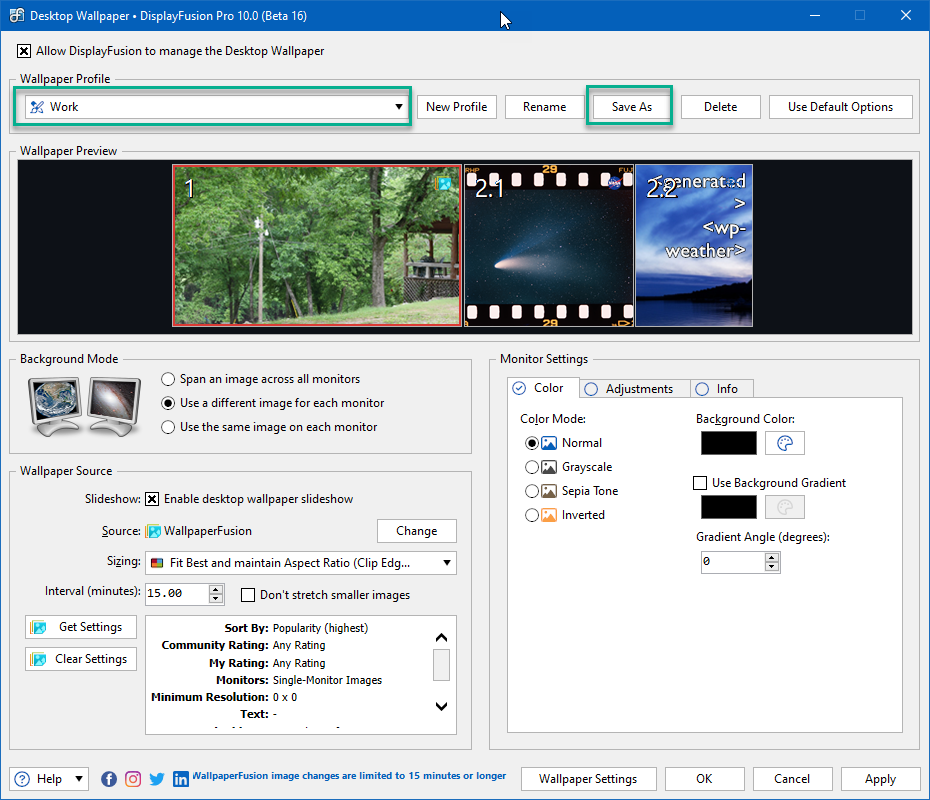
The Desktop Wallpaper window allows you to control how DisplayFusion will load, format and size your wallpaper images. It also provides sources from which you can pull new and filtered wallpaper images.
To navigate here, right-click on the DisplayFusion tray icon and click "Desktop Wallpaper." You can also reach this area via the Settings window by selecting "Settings" and clicking the "Desktop Wallpaper" button in the "Options" tab.
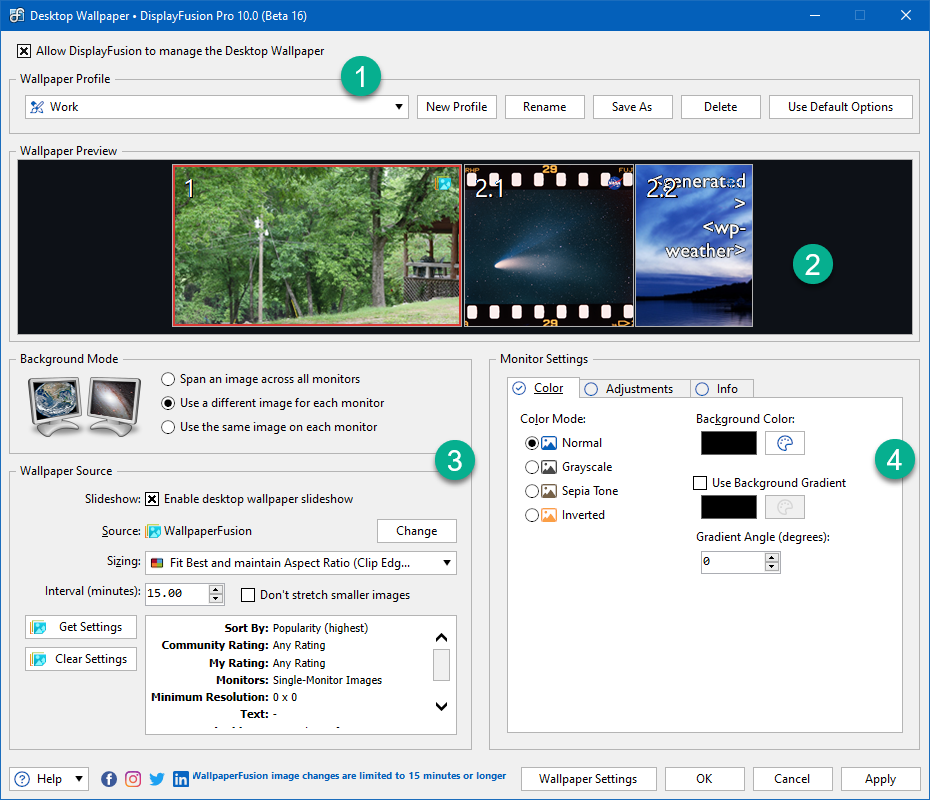
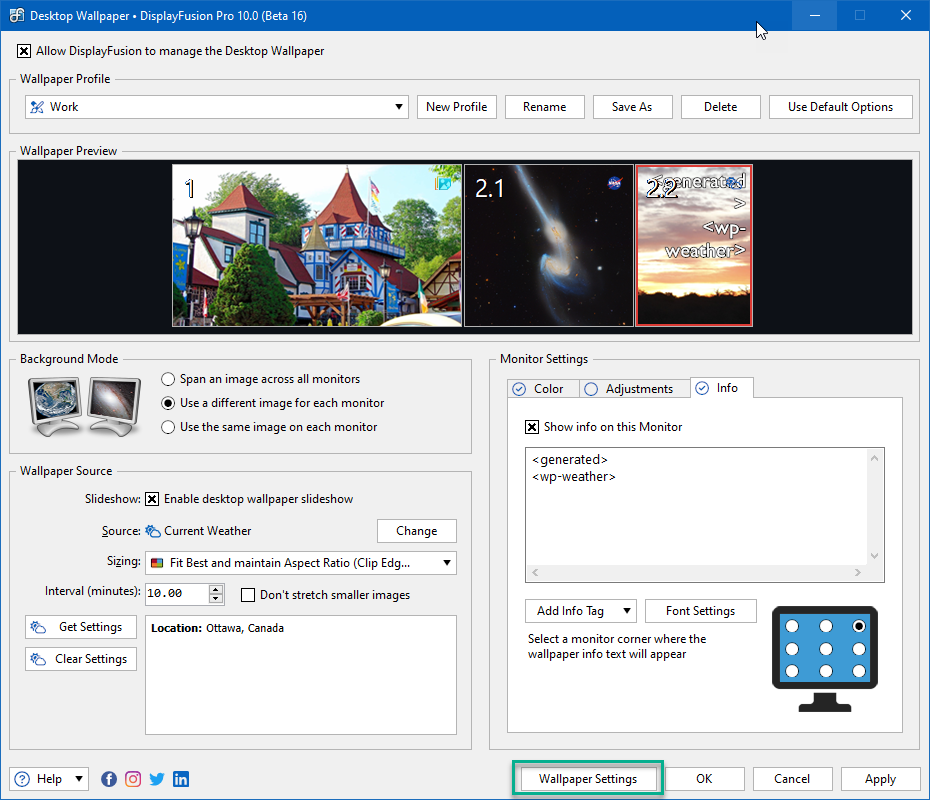
The Desktop Wallpaper window has four areas:
1. Profile Management, 2. Wallpaper Preview, 3. Wallpaper Details, and 4. Monitor Settings.
To use these wallpaper settings instead of Windows' settings, ensure the "Allow DisplayFusion to manage the Desktop Wallpaper" checkbox is enabled.
Like Monitor Profiles, a wallpaper configuration can be saved as a profile, allowing you to switch between configurations.
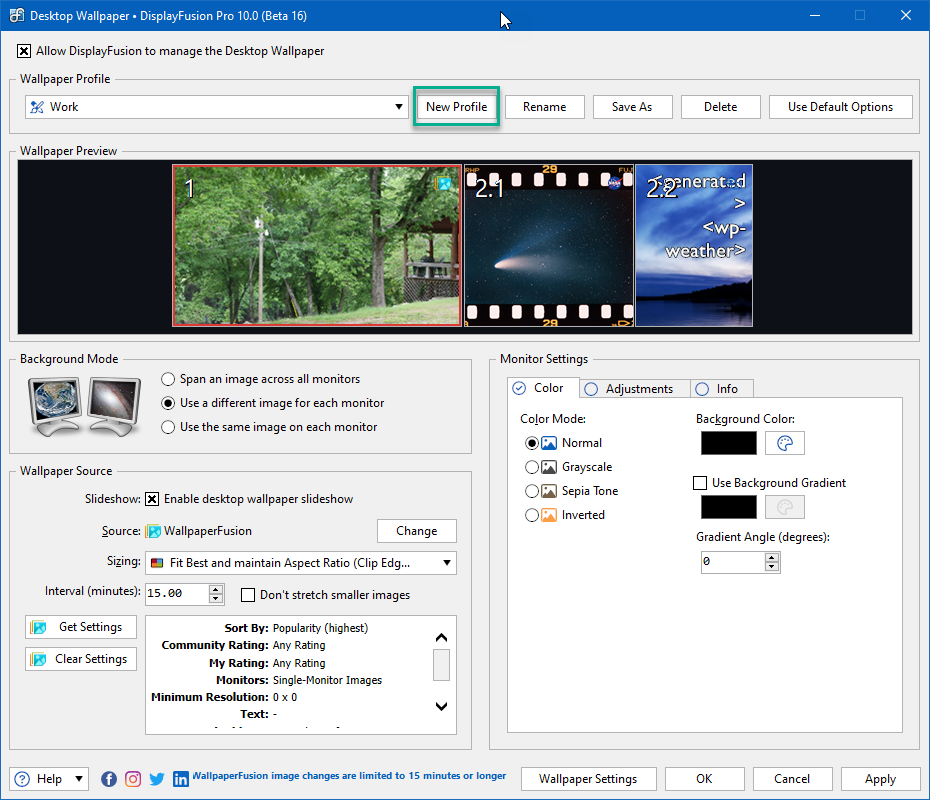
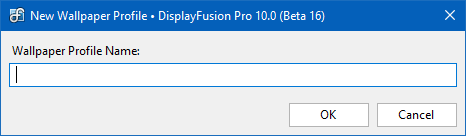
To start a new profile from scratch, click the "New Profile" button. Name the profile and click "OK."
To create a new profile from modifying an existing profile, select the saved profile from the dropdown, make the desired configuration changes, then click the "Save As" button. Name the profile and click "OK."
To make and save configurations to an existing profile, select it from the dropdown, make the desired changes, and click "Apply" at the bottom of the Desktop Wallpaper window.
Once profiles have been saved, you can load them by selecting one from the dropdown and clicking "Apply." This can also be performed via the tray icon menu. Other methods include
HotKeys,
Functions,
Triggers, and
TitleBar Buttons (click the links to see those sections in this document).
Profiles can be renamed or deleted using the "Rename" and "Delete" buttons. To clear all configuration settings, click "Use Default Options."
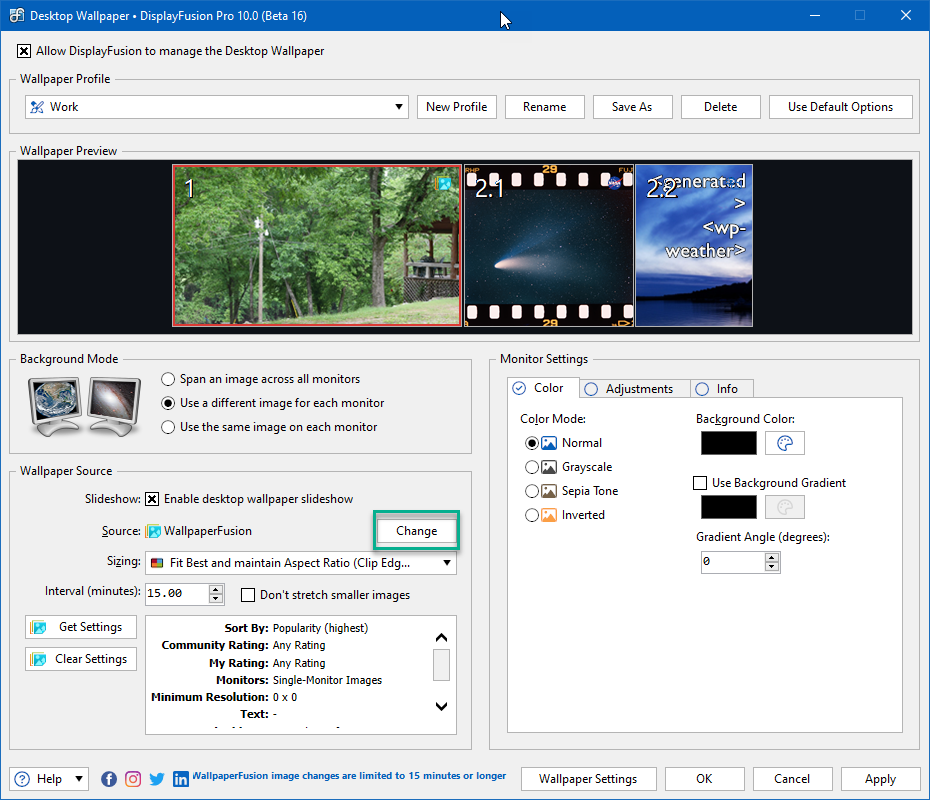
The Wallpaper Preview area showcases your configuration changes prior to applying or saving them. Monitors and splits are separated and can be individually selected. Options vary based on the chosen Background Mode.
Use the Background Mode selections to configure if one image will be used (spanned across all monitors or repeated across each) or if each monitor/split will have its own wallpaper configuration. For this example we'll select "Use a different image for each monitor."
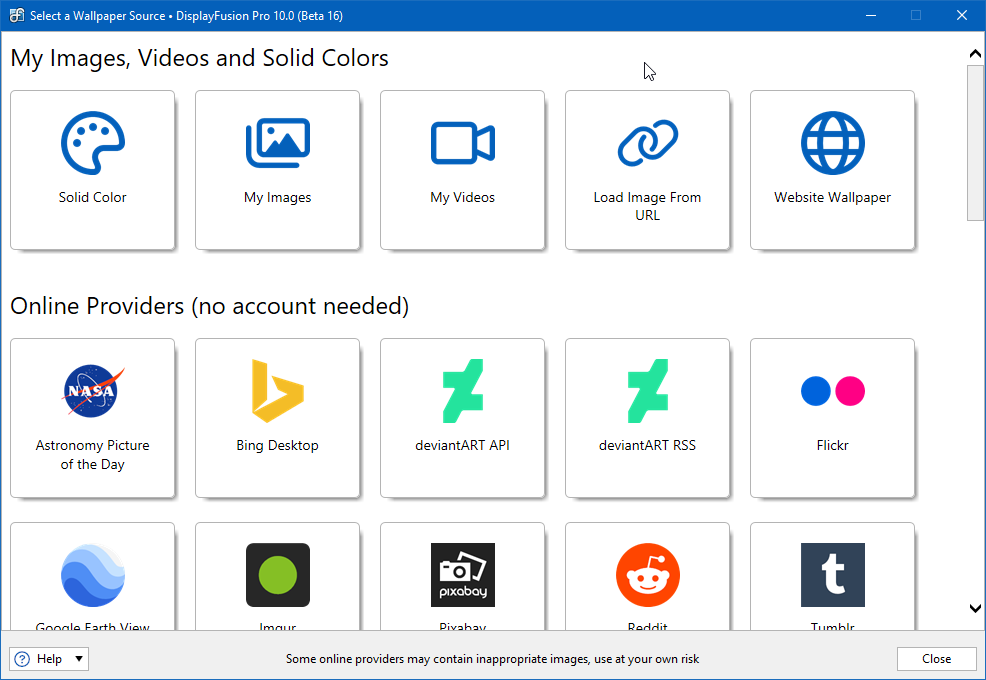
There are multiple source options for your wallpaper. To choose or change a source, click the "Change" button. This will bring up an array of options, including local and online resources. Choose one from the list to continue.
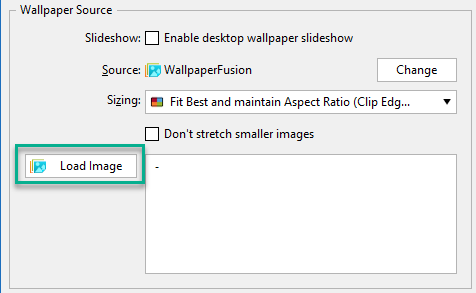
Each source will have its own configuration settings which can be accessed by clicking the various buttons that populate within the Wallpaper Source pane (i.e. "Load Image" for single image choices and "Get Settings" for slideshows). For multi-image slideshows, enable the "Enable desktop wallpaper slideshow" checkbox.
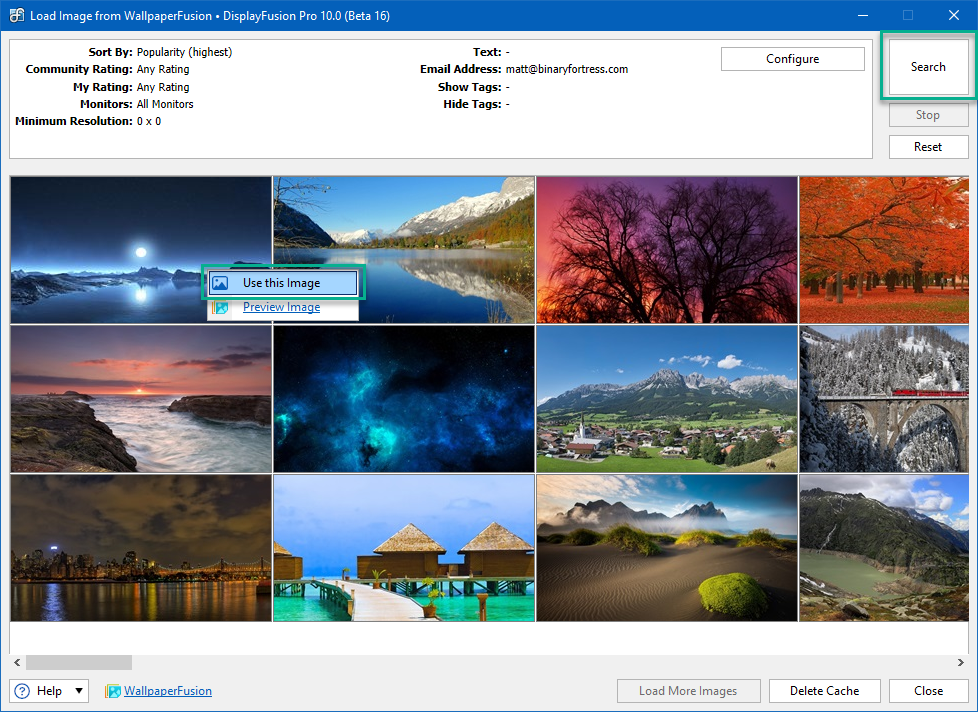
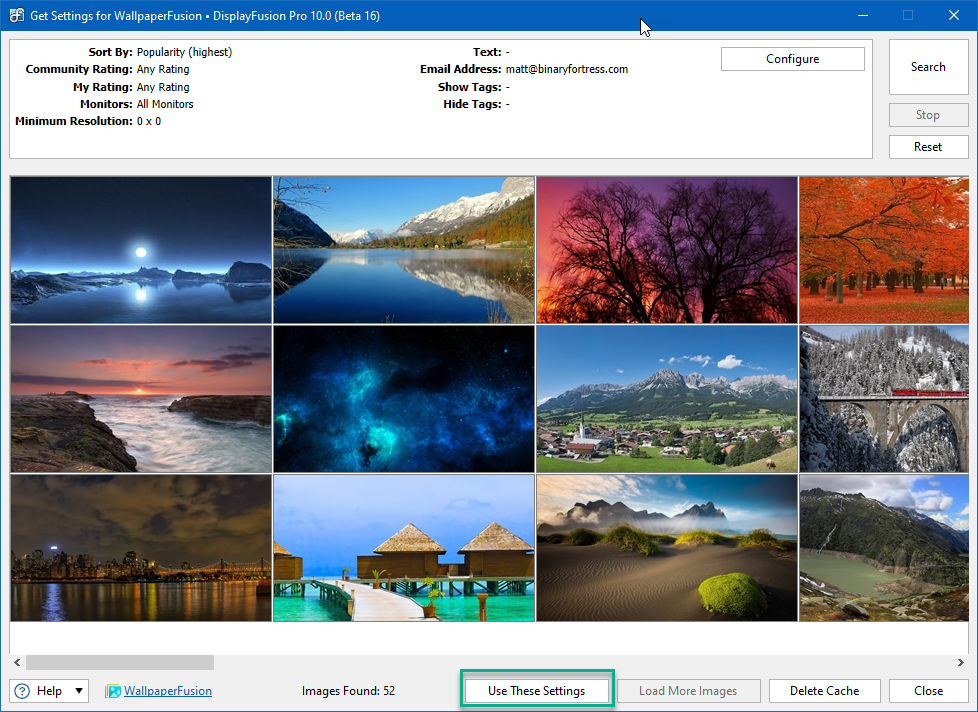
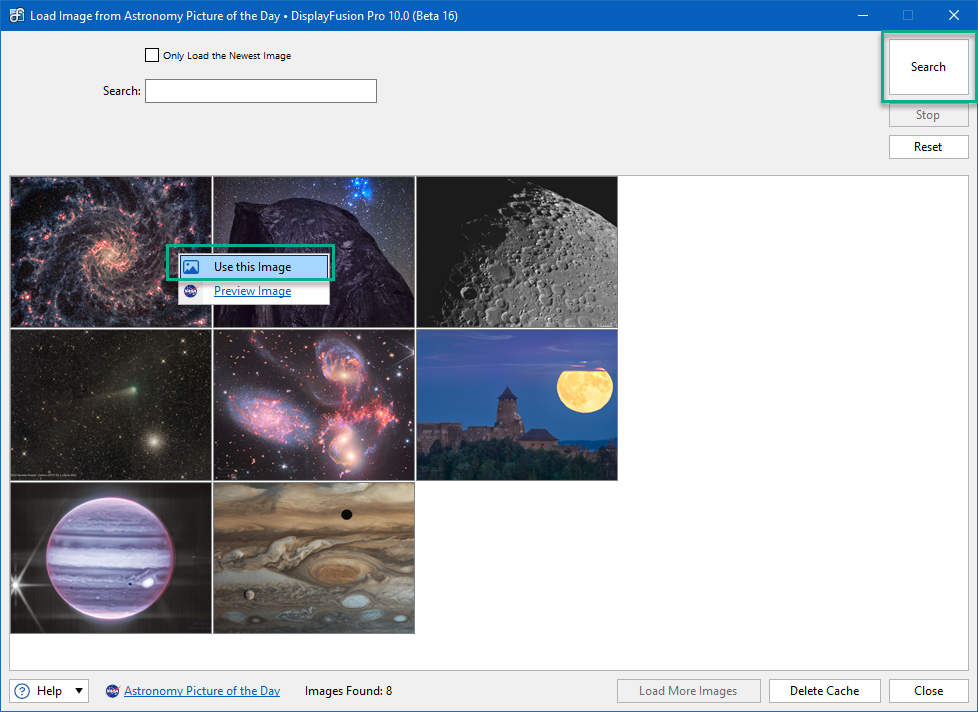
Clicking the "Load Image" or "Get Settings" buttons produces a prompt for acquiring images. Fill in any filter fields as desired and click the "Search" button to populate matching results. If the results are satisfactory, click on the image you want and select "Use this image." For slideshows, click the "Use These Settings" button.
Configured source settings are displayed in the window within the Wallpaper Source pane. They can be altered at any time. For slideshow configurations, these can be reset by clicking the "Clear Settings" button.
For local source options (i.e. "My Images" and "My Videos"), you'll select from your local files. For "Load Image from URL" or "Website Wallpaper," you'll enter a URL. "Solid Color" options are found in the Monitor Settings pane.
Additional options in the Wallpaper Source pane are for image sizing and the interval with which the slideshows will change images.
The Monitor Settings area allows for further manipulation of the wallpapers and background colors.
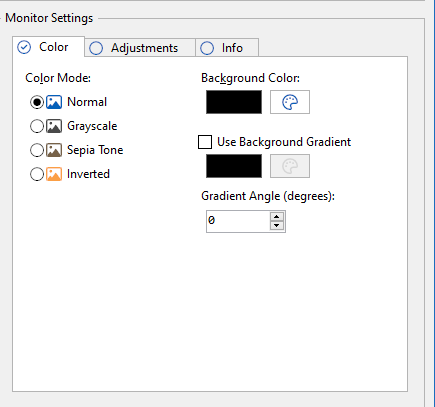
In the "Color" tab, you can alter the color mode of the selected monitor or split. For areas where the "Solid Color" source was selected, background colors and gradient selections are made here.
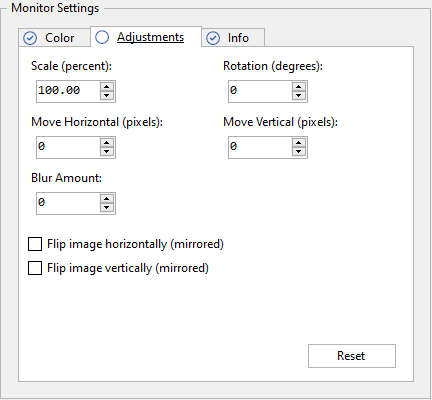
The "Adjustments" tab lets you scale, move, blur, and flip the images.
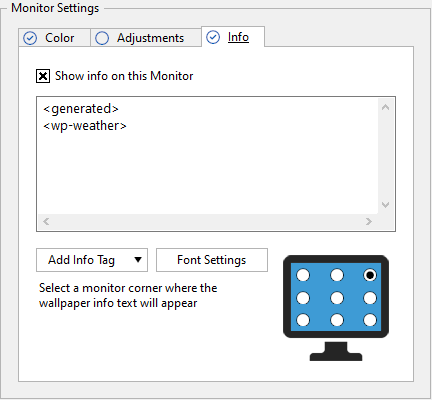
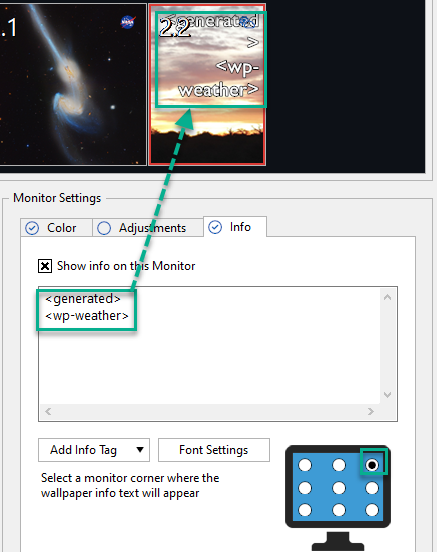
The "Info" tab allows you to overlay textual information onto an area of a monitor or split.
Enable the "Show info on this Monitor" checkbox to use this tab. Select the information to be displayed from the "Add Info Tag" dropdown. Multiple tags can be used.
Arrange them in the text window. Use the "Font Settings" button to change their appearance. Select a location dot from the example monitor to choose where in the monitor/split the text will display.
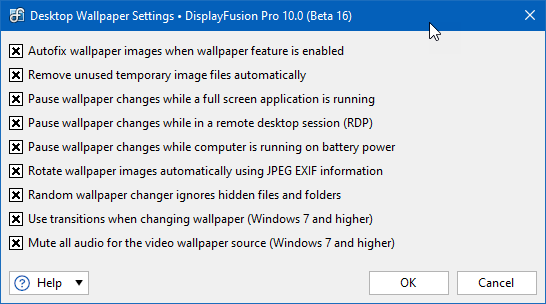
Additional settings are available from the "Wallpaper Settings" button.
When finished with your configuration details, click "Apply" or "OK" to apply and save your changes.
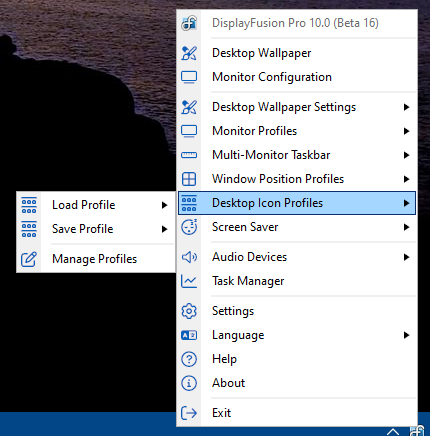
DisplayFusion can save varied arrangements of your desktop shortcuts as Desktop Icon Profiles.
To navigate to the Desktop Icon Profiles area, right-click on the DisplayFusion tray icon and click "Desktop Icon Profiles," then "Manage Profiles." You can also reach this area via the Settings window by selecting "Settings" and clicking the "Desktop Icon Profiles" tab.
To create a new profile, begin by arranging your desktop icons into the desired configuration. Once they are in place, click the "Save" button. Then name your profile.
To overwrite an existing profile, select it from the list, reconfigure your desktop icons, and click "Save."
To load a saved profile, select it from the list and click "Load."
Rename and delete profiles by selecting them from the list and clicking "Rename" or "Delete."
Click "Apply" or "OK" to apply and save your changes.
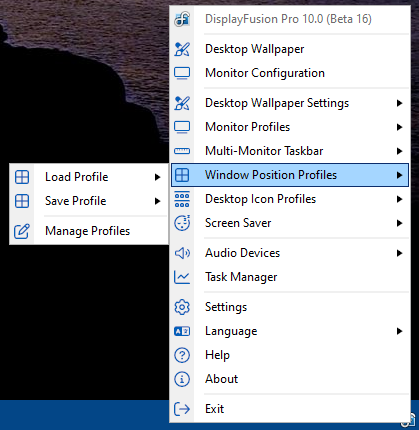
Window Position Profiles allow you to save positions for currently-opened windows to recall them at a later time. This is useful when switching between tasks or restoring windows after they have been minimized or moved.
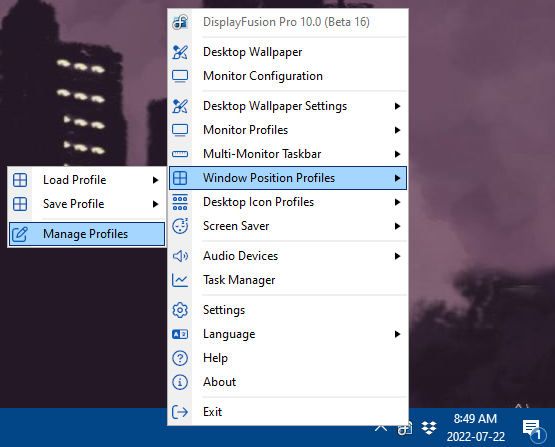
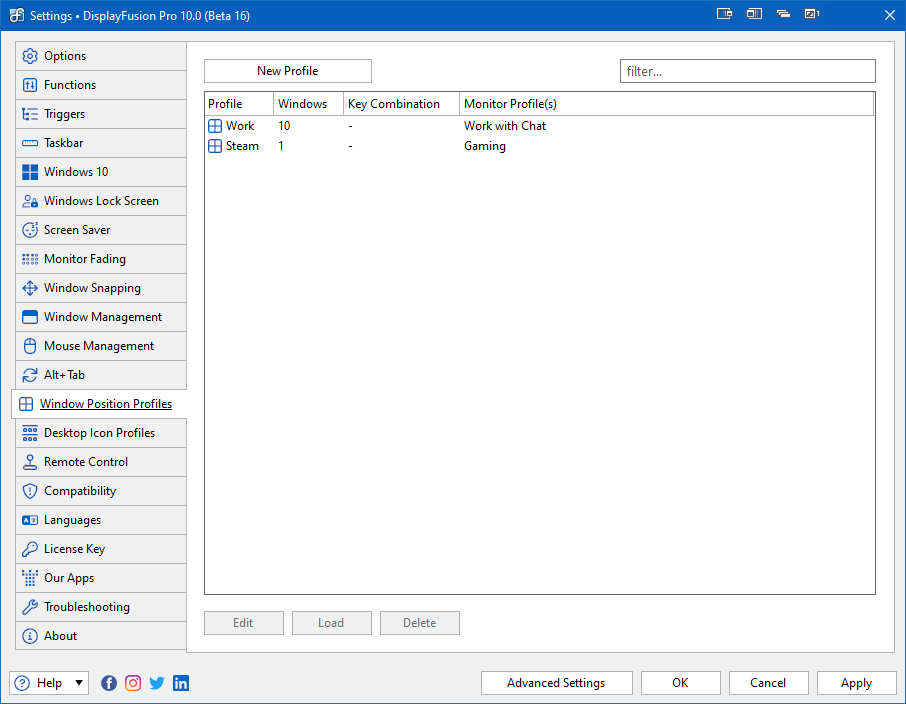
To navigate to these profiles, right-click on the DisplayFusion tray icon and click "Window Position Profiles," then "Manage Profiles." You can also reach this area via the Settings window by selecting "Settings" and clicking the "Window Position Profiles" tab.
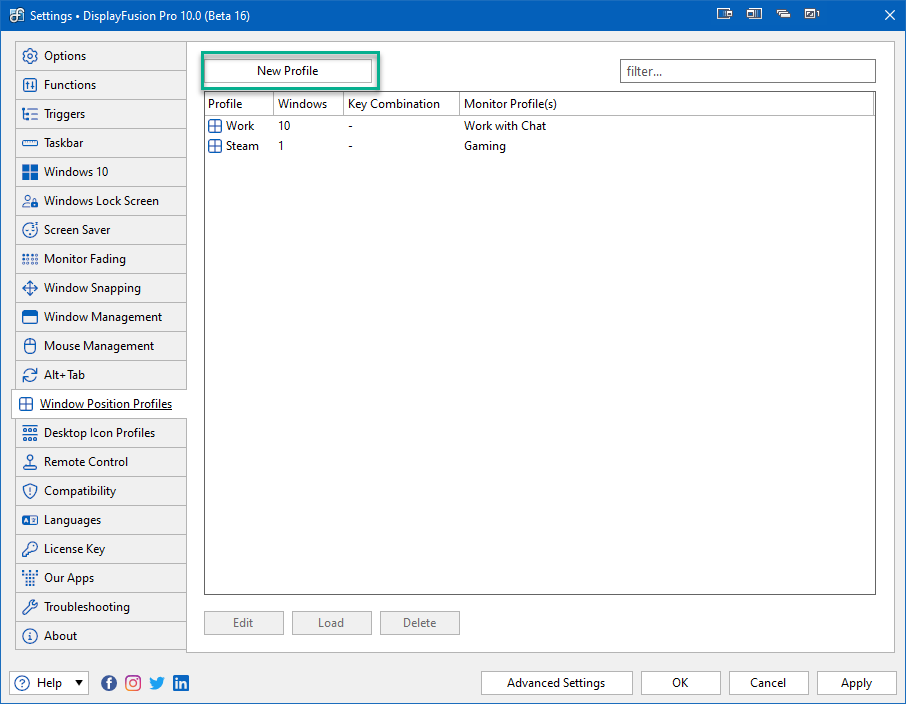
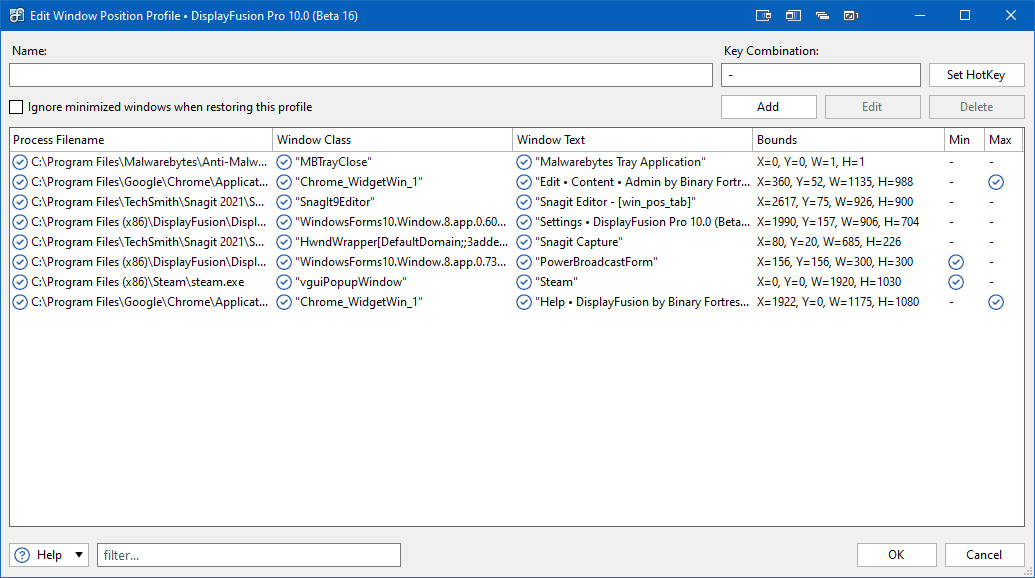
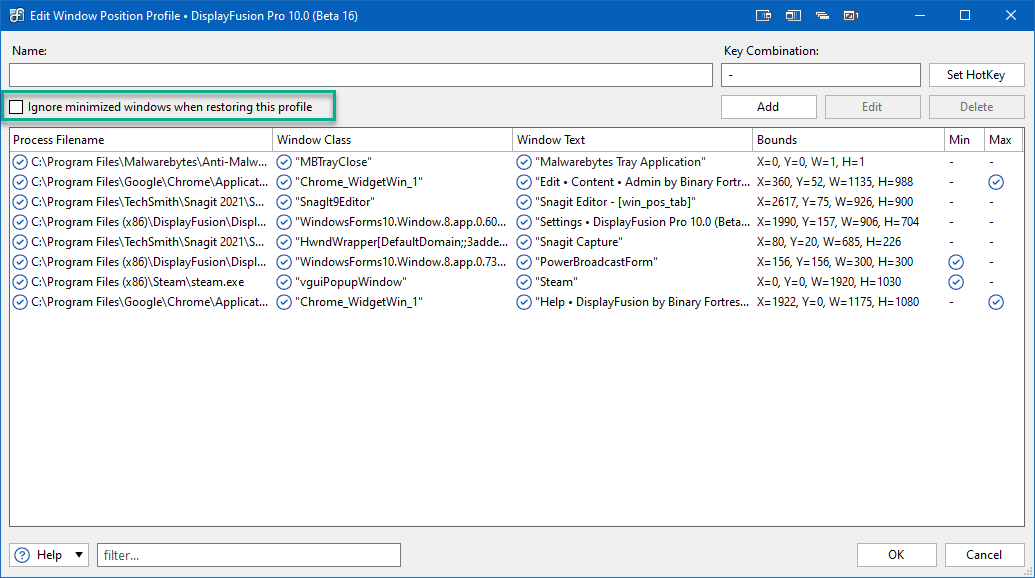
To create a new profile, begin by arranging your windows in the placement and size you desire across your screens. Then click "New Profile." This will bring up a list of all detected windows, along with their location and status (i.e. minimized and maximized).
Name your profile and set a
HotKey, if desired.
Enable the "Ignore minimized windows when restoring this profile" checkbox to disregard currently-minimized windows as part of the profile. They will remain in the list and be loaded with the profile, but their location and sizing details will be ignored. With multiple minimized windows in the profile, this option saves on profile loading time.
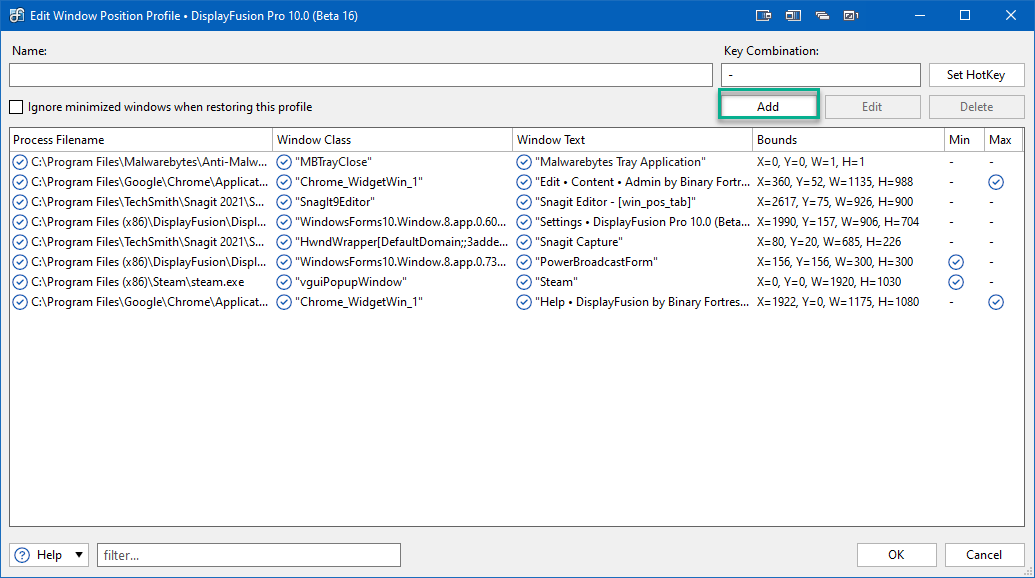
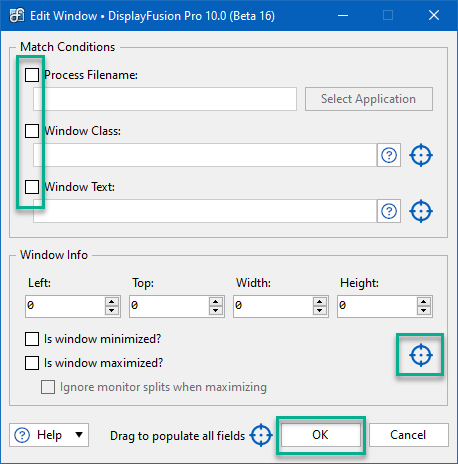
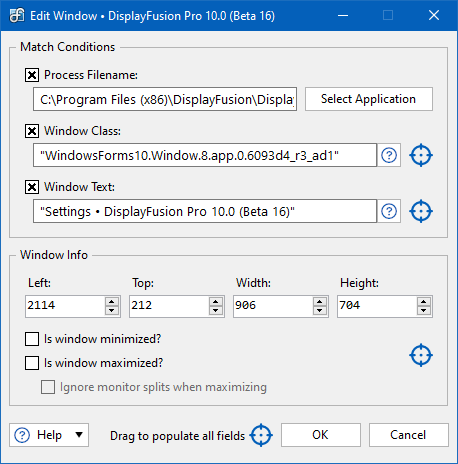
Individual windows can be added to, edited, or deleted from the list. To add a window, click the "Add" button, then configure the conditions, location, size, and status of the new window. Enable the checkboxes to use the "Process Filename," "Window Class," and "Window Text" text fields, using the blue targets to capture information from the open window. Drag the target from each section onto the window to populate relevant data. When finished, click "OK."
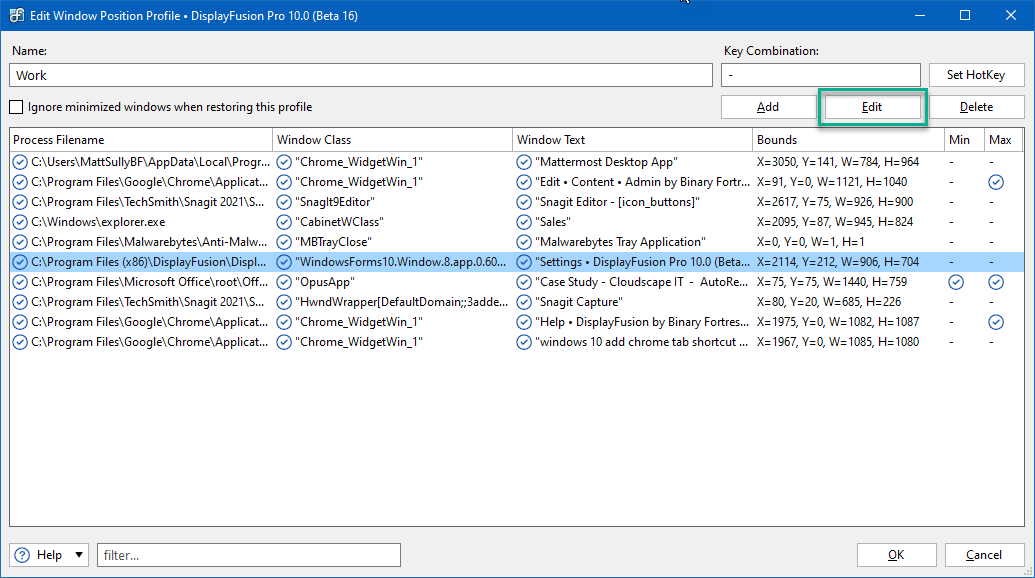
To edit the details of a window, select it from the list and click "Edit." The edit window appears to allow detailed editing. Click "OK" after changes have been made.
To remove a window from the profile, select it from the list and click "Delete." This only removes it from the profile. It does not close the current window.
When your profile is named and configured, click "OK."
To load a profile, select it from the list and click "Load." To edit or delete a profile, select it from the list and click "Edit" or "Delete."
Window Position Profiles assigned to a
Monitor Profile will display the profile in the Monitor Profile column.
From the Settings window, click "Apply" or "OK" to apply and save profile changes.
For more on Window Position Profile usage detail, see
Window Position Profiles.
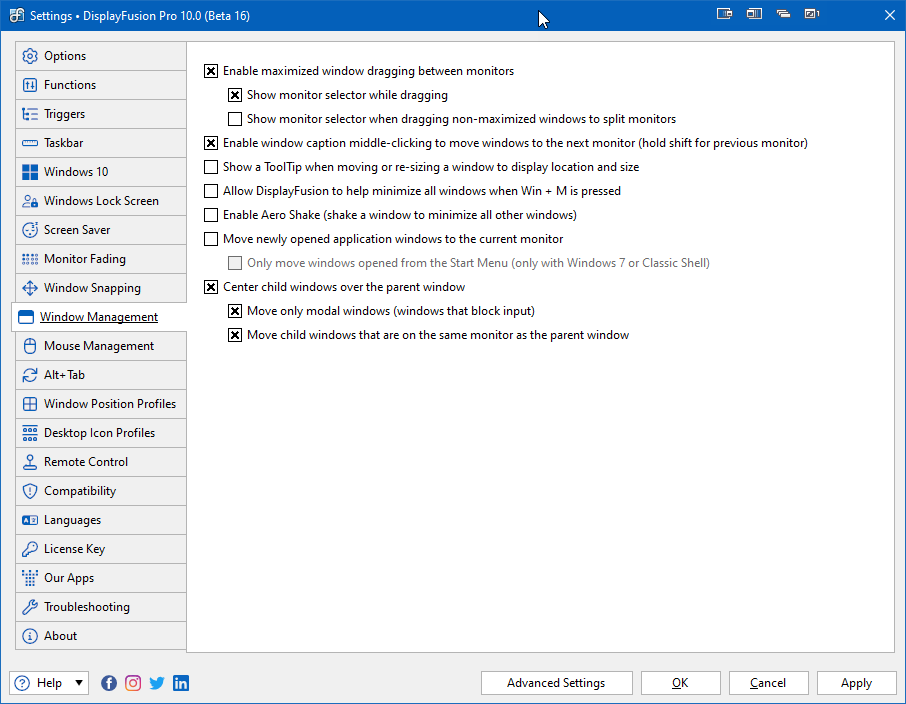
The Window Management tab has configuration options for how DisplayFusion handles application windows.
To navigate here, right-click the DisplayFusion tray icon and click "Settings," then click the "Window Management" tab.
The options here alter how windows behave during various actions. For more detailed explanation of each option, see
Window Management Setting Overview.
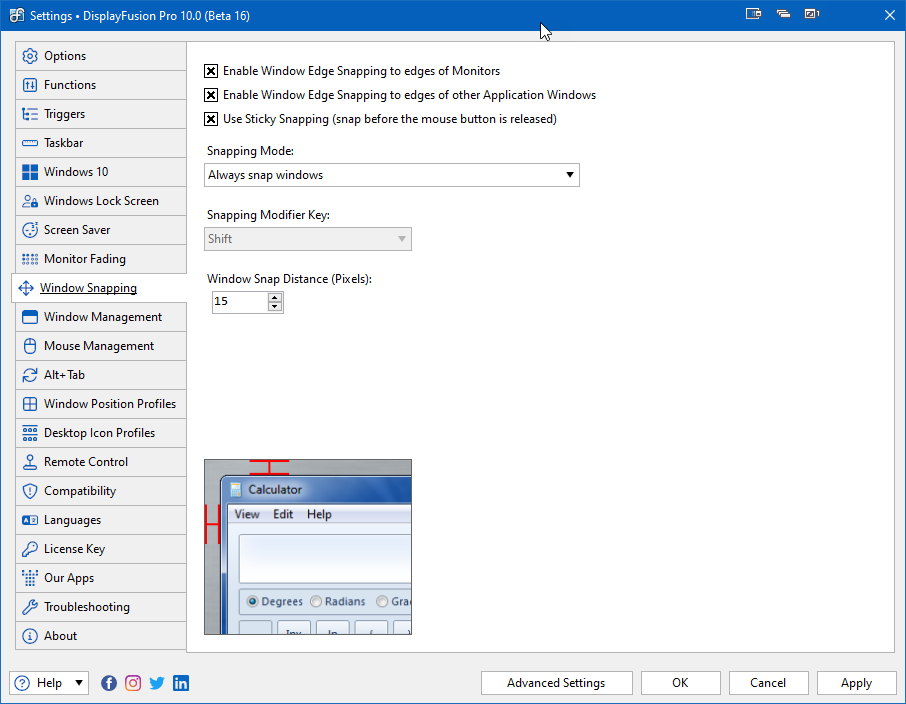
Window snapping allows application windows to be snapped (moved) to the edges of monitors and other application windows.
To navigate here, right-click the DisplayFusion tray icon and click "Settings," then click the "Window Snapping" tab.
Enable the checkboxes to snap to monitor edges, application window edges, and to snap before releasing the mouse button. Select a modifier key and how it's used as well as the snap distance in pixels.
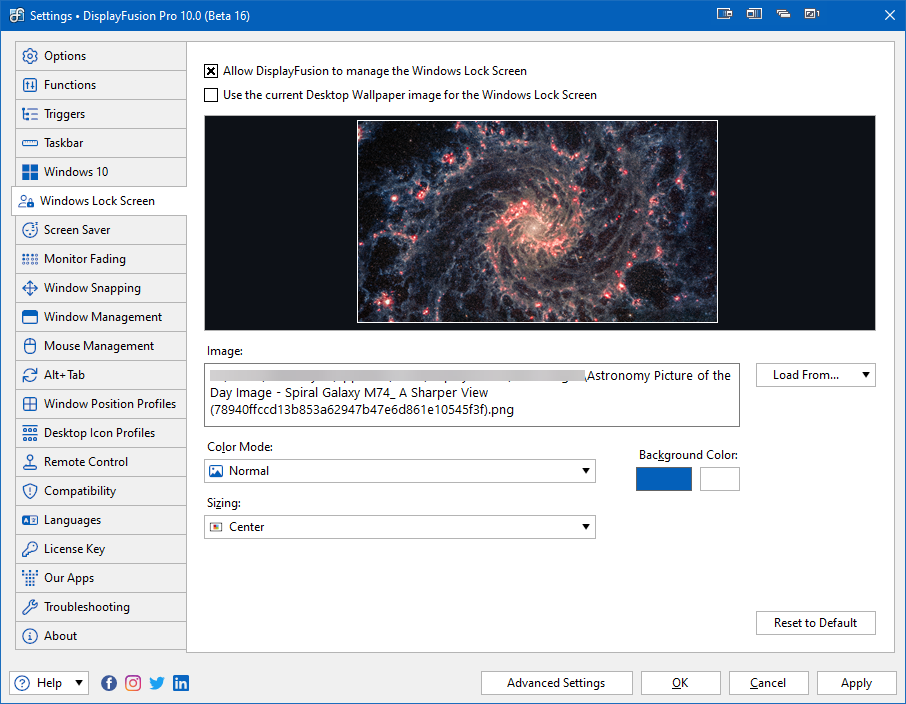
The Windows Lock Screen tab allows you to manage the lock screen through DisplayFusion. The "Allow DisplayFusion to manage the Windows Lock Screen" checkbox must be enabled.
To navigate here, right-click the DisplayFusion tray icon and click "Settings," then click the "Windows Lock Screen" tab.
Here you can choose an image for the lock screen background, along with sizing and color mode options.
To select an image, click the "Load From" dropdown and select your source. Most options produce a prompt for acquiring images. Fill in any filter fields as desired and click the "Search" button to populate matching results. If the results are satisfactory, click on the image you want and select "Use this image." For local source options (i.e. "My Images"), you'll select from your local files. For "Image URL," you'll enter a URL in the prompt and click "OK."
If the image doesn't fill the monitor, the Background Color will fill the remaining space. Choose your fill color.
Configure your desired visuals and click "Apply" or "OK" to apply and save your changes.
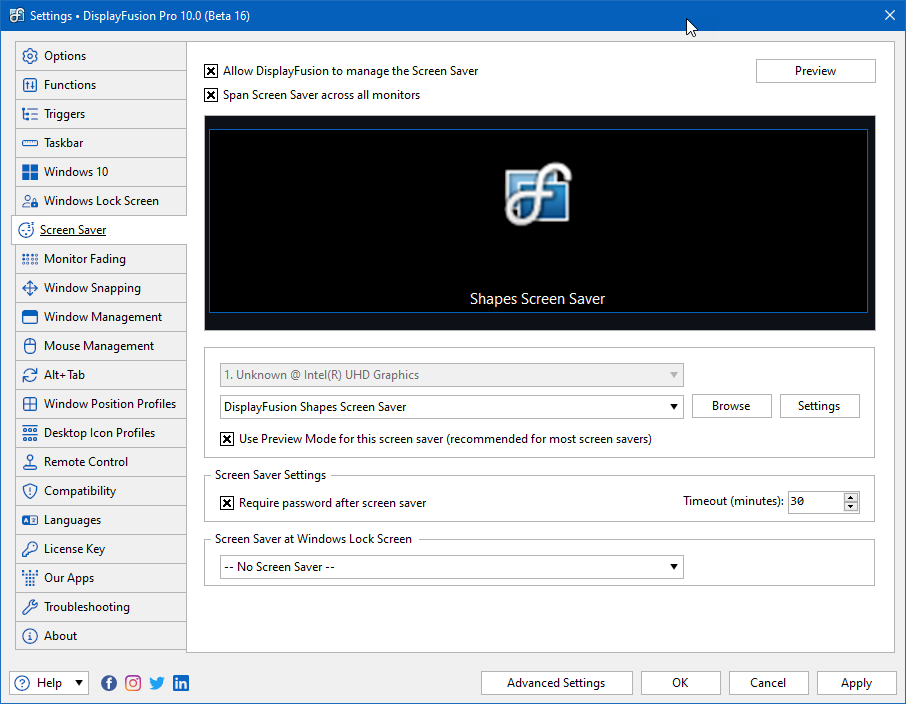
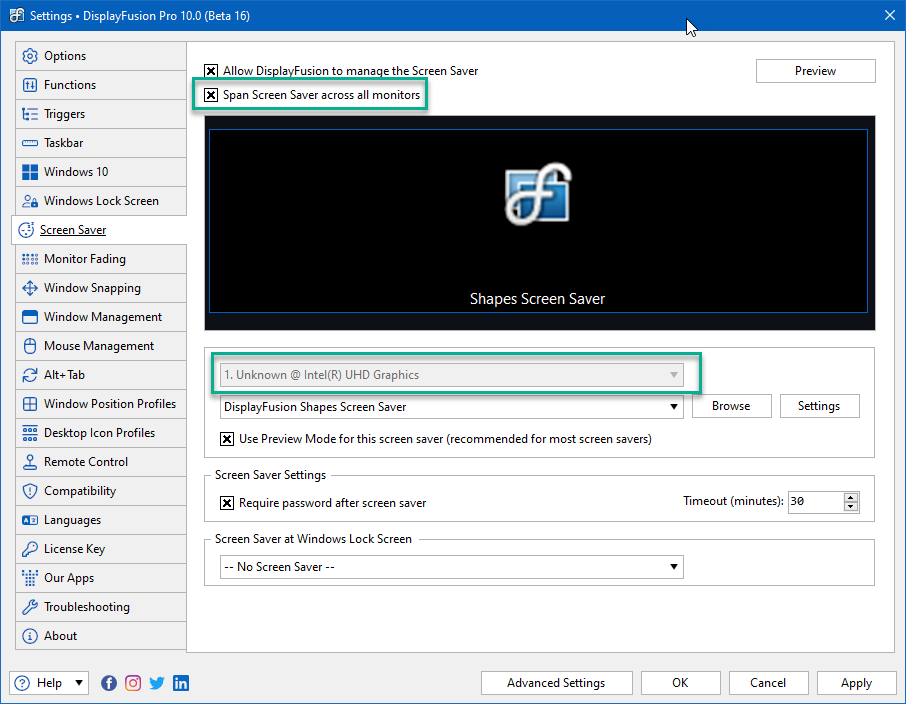
The Screen Saver tab allows you to set screen saver details normally handled by Windows. The "Allow DisplayFusion to manage the Screen Saver" checkbox must be enabled.
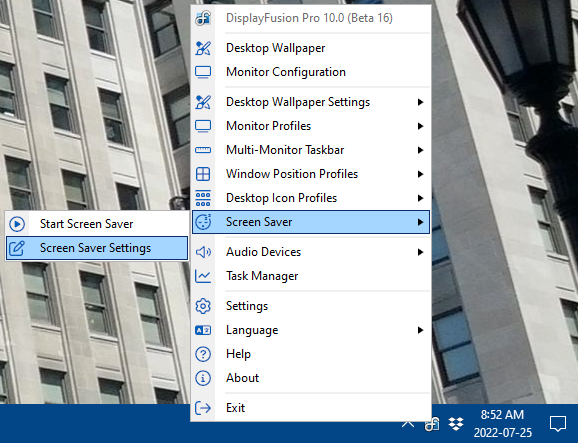
To navigate to the screen saver options, right-click the DisplayFusion tray icon and "Screen Saver," then "Screen Saver Settings." Alternatively, you can click "Settings," then select the "Screen Saver" tab.
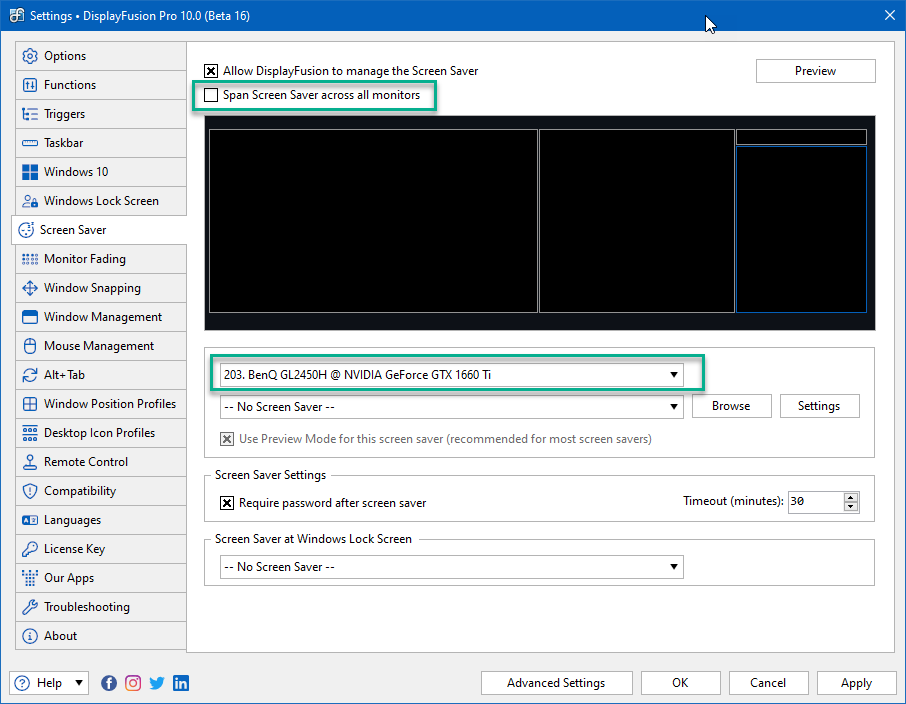
By disabling "Span Screen Saver across all monitors," screen savers can be applied to a specific monitor or split. When enabled, the monitor selector is grayed out and the preview window shows one continuous image.
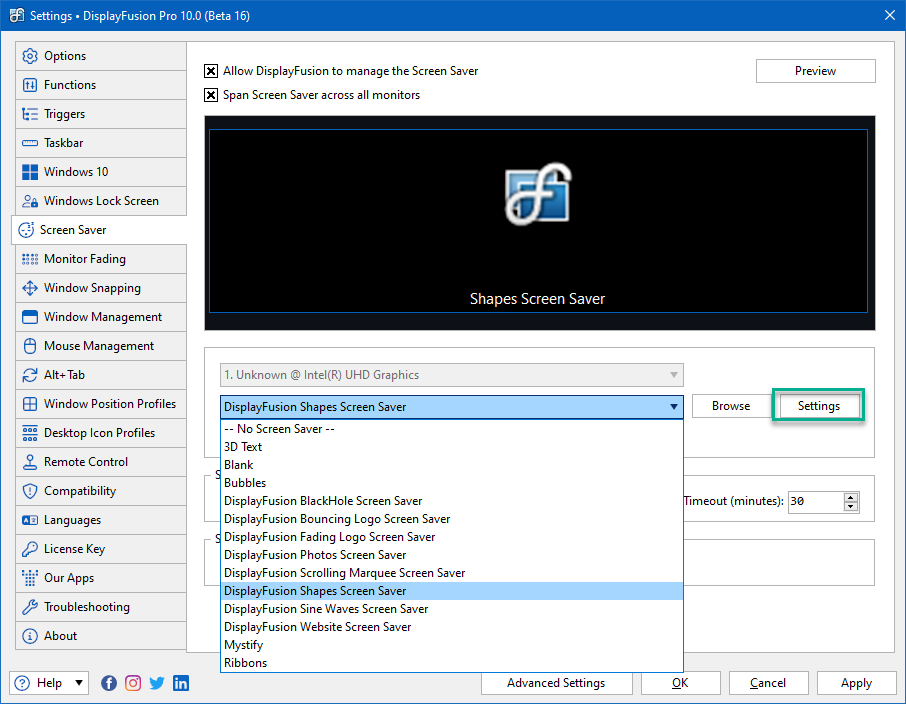
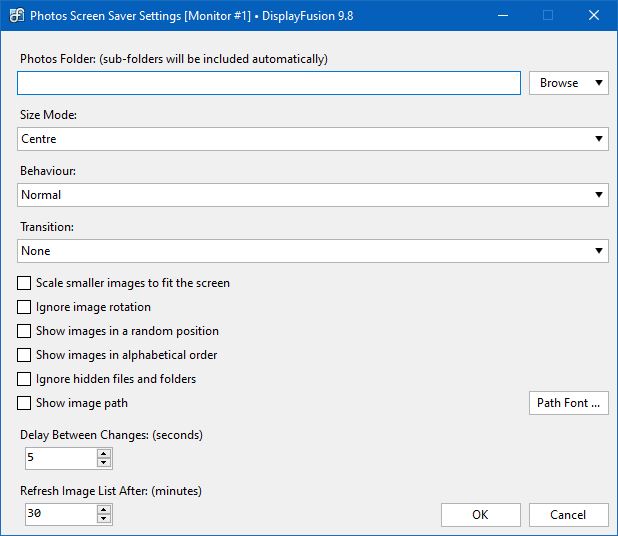
Choose from a selection of available screen savers in the dropdown menu, then click "Settings" to configure details. (Settings vary for each.)
To choose a local saved screen saver, click "Browse," select the screen saver, and click "Open."
Additional options are for requiring a password when returning from the screen saver, choosing the timeout in minutes before the screen saver activates, and selecting a screen saver for when the Windows lock screen has been activated.
Click "Preview" to see your current screen saver settings in full screen.
Click "Apply" or "OK" to apply and save your changes.
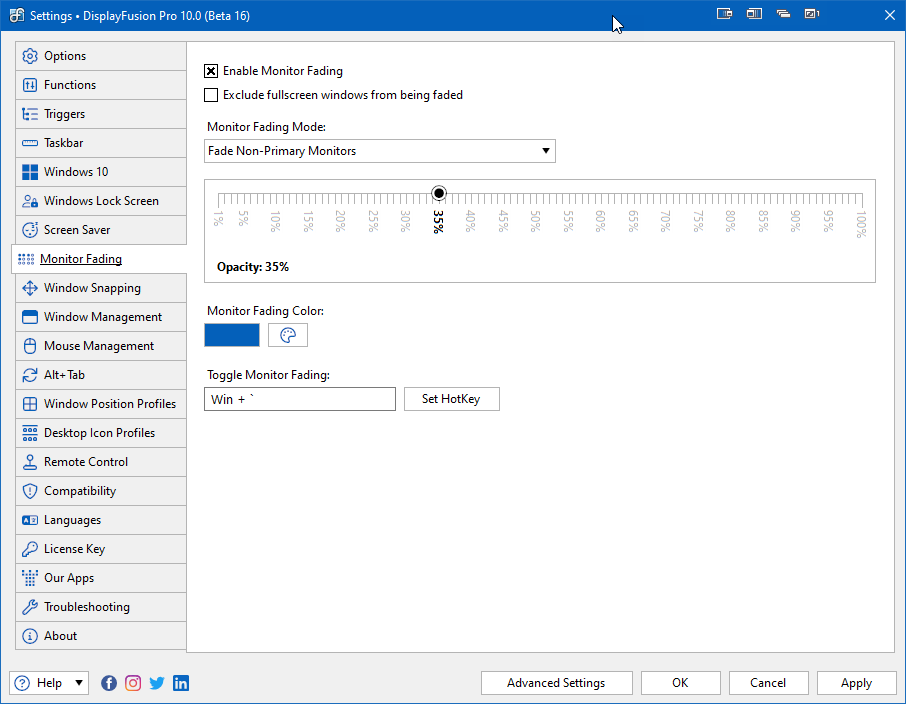
Monitor Fading allows you to alter the opacity and color of all or select monitors/splits.
To navigate here, right-click the DisplayFusion tray icon and click "Settings," then click the "Monitor Fading" tab.
Select which monitor(s) to fade, slide the dot along the ruler to the desired opacity, and choose the Monitor Fading Color.
Other options include excluding fullscreen windows from fading and setting a
HotKey for activation.
Click "Apply" or "OK" to apply and save your changes.
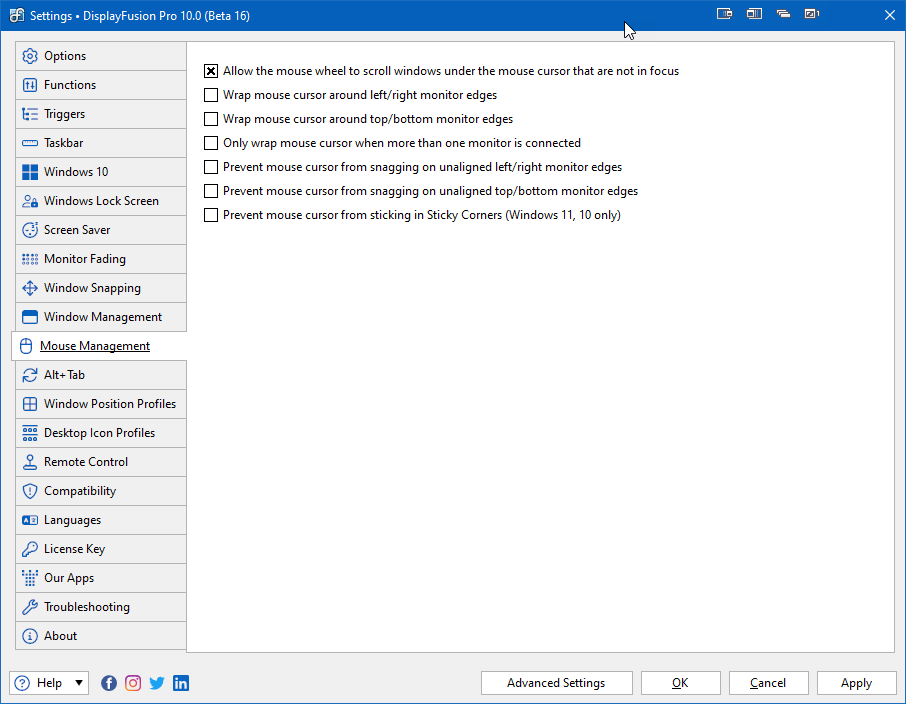
The Mouse Management tab addresses mouse behaviour regarding window focus and monitor connections, edges, and sticky corners.
To navigate here, right-click the DisplayFusion tray icon and click "Settings," then click the "Mouse Management" tab.
Enable the desired options, then click "Apply" or "OK" to apply and save your changes.
For more detailed term explanations and video demonstration of these options, see
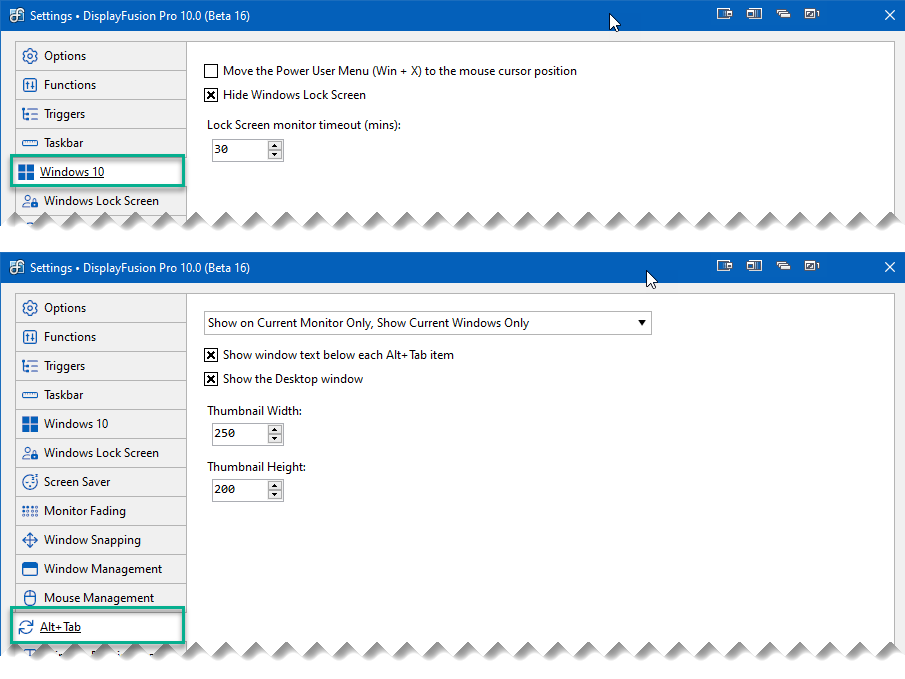
Mouse ManagementThe "Windows X" and "Alt+Tab" tabs allow further configuration. Both are found as tabs via the "Settings" menu. The Windows tab name and options will vary based on your version of Windows.
This area provides additional Windows Lock Screen control and other version-appropriate options.
This area provides styling control for the items displayed when using the Alt+Tab key combination.
Set the desired configurations, then click "Apply" or "OK" to apply and save your changes.
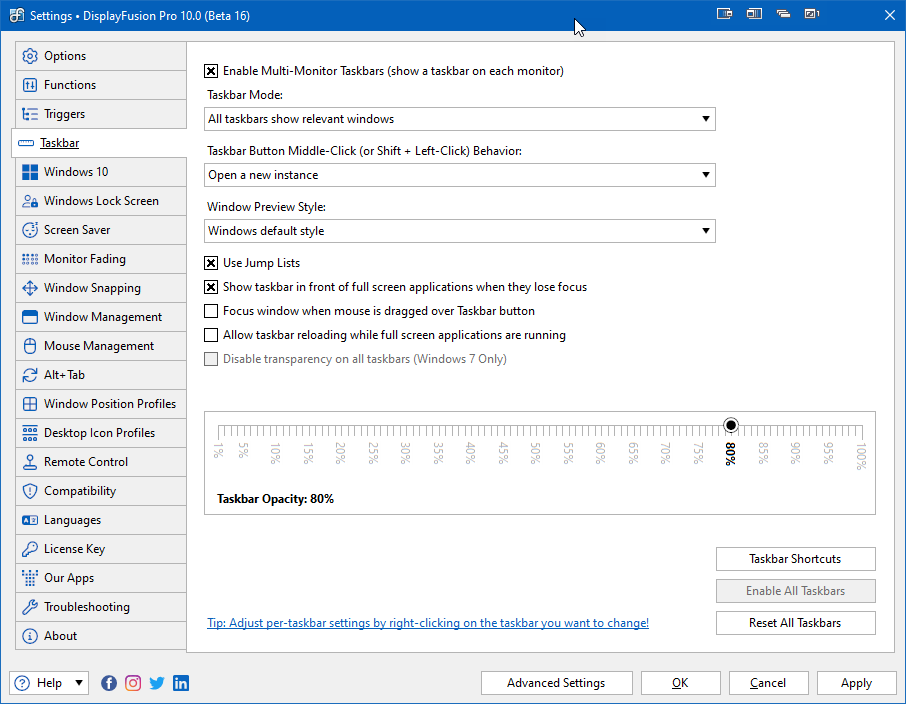
DisplayFusion expands the options for taskbars, including various behaviour, style, and shortcut choices. To enable these options, the "Enable Multi-Monitor Taskbars" checkbox should be enabled. For each split to have its own taskbar, you'll need to enable the "Taskbars" feature checkbox in the "
Monitor Configuration" area.
To navigate to the Taskbar options, right-click on the DisplayFusion tray icon and click "Settings," then click the "Taskbar" tab.
Taskbar Mode provides options for which windows appear in the taskbars. The Taskbar Button Middle-Click Behaviour lets you set the action performed when middle-clicking a docked window on the taskbar. Window Preview Style gives options for the appearance of previews when hovering over docked taskbar windows. Other options cover full screen application and focus behaviour as well as an opacity slider.
To use
Jump Lists (the right-click menu of taskbar items), be sure the "Use Jump Lists" checkbox is enabled. To create taskbar shortcuts to applications, files, folders, and websites, click the "Taskbar Shortcuts" button. For more detail, see
Shortcuts and Automation below.
Set the desired configurations, then click "Apply" or "OK" to apply and save your changes.
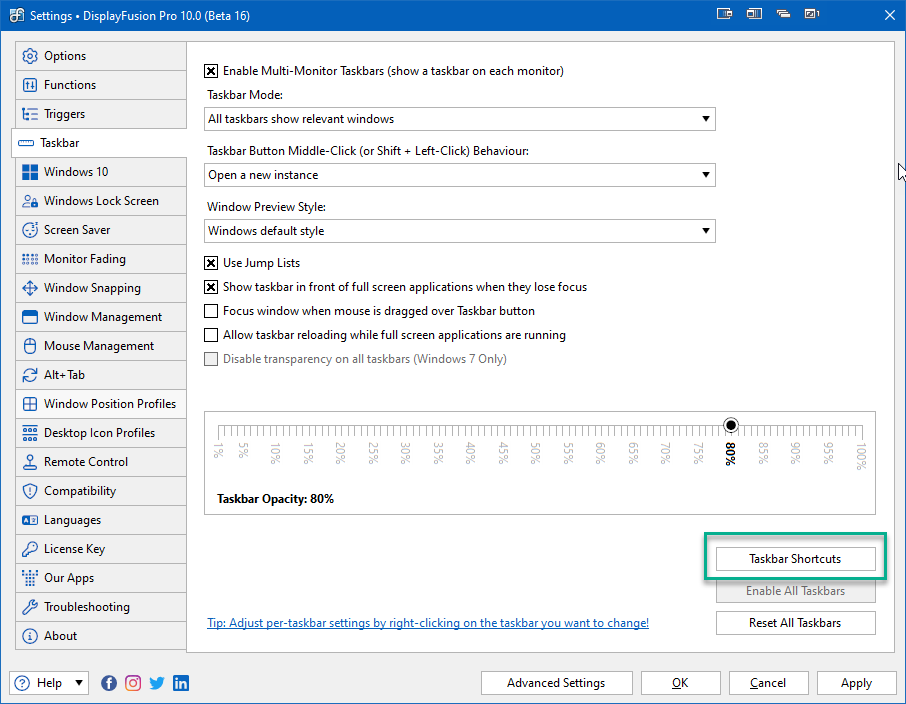
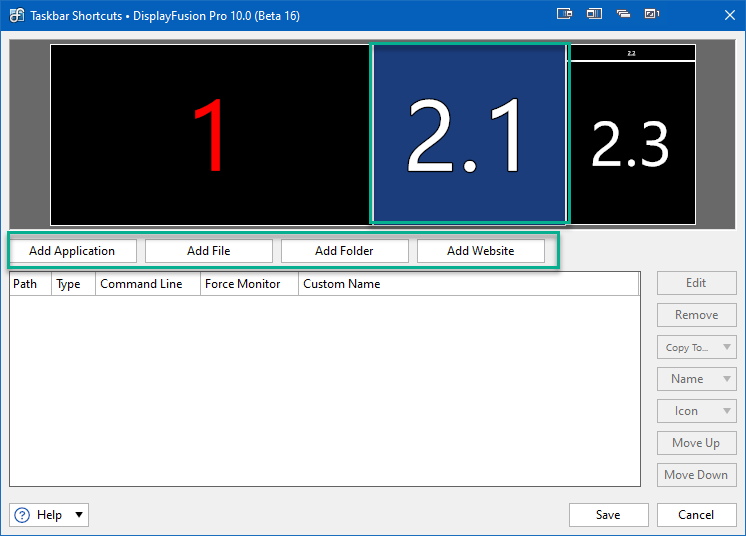
From the Taskbar Shortcuts window, you can create taskbar shortcuts to applications, files, folders, and websites.
To navigate here, right-click on the DisplayFusion tray icon, click "Settings," then the "Taskbar" tab. Then click the "Taskbar Shortcuts" button.
Begin by selecting the monitor/split where you'll place your taskbar shortcut. Each monitor/split taskbar can contain separate, custom shortcuts.
You can select secondary monitors and splits set by DisplayFusion. The primary monitor taskbar shortcuts are handled via Windows.
With the monitor/split selected, click the appropriate button for which shortcut you'd like to add: "Add Application," "Add File," "Add Folder," or "Add Website."
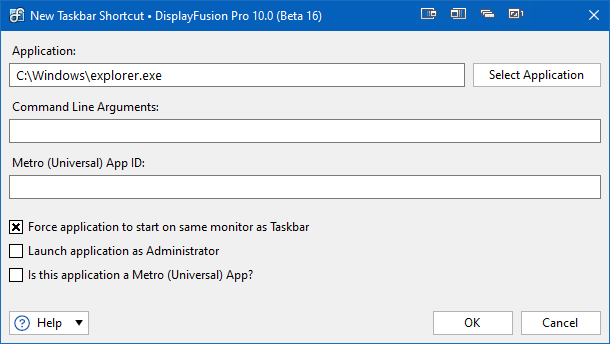
"Add Application" prompts you to select an application. You can choose one from the list, click "Browse" and select from File Explorer, or use the blue target to automatically populate the application field. Drag and drop the blue target icon overtop the application to use this feature.
With the application chosen, you can add Command Line Arguments and choose if the application will be started on the same monitor as the taskbar and whether or not to launch it as an Administrator. Metro applications will populate the "Metro (Universal App ID" field and enable the checkbox, "Is this application a Metro (Universal) App?"
Click "OK" to save your changes.
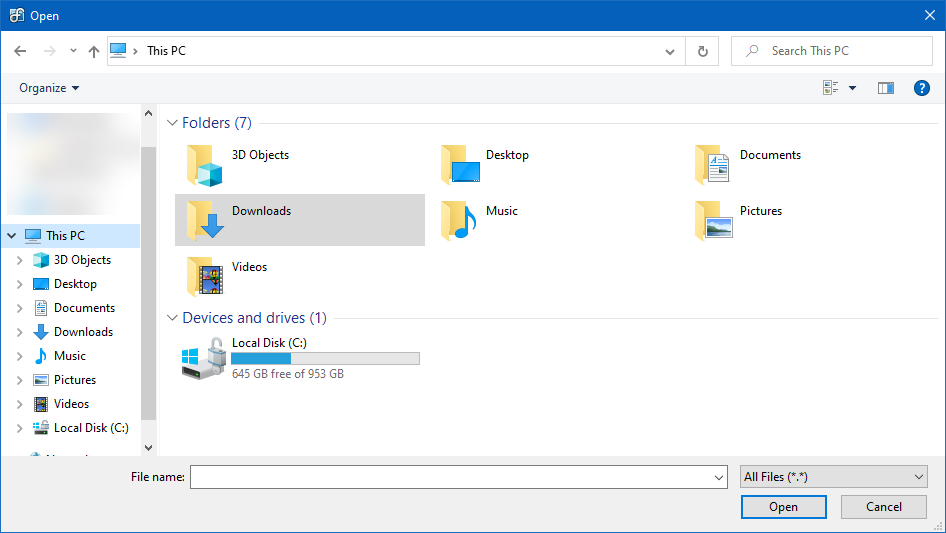
"Add File" prompts you to select a file from the File Explorer. Select the file and click "Open."
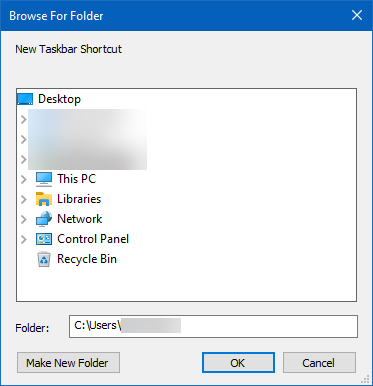
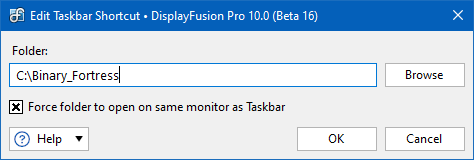
"Add Folder" prompts you to select a folder. Once selected, choose if you'd like it opened on the same monitor as the taskbar. Click "OK."
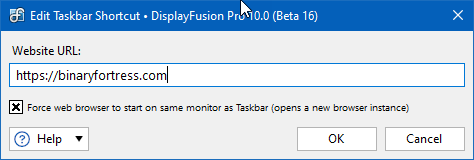
"Add Website" prompts you to enter a URL. Add it in the field and choose if you want it to open on the same monitor as the taskbar. This will open a new browser instance. Click "OK."
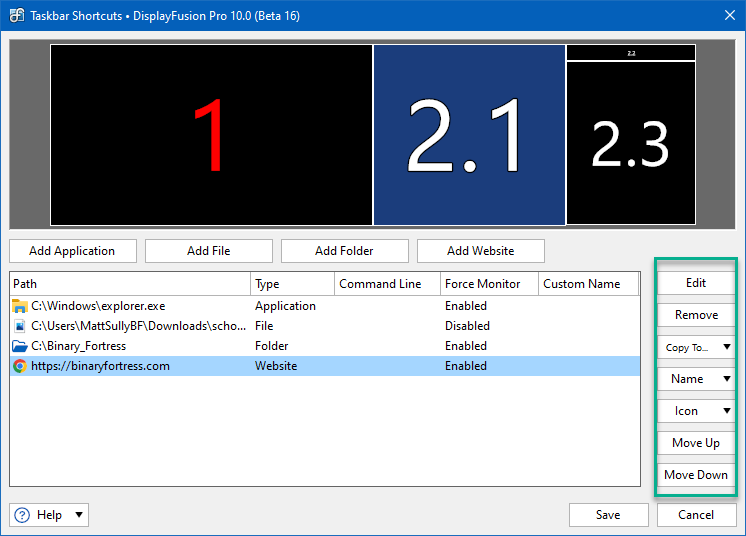
Added shortcuts appear in the list of Taskbar Shortcuts. Selecting a shortcut gives you several options via the buttons on the right: "Edit," "Remove," "Copy To" (which allows you to duplicate the shortcut onto another window/split taskbar), "Name" (custom naming), "Icon" (to assign a custom icon), and "Move Up"/"Move Down."
Click "Save" to apply and save your changes.
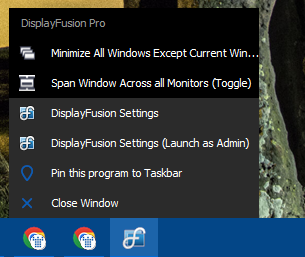
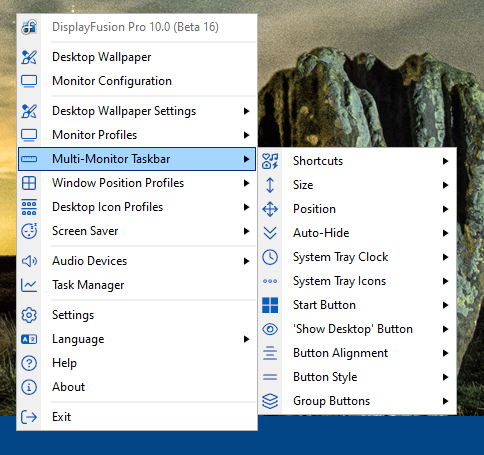
Once saved, they'll appear in the taskbar. Right-click the taskbar and select "Multi-Monitor Taskbar," then "Shortcuts" to access various arrangement options and to open the Taskbar Shortcuts editor.
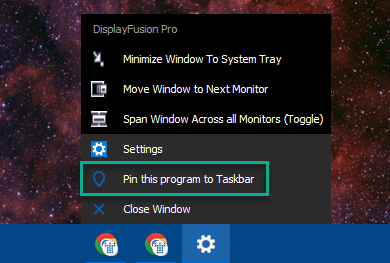
Shortcuts can also be added by right-clicking the running application icon and clicking "Pin this program to Taskbar."
For Taskbar customization examples, see
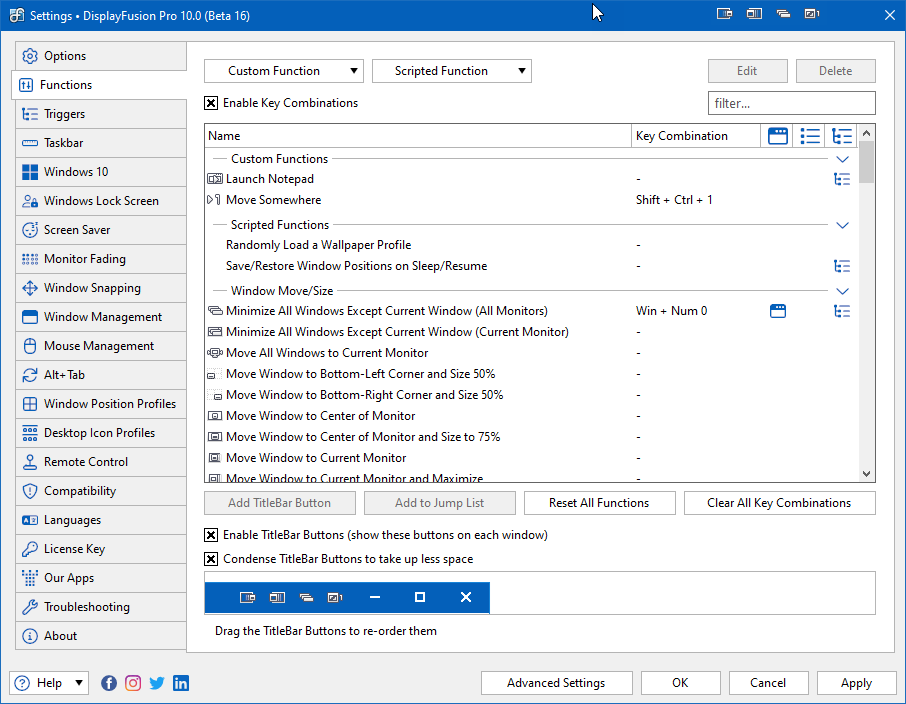
Taskbar CustomizationFunctions are quick actions used to manage windows, wallpapers, DisplayFusion profiles, mouse movement, audio devices, and select system functions. Custom and Scripted Functions can be added for additional capabilities and control.
To navigate to the Functions area, right-click on the DisplayFusion tray icon and click "Settings," then click the "Functions" tab.
Functions are grouped by similar purpose (e.g. "Window Move/Size"). While the action of each Function cannot be edited, you can create Custom or Scripted Functions with your own desired options.
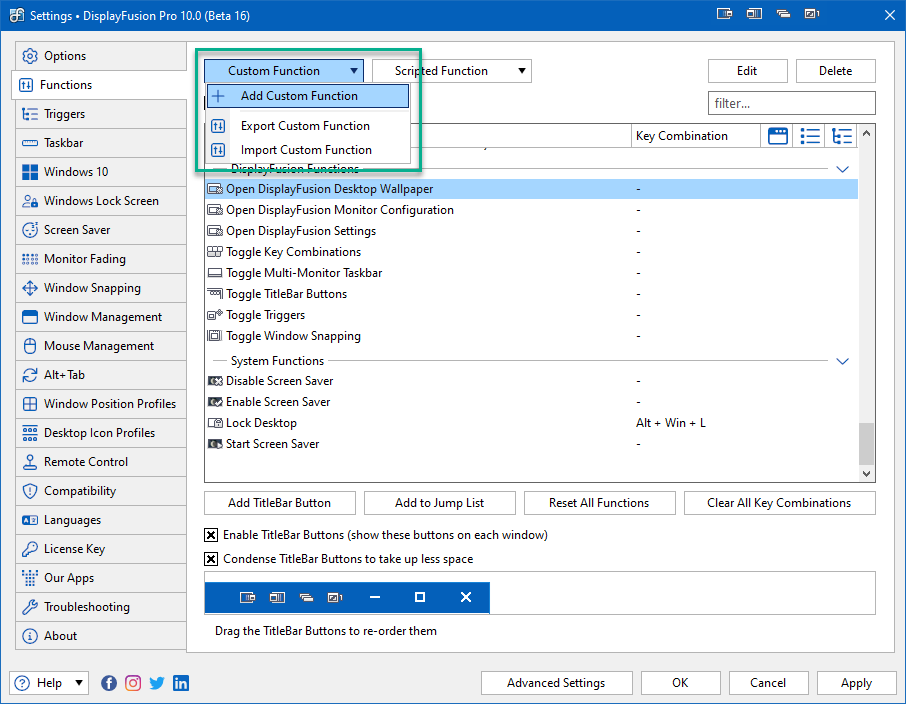
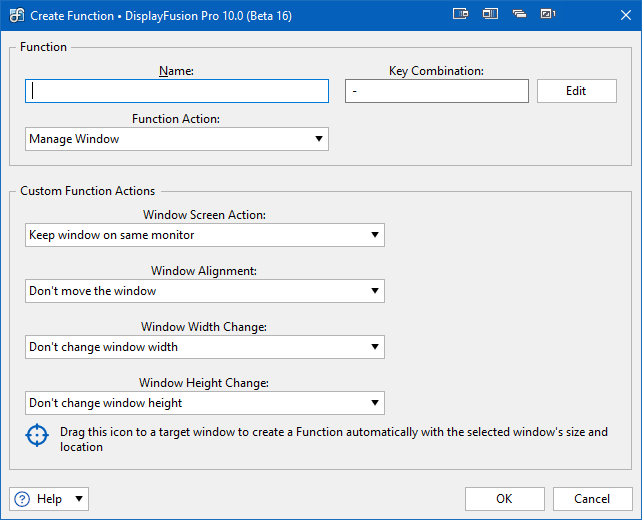
To create a Custom Function, click the "Custom Function" dropdown and select "Add Custom Function." In the Create Function prompt, Name your Function, select an Action, then configure its relevant fields. Options will change based on the chosen Function Action. Click "OK" when finished.
To better understand these options, see
Custom Functions.
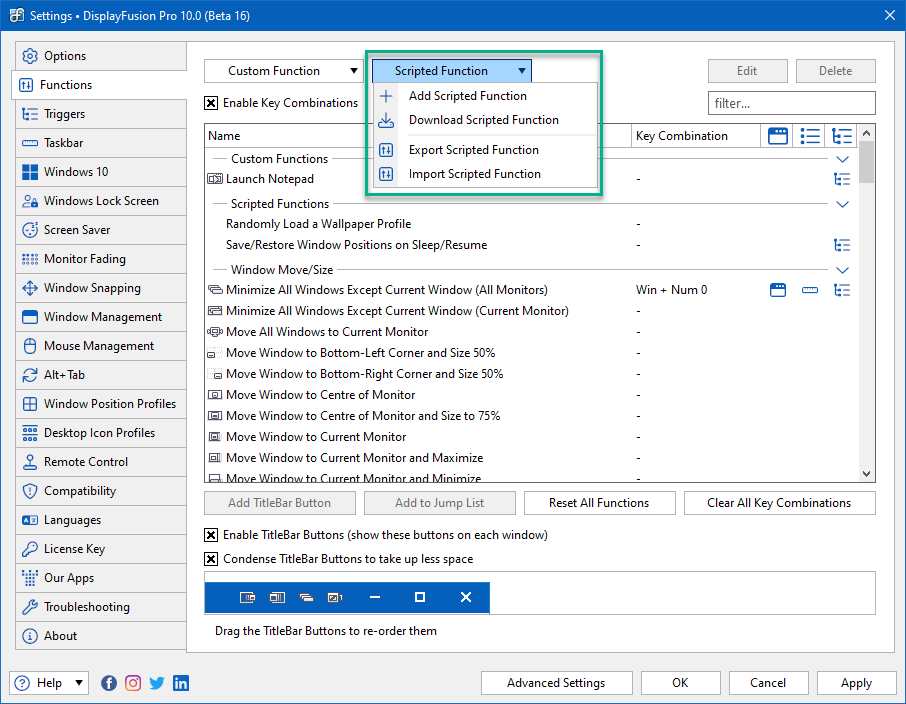
Scripted Functions, (coded in C# and VB), allow for more function flexibility. You can create your own, import them, or download pre-made scripts shared by other DisplayFusion users.
You can create shortcuts to each Function.
To assign a
HotKey, select a Function from the list and click "Edit." For Custom and Scripted Functions, click "Edit" again from the editor window.
HotKeys allow use of the keyboard to initiate a DisplayFusion action. They are available for Monitor Fading, Window Position Profiles, Monitor Profiles, and Functions (which opens up a variety of uses.)
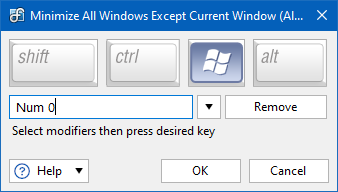
Wherever you see the terms HotKey or Key Combination, you will be able to assign a Hotkey to the profile or action. Clicking "Edit" allows you to create and edit the key combination.
The prompt has a row of modifier keys: "shift," "ctrl," "Windows," and "alt." Select one or more of these as part of your key combination.
Select the text field and type the keyboard key you'll use in your key combination.
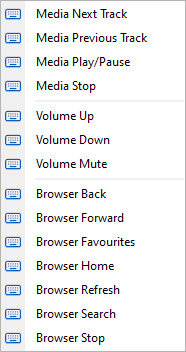
Alternatively, click the dropdown arrow and select from the additional keyboard button options.
When finished, click "OK." From the main window/tab, click "Apply" or "OK" to apply and save your changes.
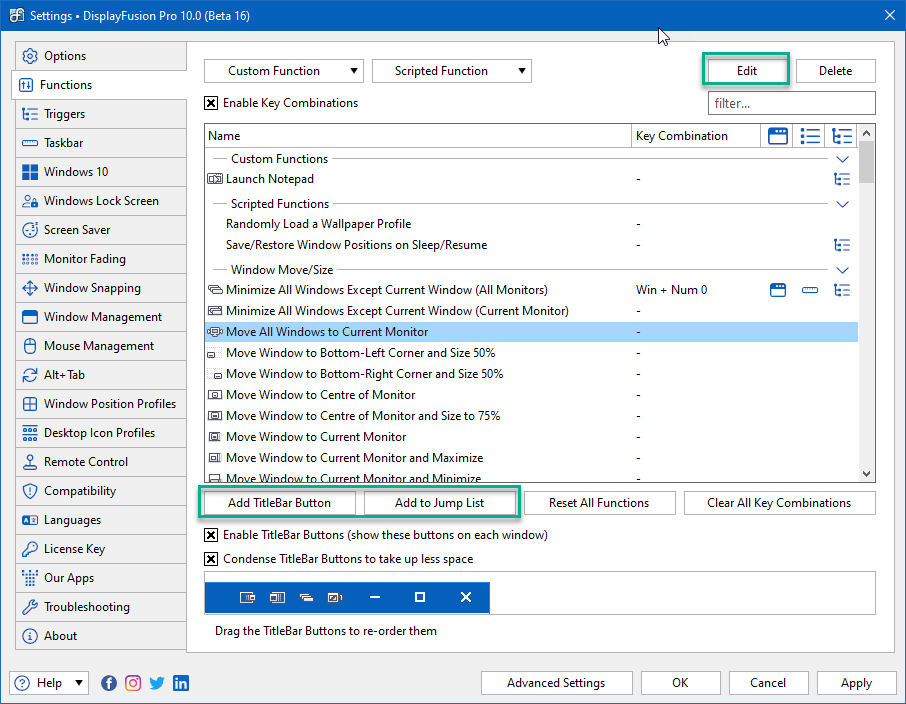
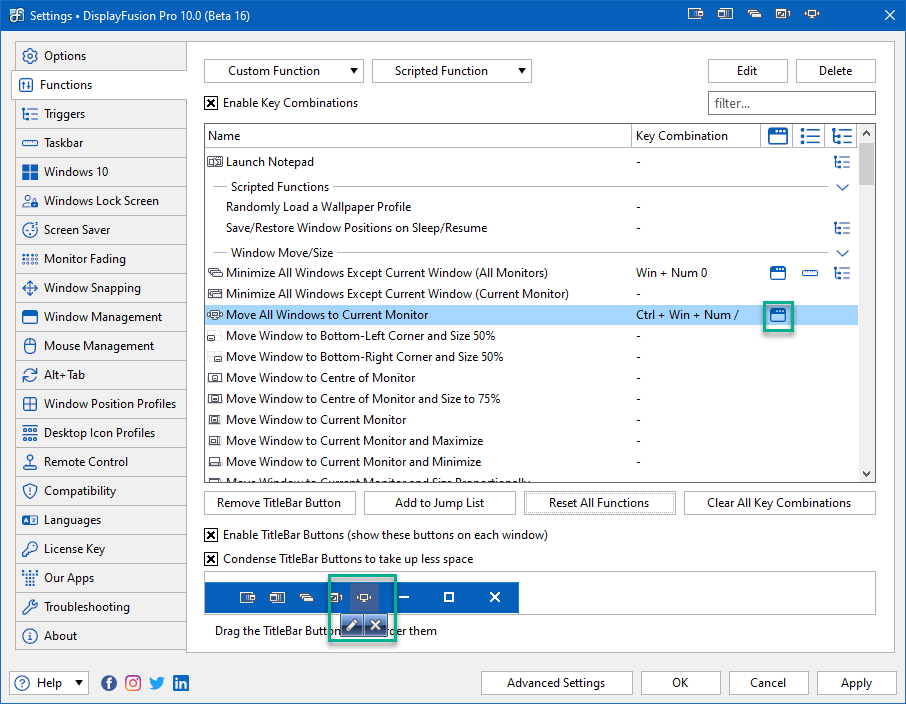
TitleBar Buttons can be added to your application windows for selected Functions. These will appear alongside Windows minimize/maximize/close icons (when room is available). To use this feature, the "Enable TitleBar Buttons" checkbox must be enabled.
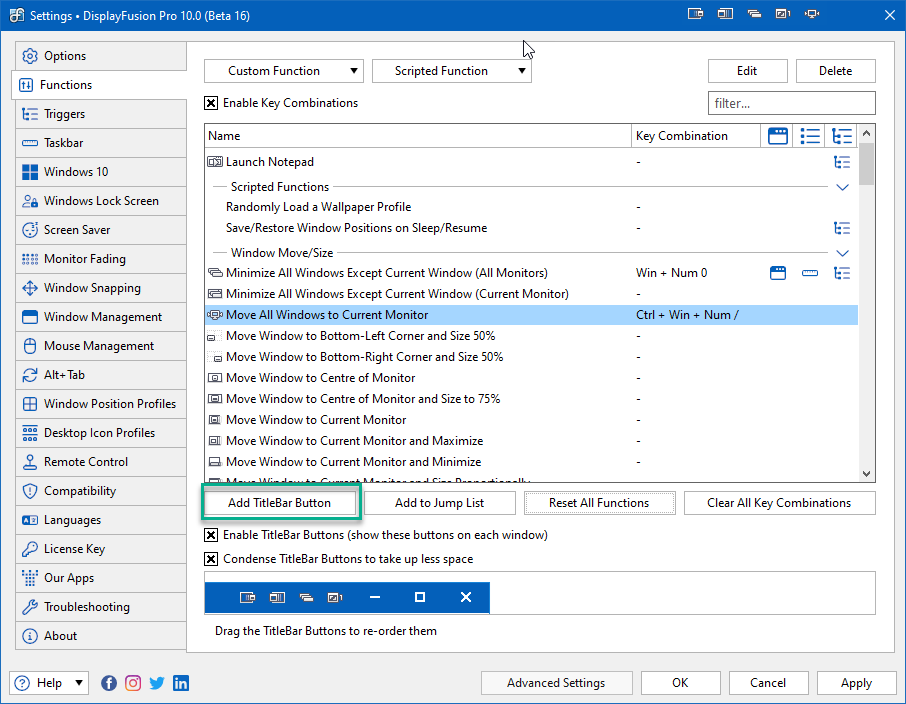
To add a Function as a button to window titlebars, select the Function from the list and click "Add TitleBar Button."
The button will be shown in the titlebar preview and an indicator is added in the "Show in TitleBar Buttons" column in the row of the Function.
TitleBar Buttons can be moved into a new position by dragging them in the titlebar preview. Clicking the edit icon allows you to choose from various button styles. Use the divider icon to add space around buttons. To condense space around the buttons, enable the "Condense TitleBar Buttons to take up less space" checkbox.
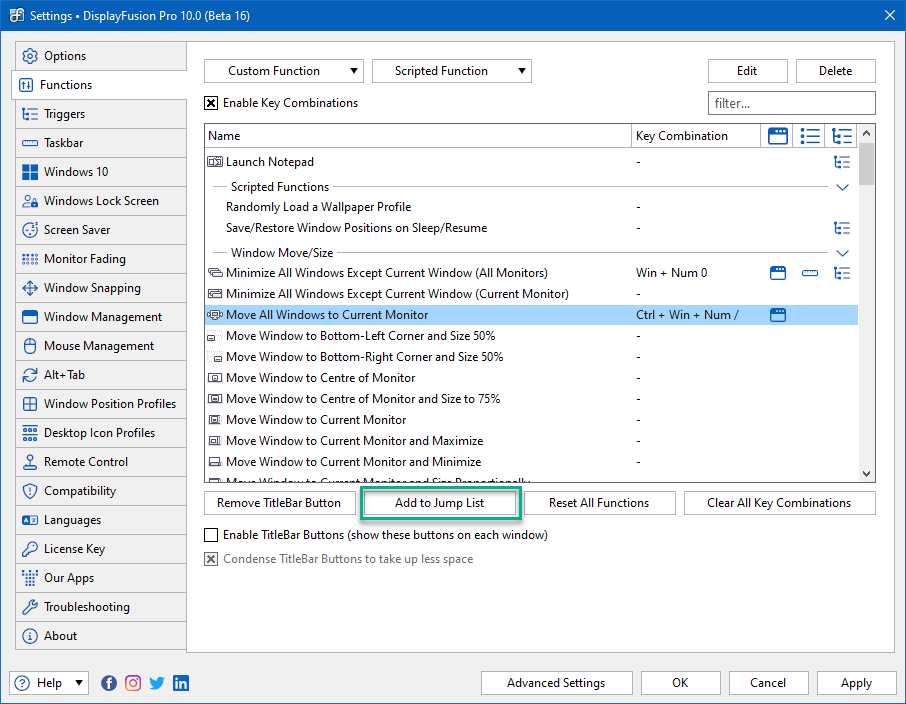
Jump Lists are a right-click menu of tasks, Functions, and other options for pinned and active applications on your taskbars.
To use Jump Lists, be sure the "Use Jump Lists" checkbox is enabled. This is found in the Taskbar tab of DisplayFusion's Settings. See
Taskbar.
To add a Function to your Jump Lists, select the Function from the list and click "Add to Jump List." An icon will appear in the "Show in Jump Lists" column in the row of the Function.
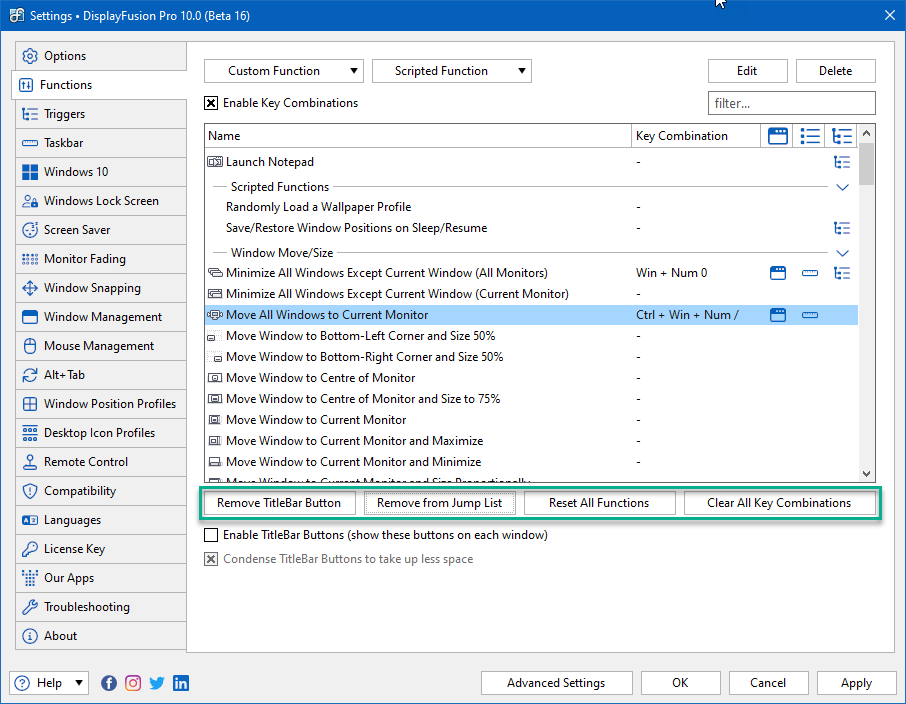
Function configurations and shortcuts can be cleared using the various buttons in the Functions tab: "Remove TitleBar Button," "Remove from Jump List," "Reset All Functions," and "Clear All Key Combinations."
Functions can also be used by Triggers, an Event which can initiate various automated actions. When a Function is associated with one or more Triggers, an icon will appear in the "Used by Triggers" column in the row of the Function.
From the Functions tab, click "Apply" or "OK" to apply and save your changes.
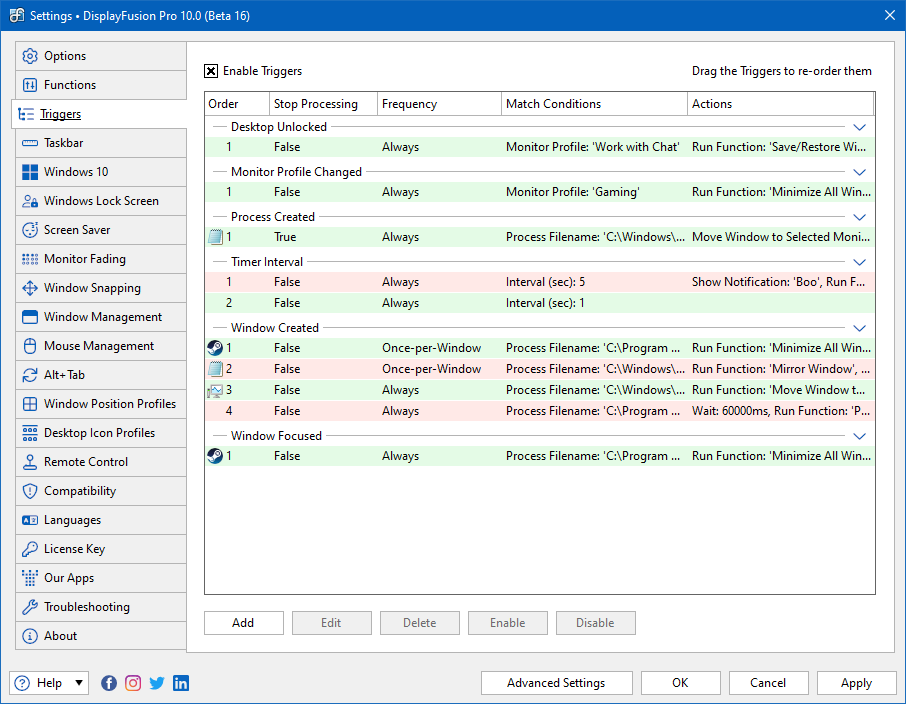
Triggers are a powerful and versatile way to automate DisplayFusion's window management tasks.
To navigate to the Triggers area, right-click on the DisplayFusion tray icon and click "Settings," then click the "Triggers" tab.
Triggers are grouped by Events. Enabled Triggers are highlighted in green, disabled ones in red. To use Triggers, the "Enable Triggers" checkbox needs to be enabled.
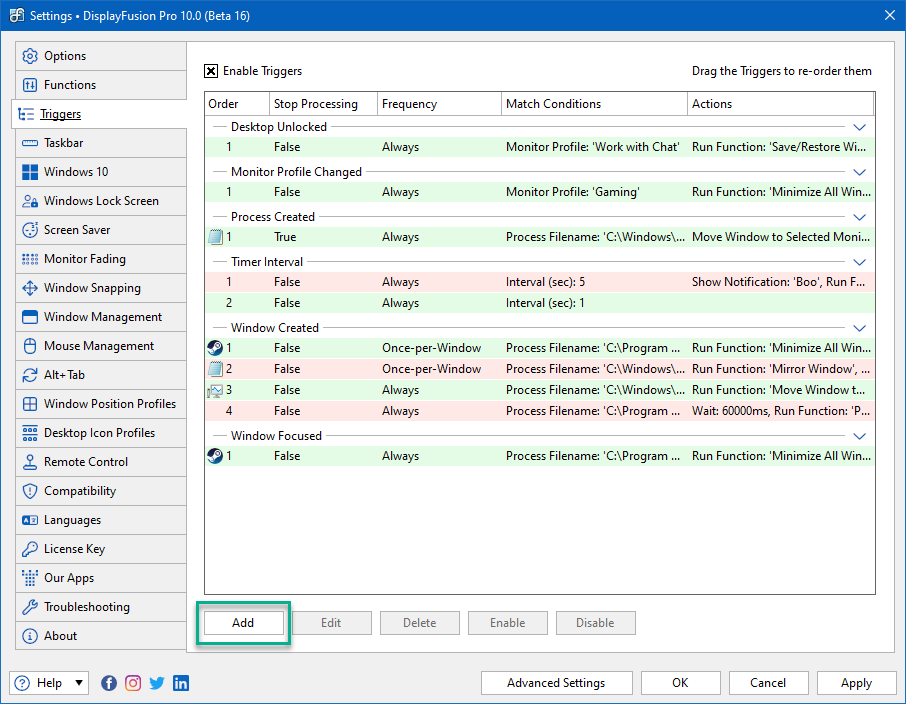
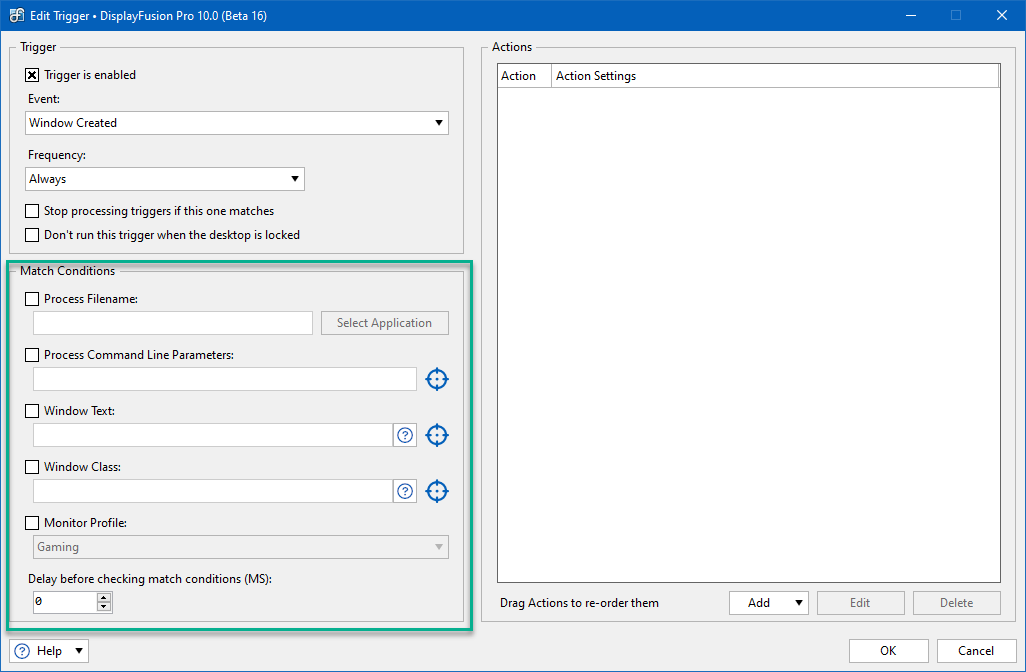
To add a Trigger, click the "Add" button. This will bring up a prompt with several sections: "Trigger," "Match Conditions," and "Actions."
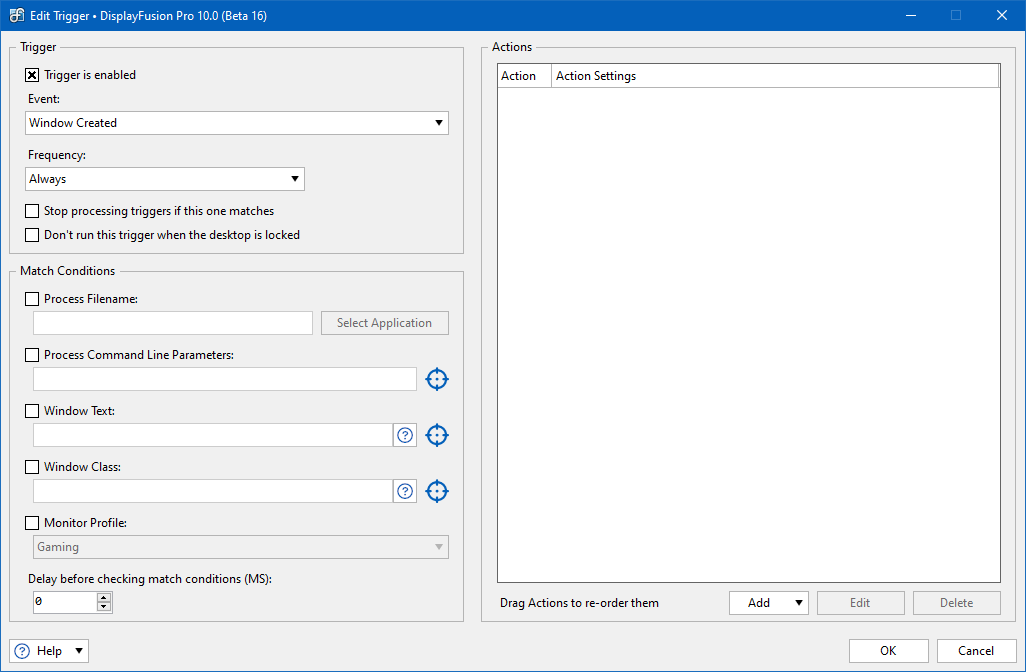
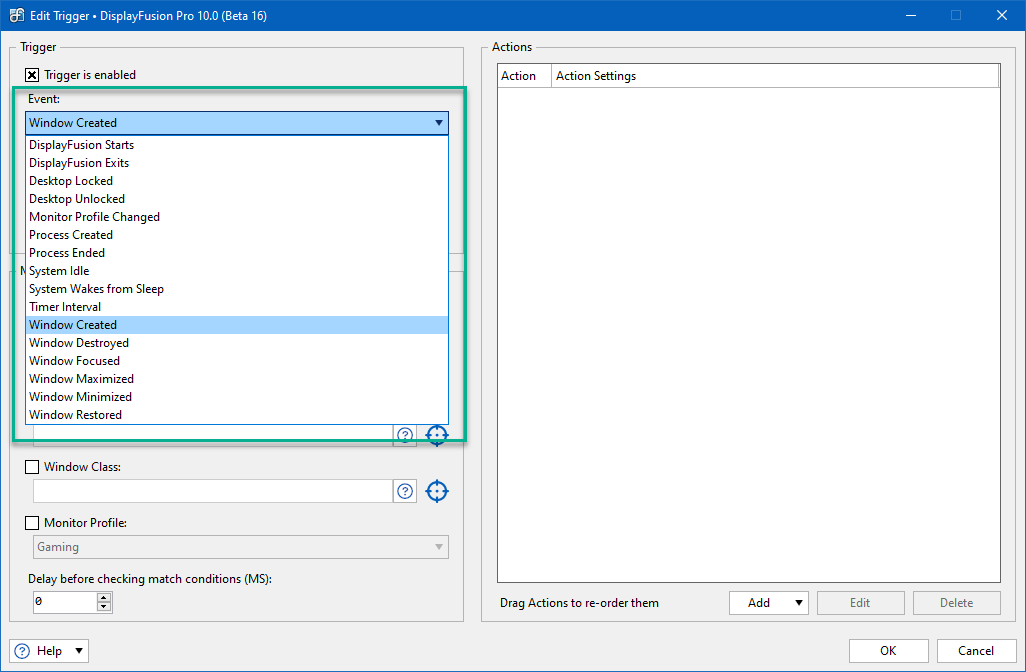
Events are what initiate the Trigger's actions. Some Event selections will require more details in the Match Conditions pane of the Edit Trigger window.
Choose an event. Then configure the other related Event fields (e.g. Frequency).
Match Conditions, when available, are a way to associate specific applications or windows with the Trigger. Process Filename and Command Line Parameters can be added as well as Window Text and Class designations.
Triggers can be limited to specific Monitor Profiles. To choose one, enable the "Monitor Profile" checkbox and select the profile from the dropdown.
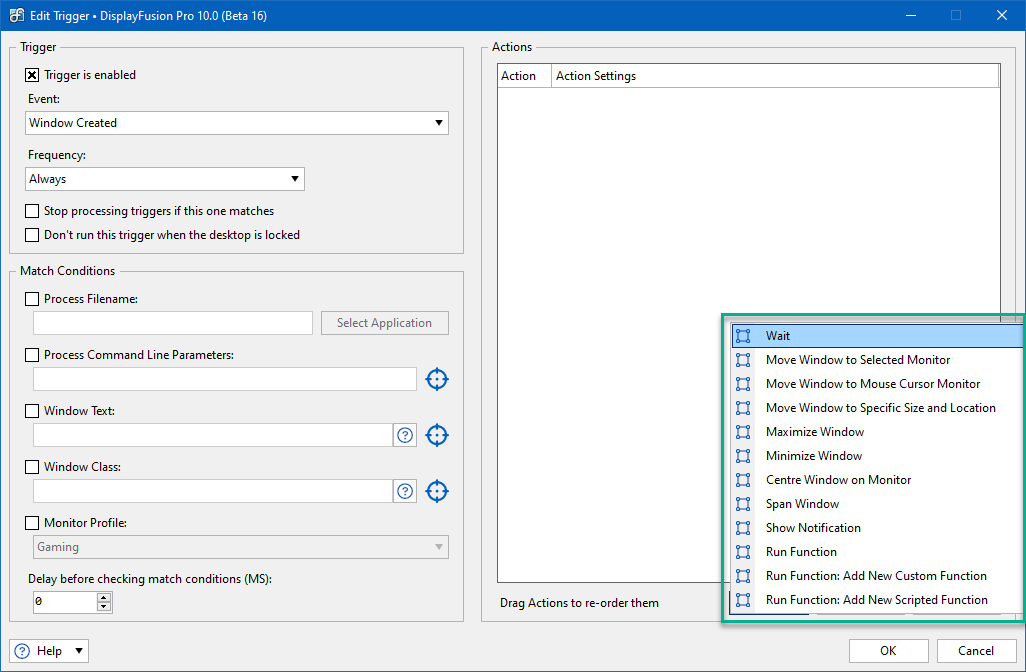
In the Actions section, click "Add" and select from the Actions list. More than one Action can be selected for a Trigger. Some require additional configuration.
They can be reordered by dragging them into place in the Actions list. When all configurations are set, click "OK."
For more detail of Trigger terms and configuration options, see
Triggers.
Apart from using
HotKeys and other
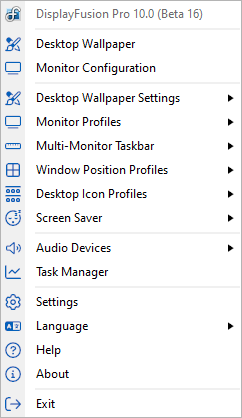
shortcuts, DisplayFusion offers controls and access to various components via its right-click menu.
Right-click on the DisplayFusion tray icon to bring up this menu.
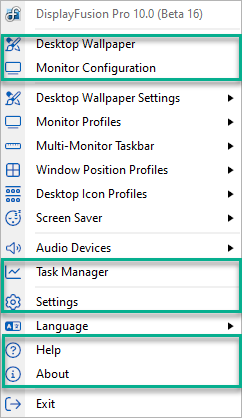
From here you can directly access the
Desktop Wallpaper and
Monitor Configuration areas.
You can access the Windows Task Manager, DisplayFusion's main Settings and About areas, as well as the product Help page.
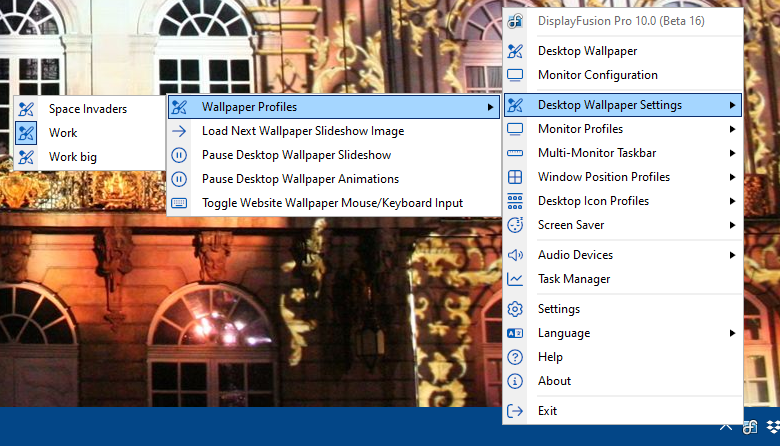
Wallpaper Profiles can be loaded directly from the menu, and there are some limited controls for slideshows/animations.
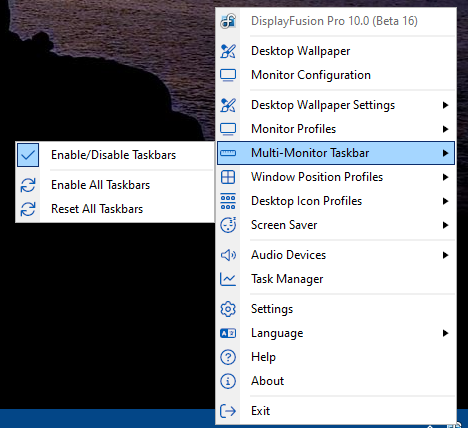
Basic Taskbar controls are available here, with more options available when right-clicking the taskbar on non-primary monitors/splits.
You can load
Window Position Profiles and
Desktop Icon Profiles, as well as access their respective management areas.
You can start the
Screen Saver or access the Screen Saver Settings area.
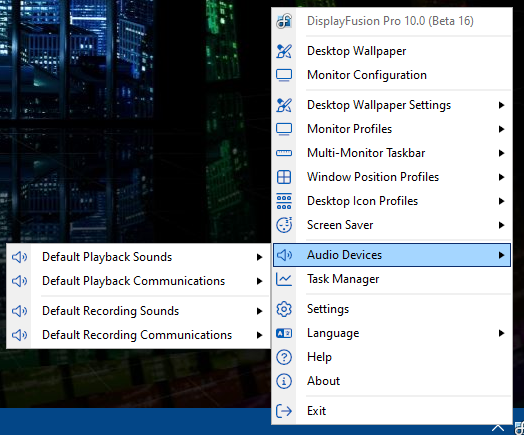
For recording and playback device selection,
Audio Devices allows you to switch between available speakers and microphones.
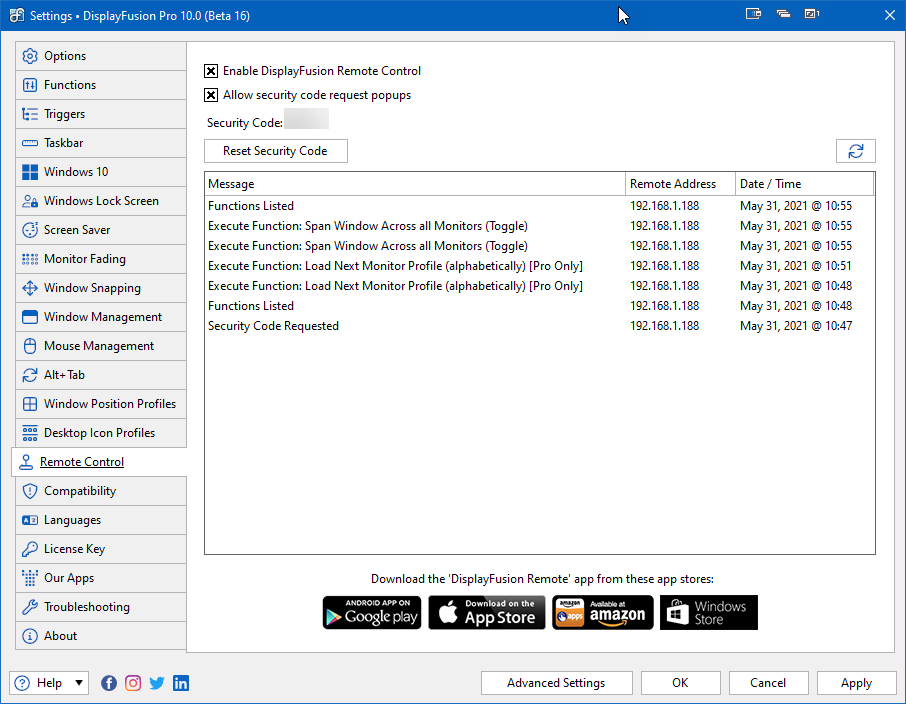
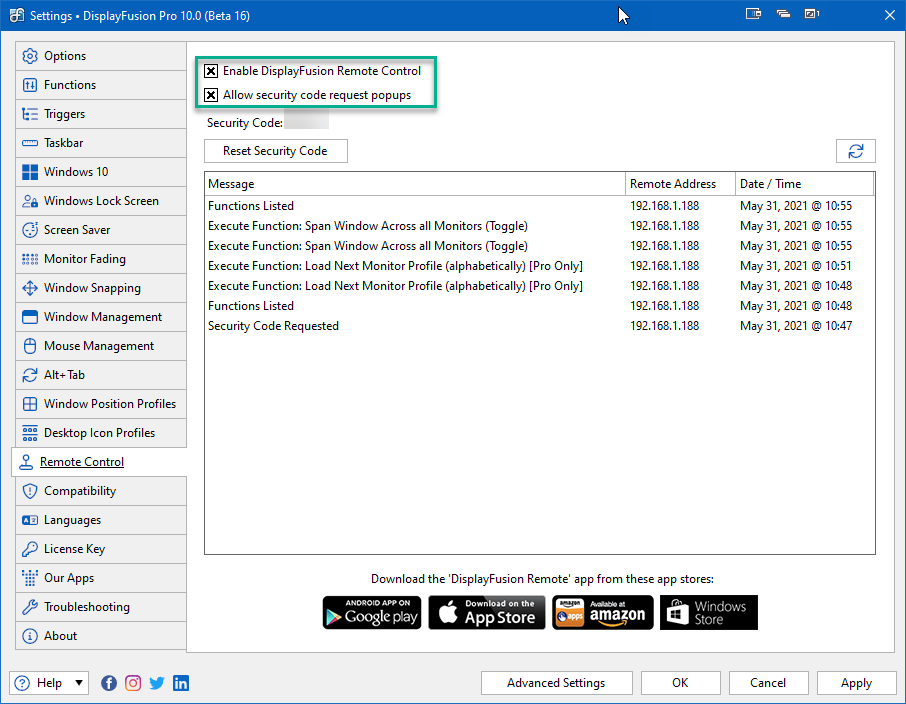
DisplayFusion's Remote Control is an app which allows you to connect to your systems running DisplayFusion.
You will need to enable the use of the Remote Control app via the "Remote Control" tab in DisplayFusion. To navigate here, right-click on the DisplayFusion tray icon and click "Settings," then click the "Remote Control" tab.
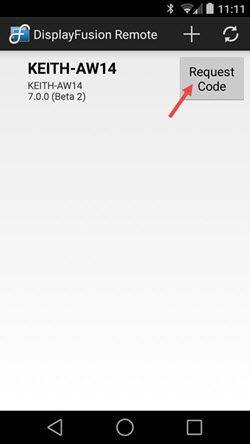
Enable the two checkboxes and open the downloaded app on your device.
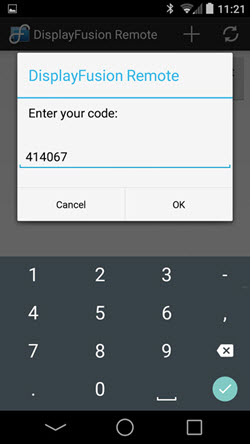
Your computer should be automatically detected and listed in the app. Click the "Request Code" button, then enter the Security Code displayed in the Remote Control tab of DisplayFusion.
Once connected, you'll see the list of available
Functions to control your system.
For a manual system entry option and troubleshooting, see
Remote Control.
DisplayFusion gives users power and precision over their multi-monitor setup, with automation and customization options to create the perfect displays, every time.
To learn more about DisplayFusion, visit:
https://www.displayfusion.comBinary Fortress has spent 19 years in pursuit of one goal: create software to make life easier. Our software ranges from display management and system enhancement utilities to monitoring tools and digital signage. IT administrators, professional gamers, coffee-shop owners, and MSPs all rely on Binary Fortress to make their days better, and their lives easier.
Copyright © 2007-2026 Binary Fortress Software, all rights reserved.
The Binary Fortress logo is a trademark of Binary Fortress Software.
The DisplayFusion logo is a trademark of Binary Fortress Software.
Binary Fortress Software
1000 Innovation Drive, Suite 500
Kanata, Ontario, Canada
K2K3E7
https://www.binaryfortress.com