DisplayFusion is an application that is always running in the background. To adjust any DisplayFusion settings, or use DisplayFusion to set your desktop wallpaper, just right-click the DisplayFusion icon in the system tray. For how-to guides on the most popular features in DisplayFusion, please see the list at the top of this page:
https://www.displayfusion.com/Help/#howtoguidesWindows will sometimes hide system tray icons. If you don't see the icon, please read the
How To Show All System Tray Icons section below.
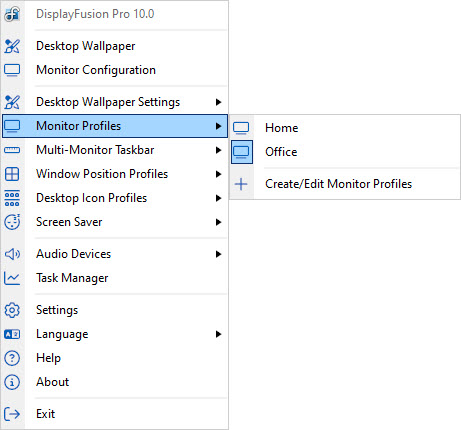
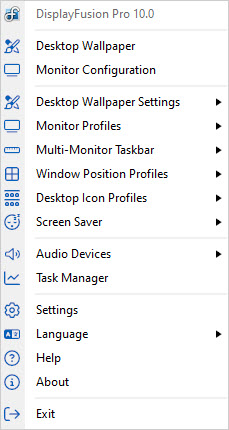
Tray Icon Actions:
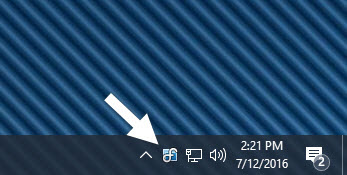
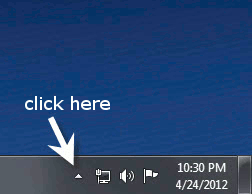
On some computers, the DisplayFusion system tray icon might be hidden by Windows.
This is how you show the hidden tray icons in different versions of Windows.
Windows 10/11
When you right-click the system tray icon, the DisplayFusion system tray context menu will appear.
The Desktop Wallpaper Settings menu allows you to control the DisplayFusion Wallpaper settings, along with your different Wallpaper Profiles.
- Wallpaper Profiles: This sub-menu shows all of your Wallpaper Profiles, and allows you to load a profile by clicking on it. You can configure new Wallpaper Profiles in the Wallpaper Settings window.
- Load Next Wallpaper Slideshow Image: Loads the next random image from your configured image source.
- Pause/Resume Desktop Wallpaper Slideshow: Pauses the random image changer, and prevents DisplayFusion from loading any new random images while paused.
- Pause/Resume Desktop Wallpaper Animations: When using the "My Videos" or "Website" wallpaper source, this option will pause the desktop animation.
- Toggle Website Wallpaper Mouse/Keyboard Input: When you are using a Website as your wallpaper, you can use this function to allow mouse and keyboard events to interact with it.
The Monitor Profiles menu allows you to switch to any of your saved Monitor Profiles. Clicking the Create/Edit Monitor Profiles menu item will open the
Monitor Configuration window.
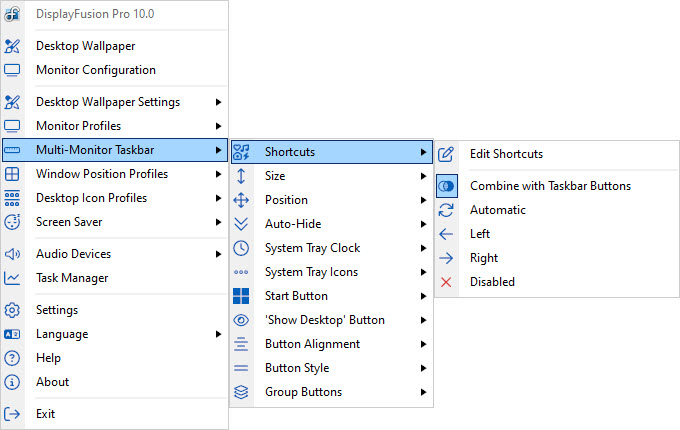
If you right-click on a DisplayFusion Taskbar, you can adjust the size, position and auto-hide settings, Start Button, and more for that Taskbar. If you right-click on the DisplayFusion system tray icon you can enable and disable the Taskbar feature for all monitors.
The Taskbar Shortcuts menu allows you to edit the Shortcuts for the selected Taskbar, or choose which side of the Taskbar the Shortcuts get aligned to. This can be the left/right sides for a horizontal Taskbar or the top/bottom sides for a vertical Taskbar.
- Edit Shortcuts: Opens the Taskbar Shortcuts window so you can manage your Taskbar Shortcuts.
- Combine with Taskbar Buttons: Combines Taskbar Buttons for the Shortcuts (pinned items) with the buttons for running programs.
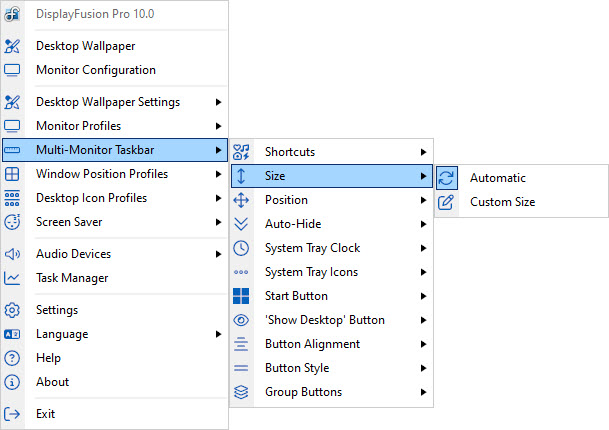
The Taskbar Size menu allows you to change the size of the Taskbar. By default it will be the same size as the Windows Taskbar, but you can set any custom value you need.
- Custom Size: Allows you to specify the new Taskbar size in pixels.
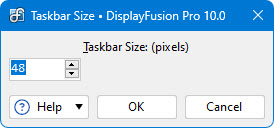
This window allows you to specify a custom value for the Taskbar's size.
- Taskbar Size: (pixels): This is the value in pixels for the new taskbar size.
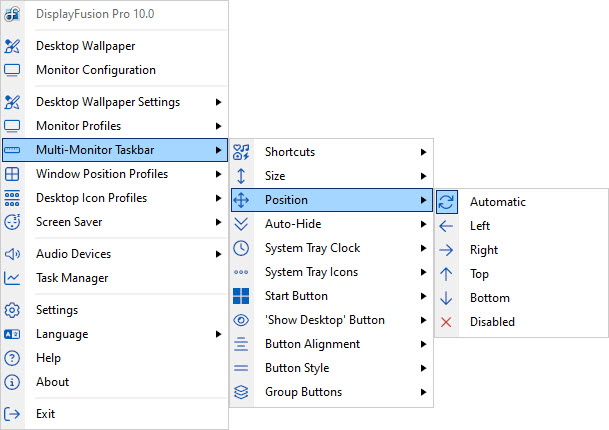
The Taskbar Position menu allows you to change which edge of the monitor the Taskbar is located. You can also disable the Taskbar for a specific monitor from here as well.
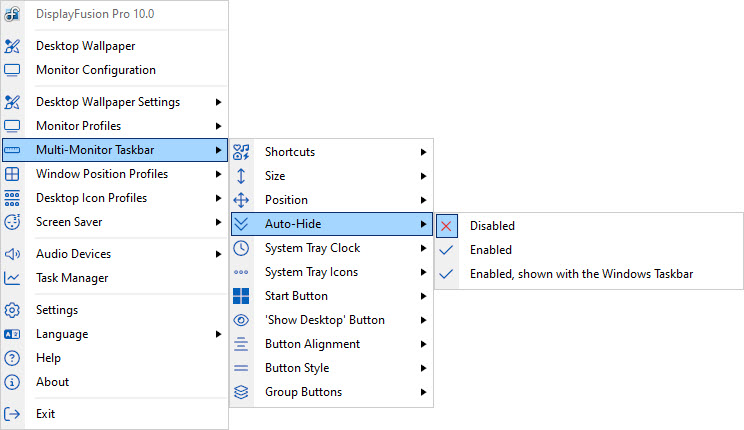
The Taskbar Auto-Hide menu allows you to set which Auto-Hide mode you would like to use. You can disable Auto-Hide, enable Auto-Hide or enable Auto-Hide and show the DisplayFusion Taskbar when the Windows Taskbar is visible as well.
- Enabled, shown with the Windows Taskbar: The selected Taskbar will auto-hide, but will also be shown when the Windows Taskbar is visible.
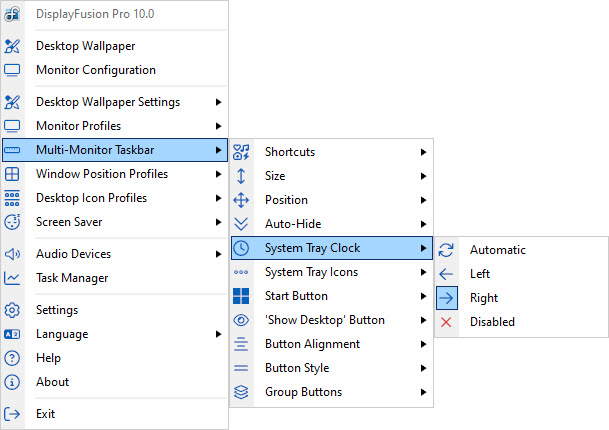
The System Tray menu allows you to adjust which side of the Taskbar the clock and tray icons appear on. This menu also allows you to disable the Clock and Tray Icons. To disable each one individually, use the "Show/Hide" options, or to disable both of them, use the "Disabled" option.
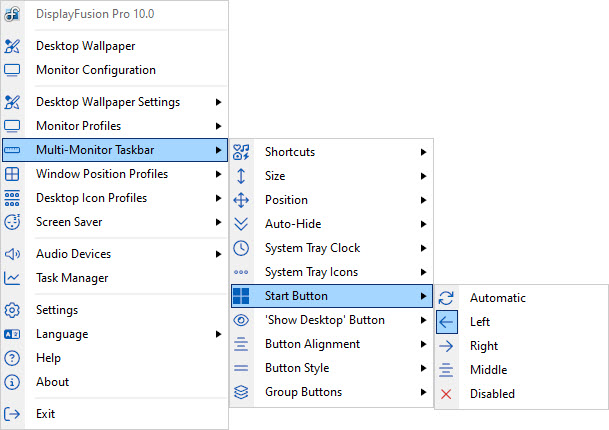
The Start Button menu allows you to choose which side of the Taskbar the Start button gets aligned to. This can be the left/right sides for a horizontal Taskbar or the top/bottom sides for a vertical Taskbar, or it can be disabled completely.
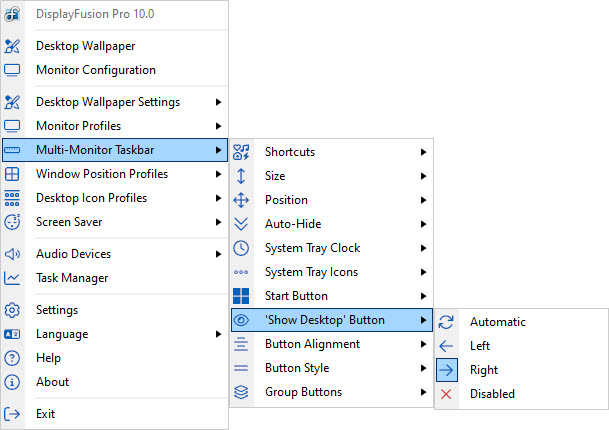
The 'Show Desktop' Button menu allows you to choose which side of the Taskbar the 'Show Desktop' button gets aligned to. This can be the left/right sides for a horizontal Taskbar or the top/bottom sides for a vertical Taskbar, or it can be disabled completely.
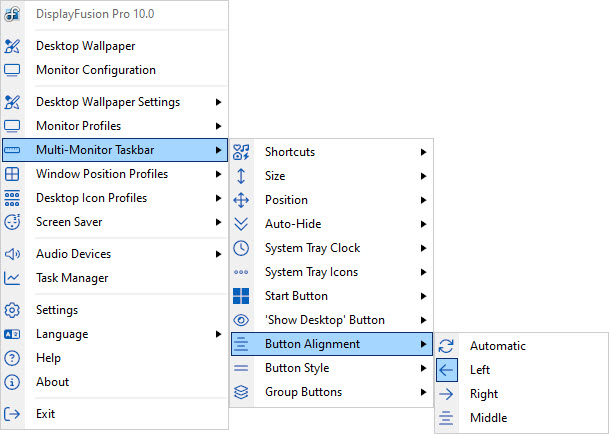
The Taskbar Button Alignment menu allows you to choose which side of the Taskbar the application buttons get aligned to. This can be the left/right sides for a horizontal Taskbar or the top/bottom sides for a vertical Taskbar.
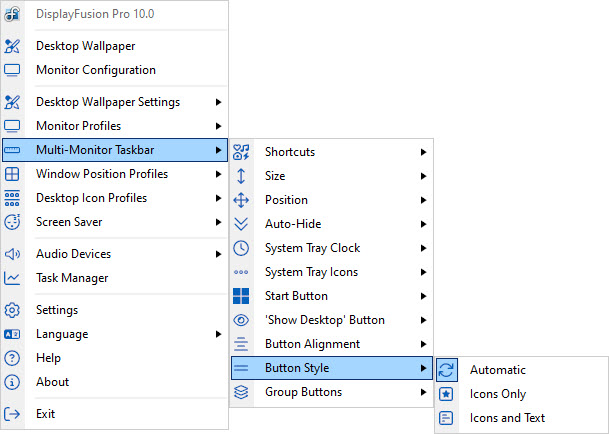
The Button Style sub-menu allows you to change the taskbar button type to Icons Only, Icons and Text, or automatically based on the native Windows taskbar button setting.
- Icons Only: This option will set the taskbar button style to "Icons Only."
- Icons and Text: This option will set the taskbar button style to "Icons and Text."
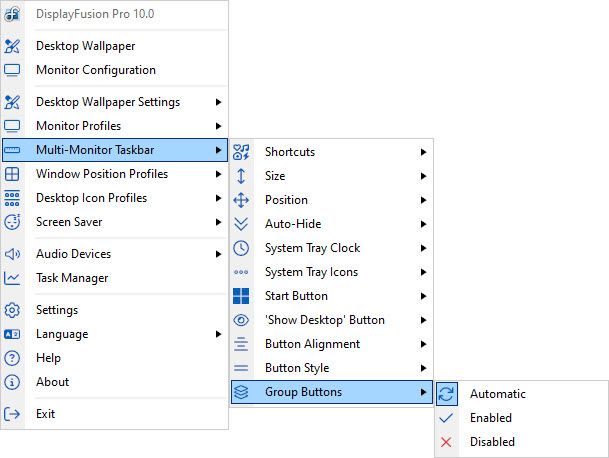
The Group Buttons menu allows you to enable or disable the Taskbar from grouping the buttons by program.
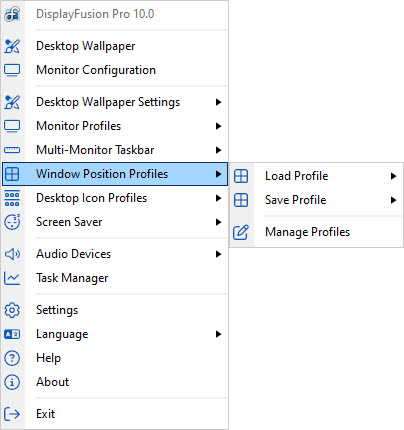
The Window Position Profiles sub-menu allows you to save or load your Window Position Profiles. Selecting an existing Profile in the Save sub-menu will overwrite that Profile with the current desktop icon positions.
- Manage Profiles: Clicking this option will take you to the Window Position Profiles tab in the DisplayFusion Settings window.
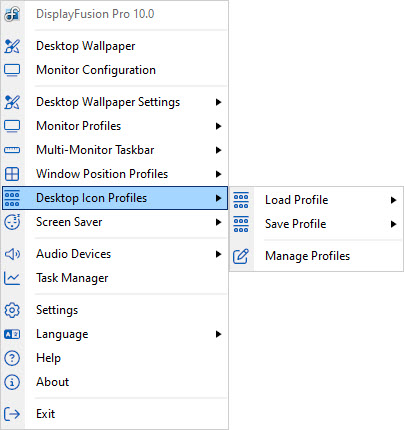
The Desktop Icons menu allows you to load, save, and manage your existing Desktop Icon Profiles.
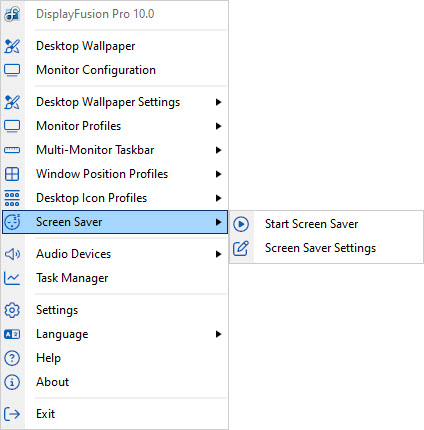
The Screen Saver context menu allows you to control the DisplayFusion Screen Saver and its settings.
- Start Screen Saver: Starts your currently configured Screen Saver.
- Screen Saver Settings: Adjust your multi-monitor Screen Saver settings using the DisplayFusion Settings window.
The Audio Devices menu allows you to easily switch between different devices used for recording and playback on your system.
- Default Playback Sounds: This menu allows you to choose which device to use as the default for sound output when using non-communications programs, like games or video players.
- Default Playback Communications: This menu allows you to choose which device to use as the default for sound output when using communications programs, like Skype.
- Default Recording Sounds: This menu allows you to choose which device to use as the default for microphone input when using non-communications programs, like games or other applications.
- Default Recording Communications: This menu allows you to choose which device to use as the default for microphone input when using communications programs, like Skype.
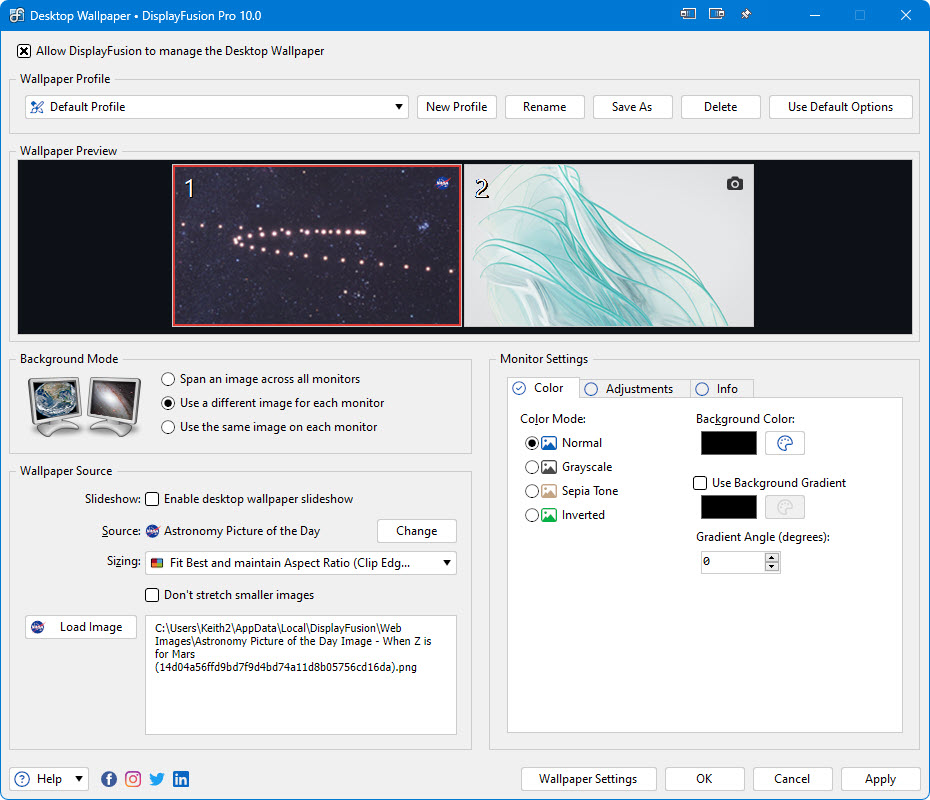
The Desktop Wallpaper window allows you to control how DisplayFusion will load, format and size your wallpaper images. There are many options and many sources to load your images from.
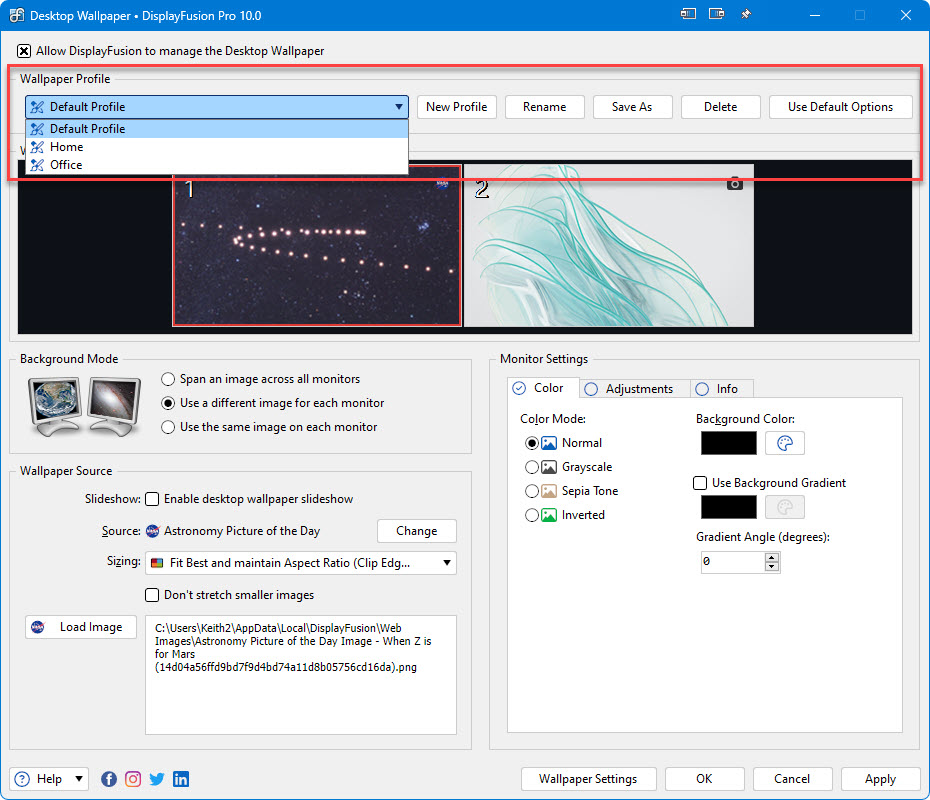
The controls at the top of the Wallpaper window allow you to add, remove, duplicate, and delete Wallpaper Profiles. You can create many different wallpaper profiles for different wallpaper settings.
Upgrade to DisplayFusion Pro to use this feature.
- New Profile: Creates a new Wallpaper Profile using default settings. You will be prompted for the new profile's name.
- Rename: Renames the currently selected Wallpaper Profile. You will be prompted for profile's new name.
- Save As: Creates a new Wallpaper Profile using the current profile's settings. You will be prompted for the new profile's name.
- Delete: Deletes the currently selected Wallpaper Profile. You can't delete the last Wallpaper Profile in the list, you need to always have at least 1 profile.
- Use Default Options: Resets all wallpaper settings to their defaults for the currently selected profile.
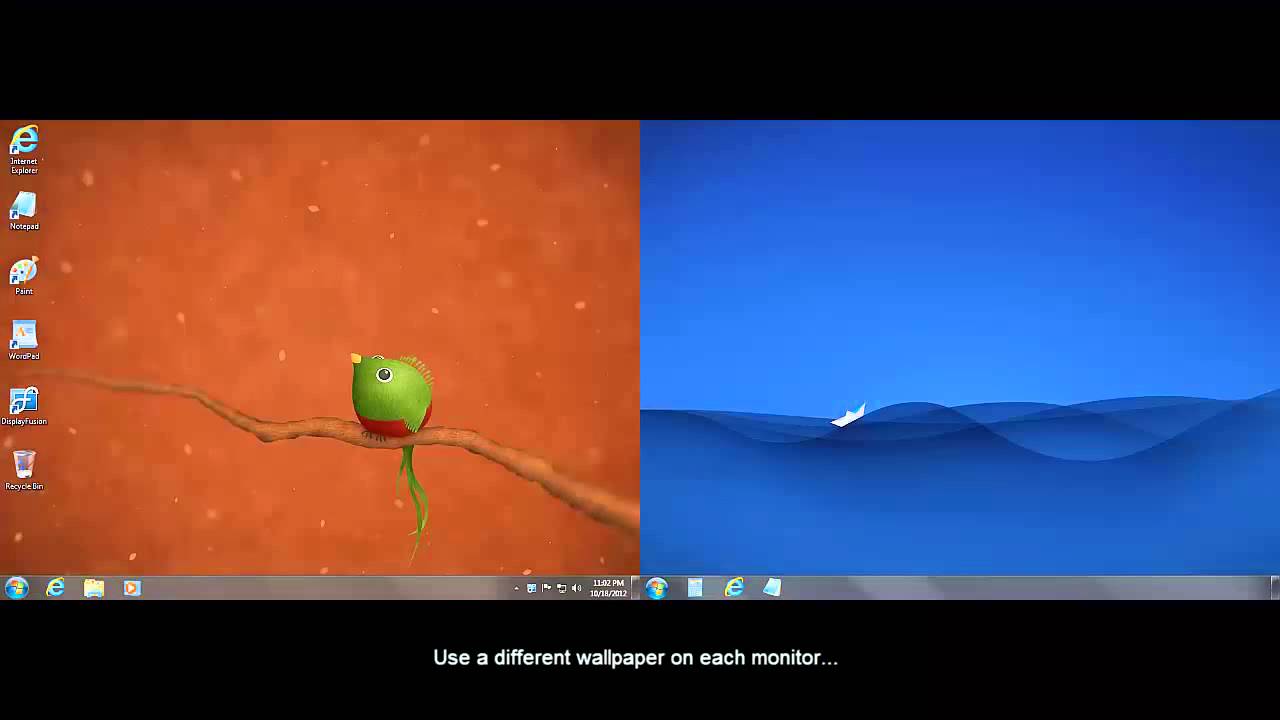
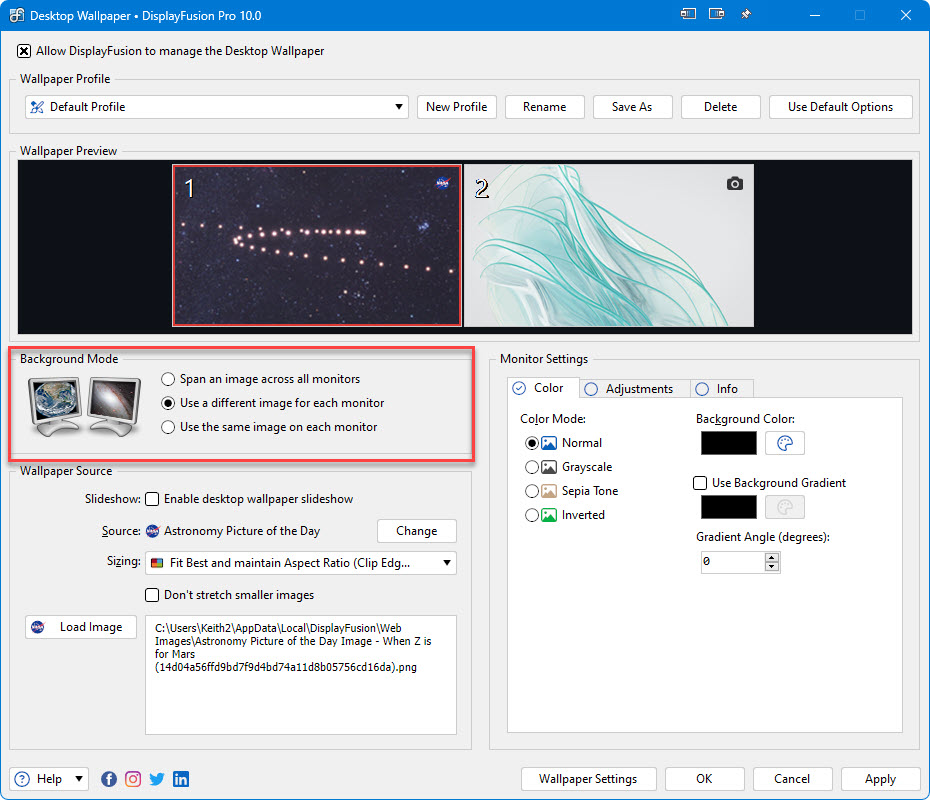
The Background Mode options allow you to choose whether you want to use a different image on each monitor, the same image on each monitor, or a single image spanned across all monitors. You can also have an image span selected monitors:
How To Span Wallpaper Images Across Groups of Monitors- Span an image across all monitors: Selecting this option allows you to choose a single image that will be spanned across all monitors.
- Use a different image for each monitor: Selecting this option allows you to choose a different image to use as the wallpaper on each monitor.
- Use the same image on each monitor: Selecting this option allows you to choose a single image that will be shown on each monitor.
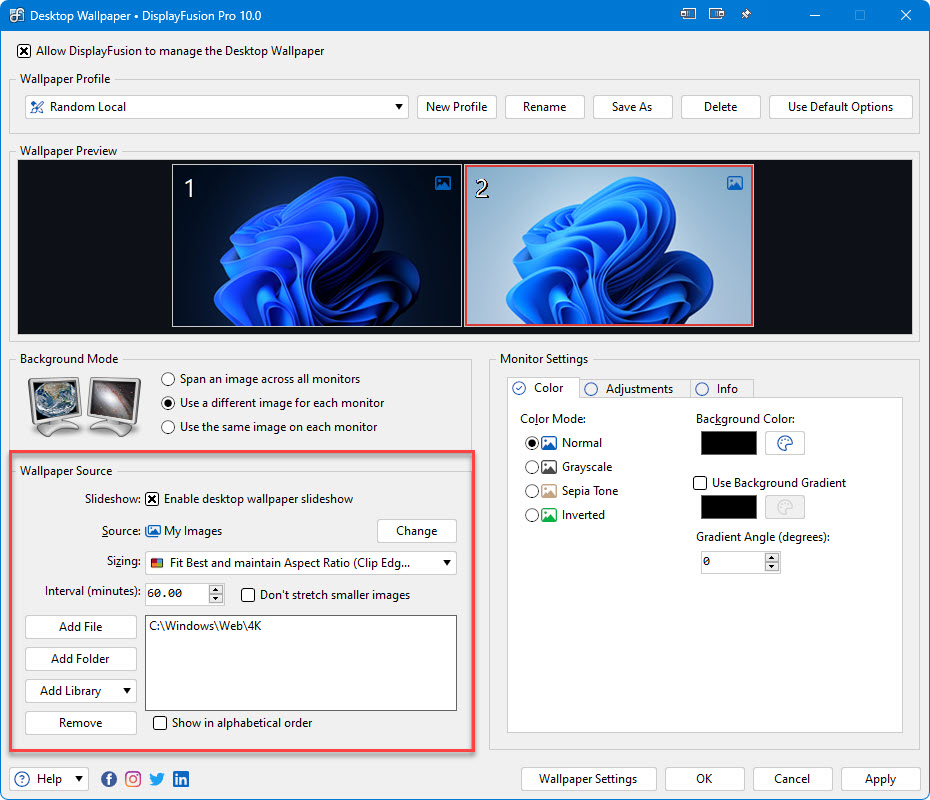
The Wallpaper Source options allow you to choose whether you would like to use a solid colour as your wallpaper, a website, videos from your local computer, or choose images from your local computer or various online sources. After choosing the wallpaper source, you can configure the various options available for the selected source.
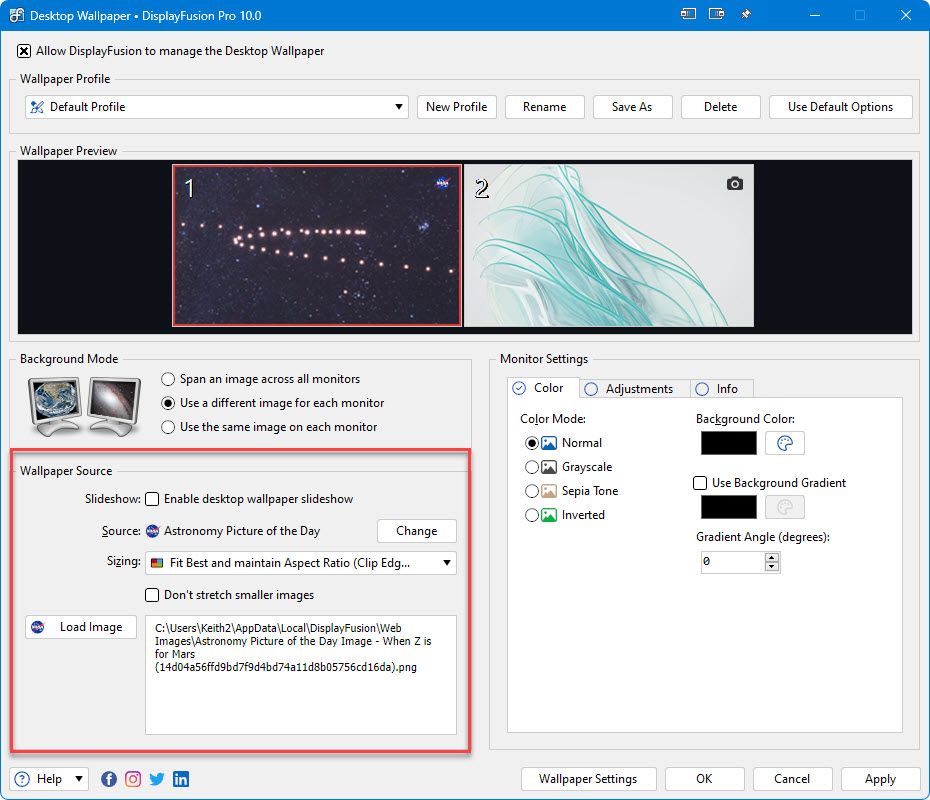
- Source: Clicking the "Change" button allows you to choose where DisplayFusion will load the images from:
- Solid Colour: Sets the wallpaper to a solid colour of your choice
- My Images: Use a single image or load random images from your computer
- My Videos: Use a single video or load random videos from your computer
- Website: Use a website loaded from a URL, or local HTML file on your computer
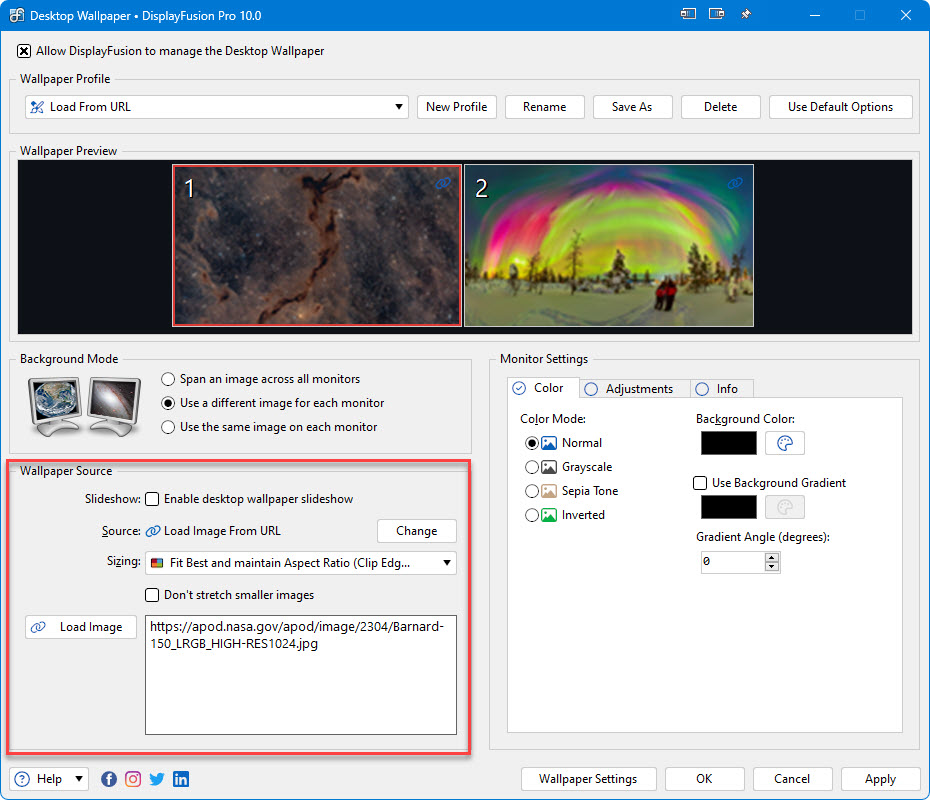
- Load From URL: Load a single image or reload from a URL on a timer
- Online Image Providers Load images from WallpaperFusion, Bing, deviantART, Digital Blasphemy, Flickr, Google, Imgur, InterfaceLift, Vladstudio, Zenfolio and many more!
- Change: Click this button to choose the wallpaper source. You can choose from various options like local images, local videos, and many online image providers.
- Enable desktop wallpaper slideshow: Enable this option to have DisplayFusion randomly choose images from the selected wallpaper source.
- Sizing: Allows you to specify how DisplayFusion should size the image.
- Centre: Centres the image in the monitor's dimensions. May leave gaps along the edges if it isn't an exact fit.
- Stretch: Stretches the image to fit the monitor's dimensions. May distort the image.
- Fit Best and Maintain Aspect Ratio (No Clipping): Scales the image without distorting it to fill the monitor, without clipping any image edges. May leave gaps along the edges if it isn't an exact fit.
- Fit Best and Maintain Aspect Ratio (Clip Edges): Scales the image without distorting it to fill the monitor and clips the image's edges to fill the monitor completely.
- Fit Width and Maintain Aspect Ratio: Scales the image so that the width of the image equals the monitor's width. May leave gaps along the top/bottom sides if the image isn't an exact fit.
- Fit Height and Maintain Aspect Ratio: Scales the image so that the height of the image equals the monitor's height. May leave gaps along the left/right sides if the image isn't an exact fit.
- Tile: Puts the image into the top-left corner and repeats the image over and over until the monitor is filled.
- Don't stretch smaller images: This setting will allow DisplayFusion to scale larger images to fit the screen, but it will centre smaller images so that they aren't blown up.
- Interval (minutes): The amount of time (in minutes) between wallpaper changes.
When you choose a wallpaper source, but leave the "Enable desktop wallpaper slideshow" option disabled, you can select a single image from your chosen wallpaper source to use as your desktop wallpaper.
- Load Image: Click this button to choose the image you would like to use as your wallpaper.
- Image: Displays the currently loaded image's filename.
When "My Images" is chosen as the wallpaper source, and the "Enable desktop wallpaper slideshow" option is enabled, you will see the screen below. You can add folders and/or files from your computer to the list of images that DisplayFusion will randomly choose from.
- Add File: Browse for an image file to add to the random rotation list.
- Add Folder: Browse for a folder to add to the random rotation list (sub-folders are included by default).
- Add Library: Browse for a Windows Library to use as the wallpaper source.
- Show in alphabetical order: Shows the images in alphabetical order, instead of randomly.
When an online provider such as Vladstudio is chosen as the wallpaper source, and the "Enable desktop wallpaper slideshow" option is enabled, you will see the screen below. You can use the "Get Settings" button to adjust the criteria that DisplayFusion will use when choosing images from the source.
When you choose the Load from URL source, you can specify a website URL to load images from. If you'd like DisplayFusion to update the wallpaper on an interval using that URL, you can also enable the "Enable desktop wallpaper slideshow" checkbox and specify the interval at which DisplayFusion should refresh the image.
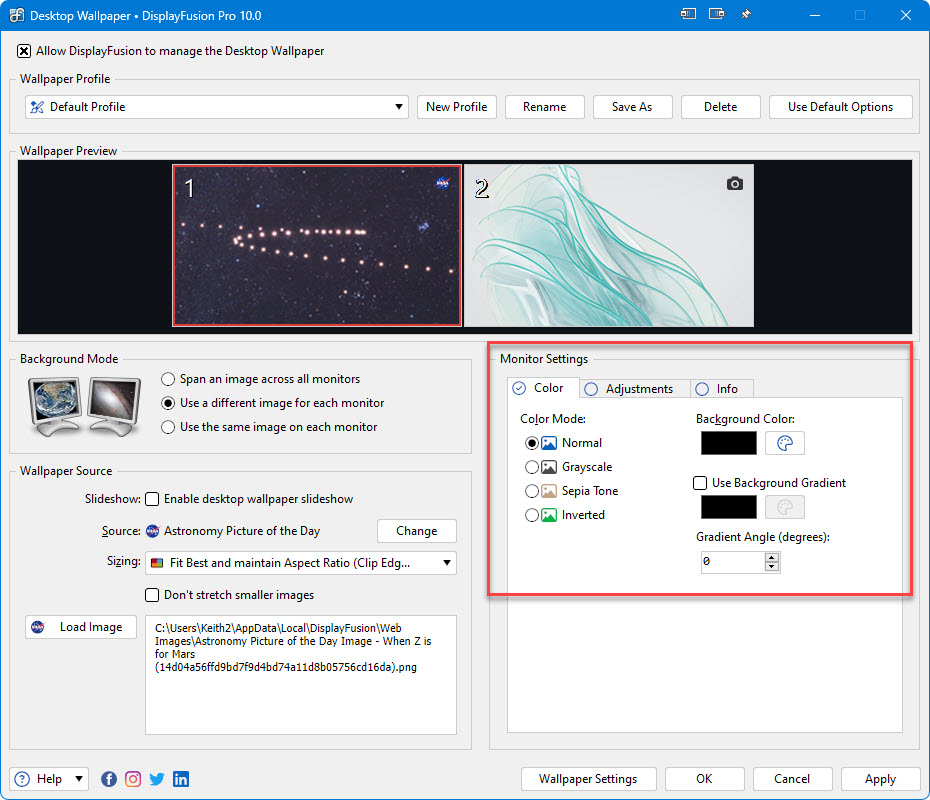
The Colour tab allows you to choose from various colour modes (Normal, Grayscale, Sepia Tone, Inverted), and also allows you to set the background colour that should be used when a wallpaper does not fill the screen. If you select "Solid Colour" as the image source, the background colour on this tab will be used.
- Colour Mode: Allows you to modify an image's colours
- Normal: Displays the image using it's normal colours
- Greyscale: Converts the image into a greyscale image
- Sepia Tone: Converts the image into a sepia toned image (brownish colours)
- Inverted: Inverts the image colours
- Background Colour: This is the background colour that will be used if the image doesn't fill the monitor completely.
- Use Background Gradient: Enabling this will set the background around the image to a two colour linear gradient.
- Gradient Angle (degrees): The amount (0-360) to rotate the gradient by.
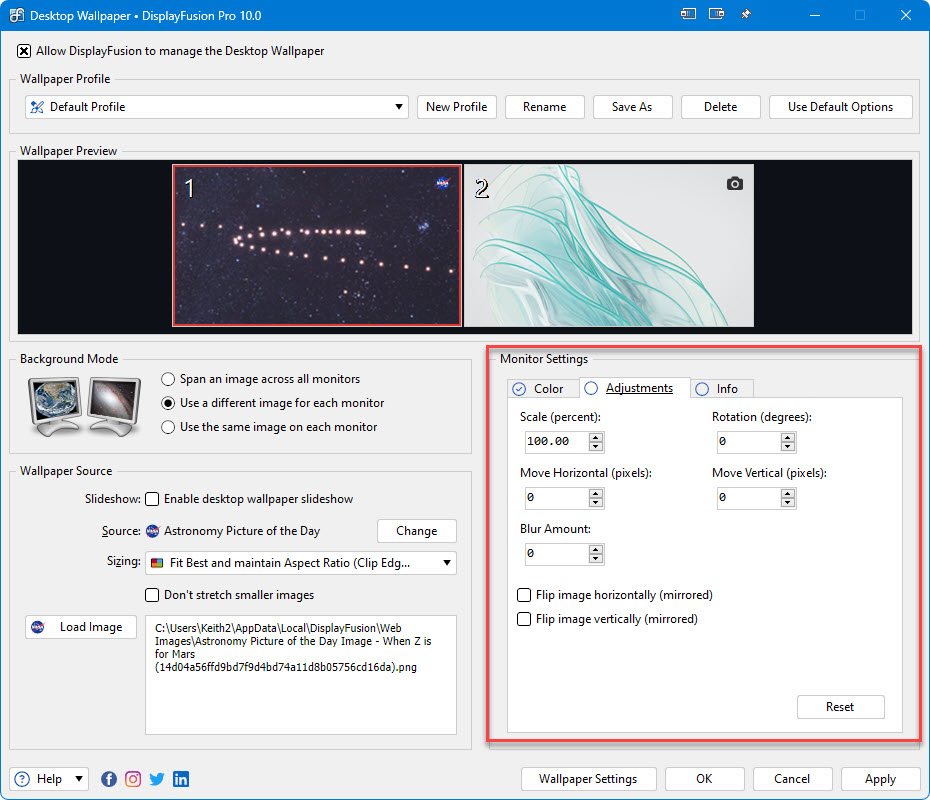
The wallpaper adjustments allow you to modify the size, location, and rotation of the image. You can also flip the image horizontally or vertically, and blur the image.
- Scale (percent): The amount to scale the original image by. Negative values will shrink the image. Positive values will enlarge the image.
- Rotation (degrees): The amount of rotation (0-360) to apply to the image.
- Move Horizontal (pixels): The amount (in pixels) to move the image left or right. Negative values move the image to the left, positive values move the image to the right.
- Move Vertical (pixels): The amount (in pixels) to move the image down or up. Negative values move the image down, positive values move the image up.
- Blur Amount: Sets the amount of blur to be used when processing the image.
- Flip image horizontally (mirrored): Mirrors the image horizontally.
- Flip image vertically (mirrored): Mirrors the image vertically.
- Reset: Resets the positioning to the defaults (all 0's).
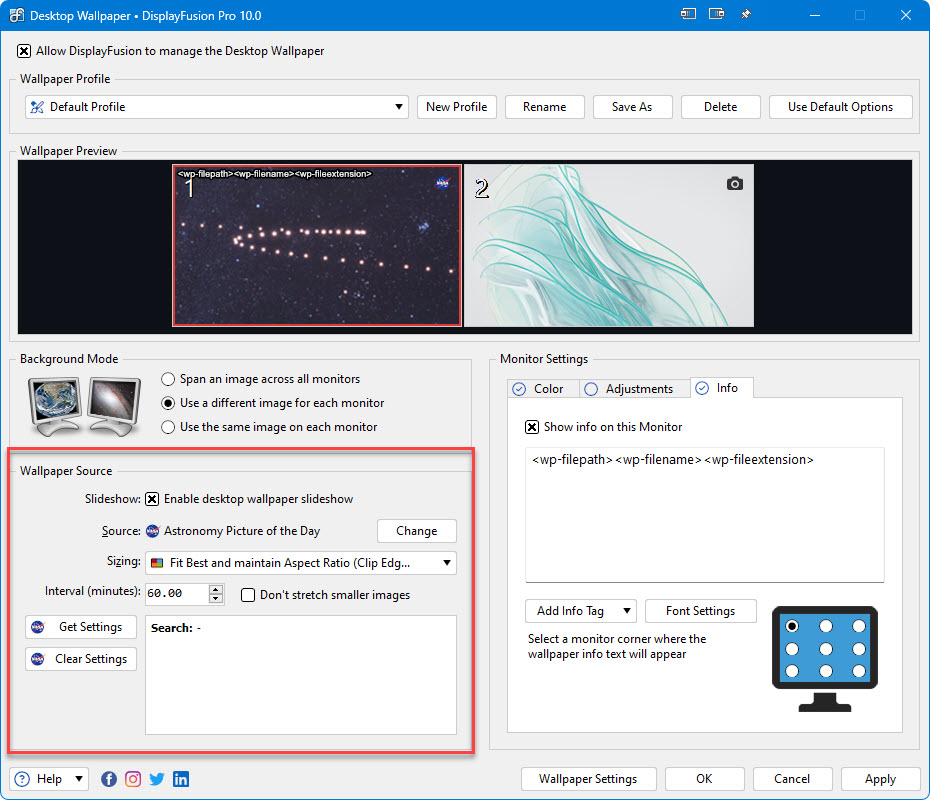
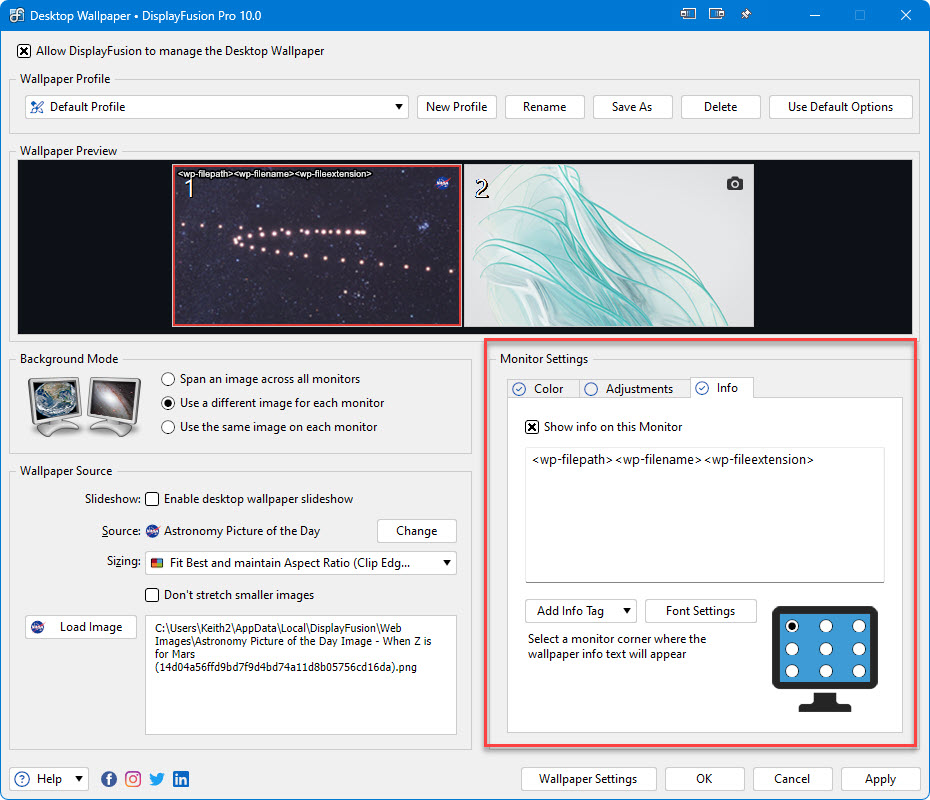
The Info tab allows you to specify text that you would like displayed on top of the wallpaper on each screen. This text can be manually entered, or you can add Info Tags that will display text dynamically based on the context. You can set the position of the Image Info text by selecting one of the radio buttons inside the monitor icon on the lower-right side of the Info tab.
- Show info on this Monitor: Enabling this will allow you to add Image Info text to the selected monitor.
- Add Info Tag: Adds a predefined tag that will display text dynamically based on the context.
- Font Settings: Allows you to customize the font family, size, style, and colours for the Image Info text.
Right-click any monitor displayed at the top of the Wallpaper window to show this context menu. From here, you can load or clear images, as well as copy or swap settings from other monitors.
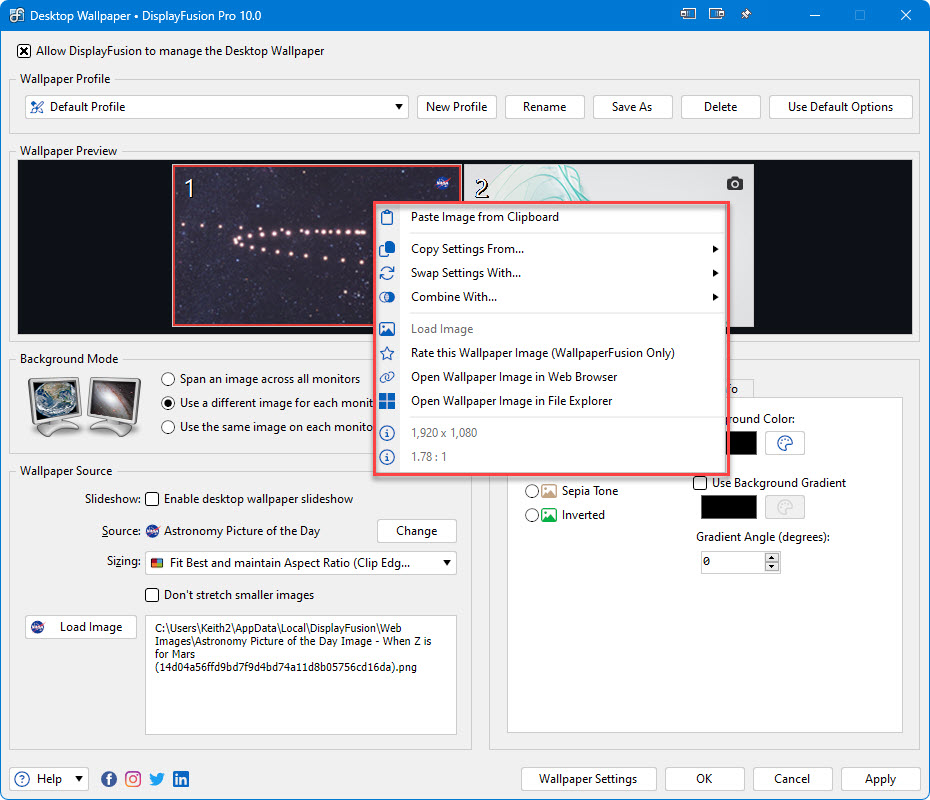
- Paste Image from Clipboard: Sets the image currently in the clipboard as the desktop wallpaper.
- Copy Settings From: Allows you to copy all of the wallpaper settings and adjustments from another monitor.
- Swap Settings With: Exchanges the wallpaper settings and adjustments of the selected monitor with the wallpaper settings and adjustments of another monitor.
- Combine With: Combines the monitor with the selected monitor for the purposes of spanning the wallpaper across both monitors. This is used when the "Different Image for Each Monitor" background mode is selected, and allows you to span a wallpaper across some monitors, while using a different wallpaper on other monitors. How To: Wallpaper Combining
- Load Image: Shows the open file dialog, allowing you to choose the image to use as the desktop wallpaper.
- Rate this Wallpaper Image (WallpaperFusion Only): Allows you to rate WallpaperFusion images from inside DisplayFusion.
- Open Wallpaper Image in Web Browser: Opens the selected wallpaper image in your web browser, if the image was loaded from an online wallpaper source.
- Open Wallpaper Image in File Explorer: Opens the selected wallpaper image in Windows Explorer so you can copy, delete or do whatever else with the image file.
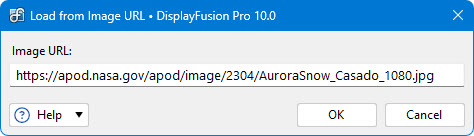
This option allows you to directly specify the URL of the image you'd like to use as your wallpaper.
- Image URL: Allows you to specify the website address of the image to set as the desktop wallpaper.
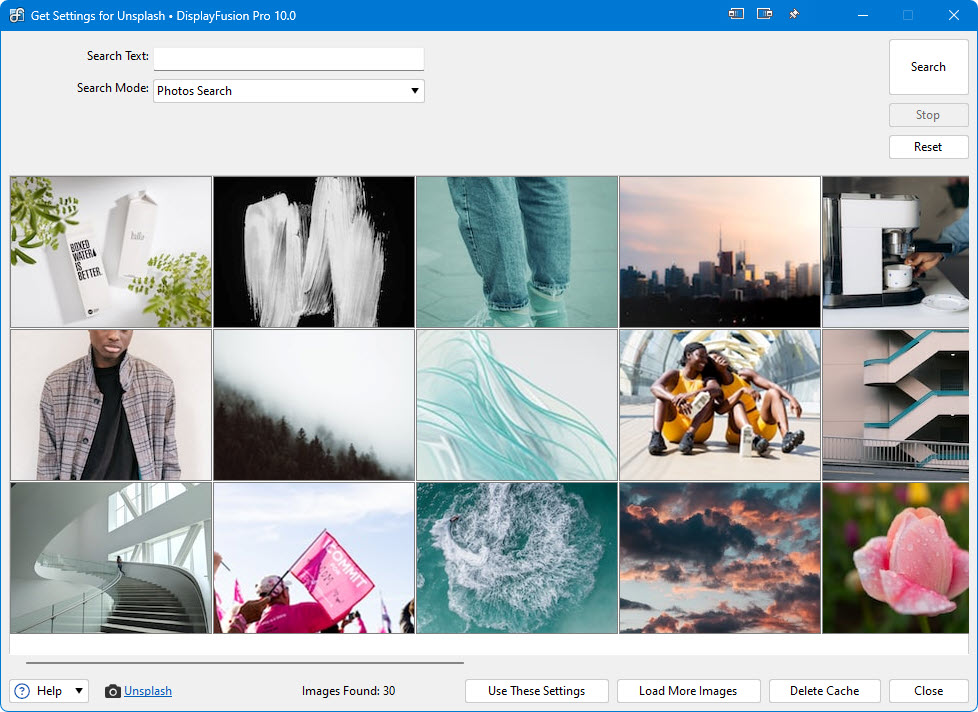
This window allows you to search for images in any of the online providers included in DisplayFusion (Flickr, Vladstudio, Google Image Search, deviantArt, Digital Blasphemy, Imgur, Unsplash, and many more online providers).
The various online providers may include options in addition to searching, such as category selection, safe search filters, and more.
- Search: Starts the image search using the entered criteria.
- Stop: Stops the currently running search.
- Use These Settings: Saves the currently entered search criteria for automatic random image loading.
- Reset: Resets all search criteria.
- Load More Images: Loads more images in the search results if they are available.
Various wallpaper settings are available on this window. Everything from pausing the random wallpaper changer while your computer is running on battery, to having DisplayFusion keep or delete the temporarily downloaded images from online providers.
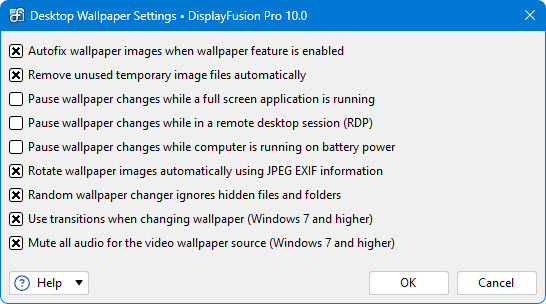
- Autofix wallpaper images when wallpaper feature is enabled: Disables this feature will prevent DisplayFusion from automatically fixing your desktop wallpaper if it needs to be adjusted.
- Remove unused temporary image files automatically: This setting will delete any previously downloaded images from the random wallpaper changer (Flickr, Vladstudio, Google Image Search, deviantArt, and other online providers) when that image is no longer being used by DisplayFusion - this setting won't delete any of your images
- Pause wallpaper changes while a full screen application is running: This setting will prevent DisplayFusion from adjusting the wallpaper or downloading new random images while a full screen application (game, video… etc) is running.
- Pause wallpaper changes while in a remote desktop session (RDP): This setting will prevent DisplayFusion from adjusting the wallpaper or downloading new random images while someone is connected to the computer in an RDP (Remote Desktop) session.
- Pause wallpaper changes while computer is running on battery power: This setting will prevent DisplayFusion from adjusting the wallpaper or downloading new random images while your computer is running on battery power.
- Rotate wallpaper images automatically using JPEG EXIF information: This setting allows DisplayFusion to automatically rotate images using the orientation setting contained in the image's JPEG EXIF information.
- Random wallpaper changer ignores hidden files and folders: This setting will force DisplayFusion to not use any hidden image files while using the random wallpaper changer.
- Use transitions when changing wallpaper (Windows 7 and higher): This setting allows DisplayFusion to gradually fade in a new desktop wallpaper. (Windows 7 only)
- Mute all audio for the 'My Videos' Wallpaper Source (Windows 7 and higher): Makes the "My Videos" wallpaper source play the videos without any sound.
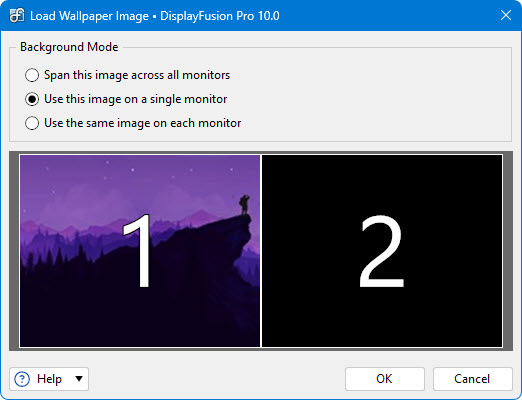
This dialog will be shown when using the "Download with DisplayFusion" option on
WallpaperFusion. After selecting the wallpaper settings in this window, the full DisplayFusion Desktop Wallpaper window will be shown where you can further customize the settings before applying them.
- Span this image across all monitors: Select this option to have the downloaded wallpaper span all monitors.
- Use this image on a single monitor: Select this option, then choose a monitor to display the downloaded wallpaper on.
- Use the same image on each monitor: Select this option to have the downloaded wallpaper display separately on all monitors.
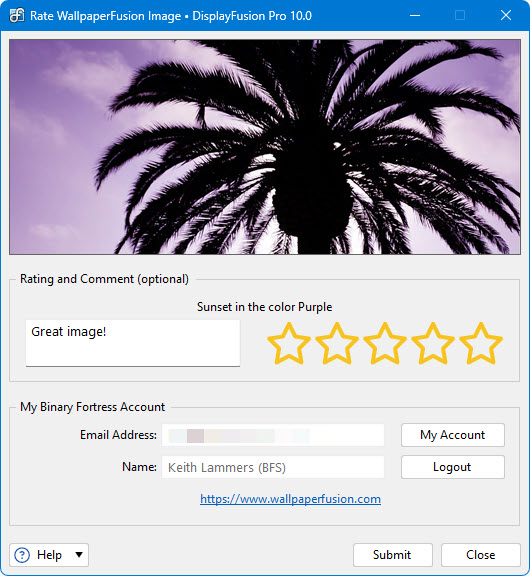
This window allows you to rate and comment on the currently displayed WallpaperFusion image. You can access this window by right-clicking the desktop on a monitor configured to use WallpaperFusion, and navigating to DisplayFusion > Rate this Wallpaper Image. Alternatively, you can access it by right-clicking the monitor configured for WallpaperFusion in the DisplayFusion Desktop Wallpaper window. Note that this will also work for the "Current Time of Day" and "Current Weather" wallpaper sources, as they pull their images from WallpaperFusion as well.
- Rating and Comment (optional): This box allows you to select a rating, using the 5-star rating system, and optionally enter a comment as well.
- Submit: Click this button to submit your rating and comments for the WallpaperFusion image.
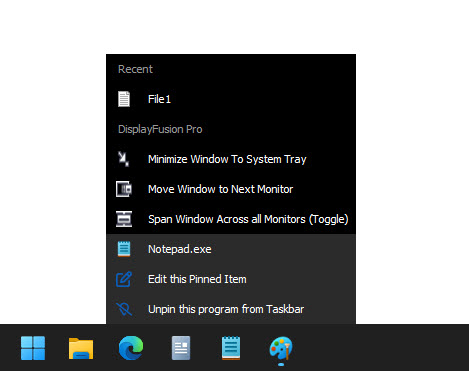
This is the Jump List menu that gets shown when you right-click a DisplayFusion Taskbar button.
- Pin this program to Taskbar: Pins the selected application to the taskbar.
- Unpin this program from Taskbar: Unpins the selected application from the taskbar.
- Edit this Pinned Item: Edits the pinned item's details.
- Close Window: Closes the selected window.
This window allows you to configure your monitors, including screen resolution, colour depth, orientation, and the monitor position. You can also save the configuration as a Monitor Profile to be loaded at a later time.
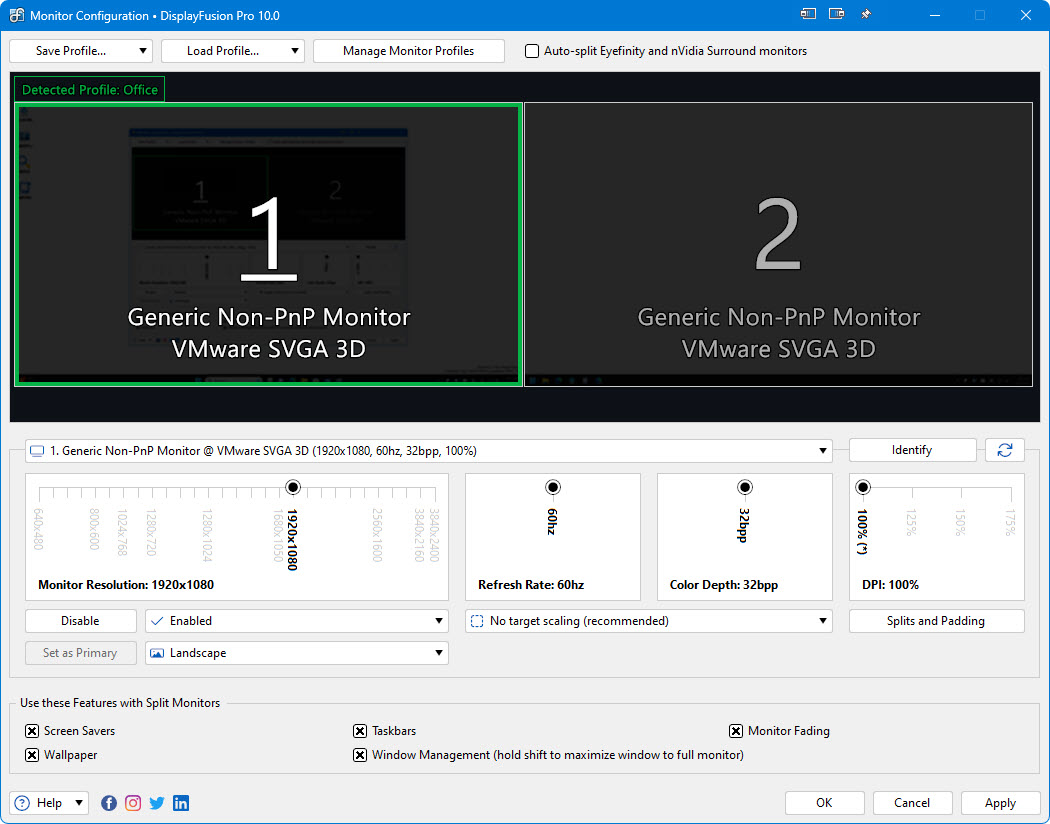
- Save Profile: Saves the current Monitor Configuration to a profile that can be easily loaded at a later time.
- Load Profile: Loads a previously saved Monitor Profile.
- Manage Monitor Profiles: Opens the Manage Monitor Profiles window, where you can rename, delete, and assign Wallpaper Profiles and HotKeys to your saved Monitor Profiles.
- Auto-split Eyefinity and nVidia Surround monitors: Select this checkbox to have DisplayFusion automatically determine the number of splits based on your Eyefinity/Surround screen resolution. If the splits are not detected, you can still manually specify them using the Horizontal Split and Vertical Split options.
- Identify: Displays the monitor ID for each monitor on their respective screen.
- Monitor Resolution: Sets the selected monitor's screen resolution.
- Refresh Rate: Sets the selected monitor's refresh rate. Please note that for LCD monitors in most cases, this setting does not need to be modified.
- Colour Depth: Sets the selected monitor's colour depth.
- Set as Primary: Sets the selected monitor as the primary monitor.
- Orientation: This option allows you to specify whether the selected monitor should be configured in a portrait or landscape orientation.
- No target scaling (recommended): If you're having trouble applying a monitor configuration, you can try setting different values in this dropdown. Some monitors may require a specific value from this option.
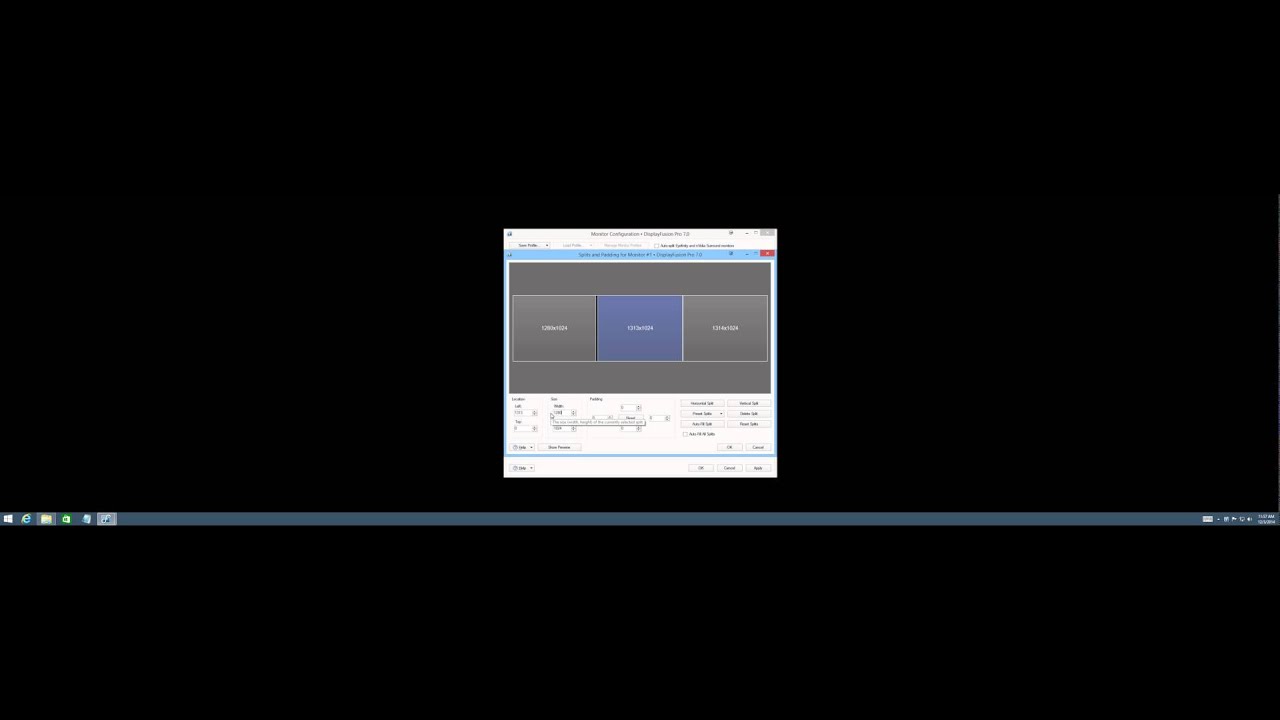
- Splits and Padding: Click this button to open the Splits and Padding configuration for the selected monitor. The Splits and Padding window allows you to divide the monitor up into several smaller virtual monitors. Note: It's not currently possible to constrain full screen videos or full screen games to monitor splits.
- Screen Savers: Enable this option to have DisplayFusion run separate screen savers on each monitor split.
- Taskbars: Enable this option to have DisplayFusion put a separate taskbar on each monitor split.
- Wallpaper: Enable this option to have DisplayFusion use a different wallpaper on each monitor split.
- Window Management (hold shift to maximize window to full monitor): Enable this option to have DisplayFusion Functions, and window maximizing treat each monitor split as a separate monitor.
The Splits and Padding feature allows you to split a physical monitor into smaller virtual monitors that have their own taskbar, wallpaper, and screen saver. Application windows will also maximize within the splits, rather than the entire physical monitor.
Note: It's not currently possible to constrain full screen videos or full screen games to monitor splits.
You can use the Preset Splits button to choose from various symmetrical split layouts, and then tweak the settings further if you like. It's possible to adjust the splits to work with bezel corrected Surround/Eyefinity setups as well. For more information on that, see the following guide:
Configuring Monitor Splits for Bezel Correction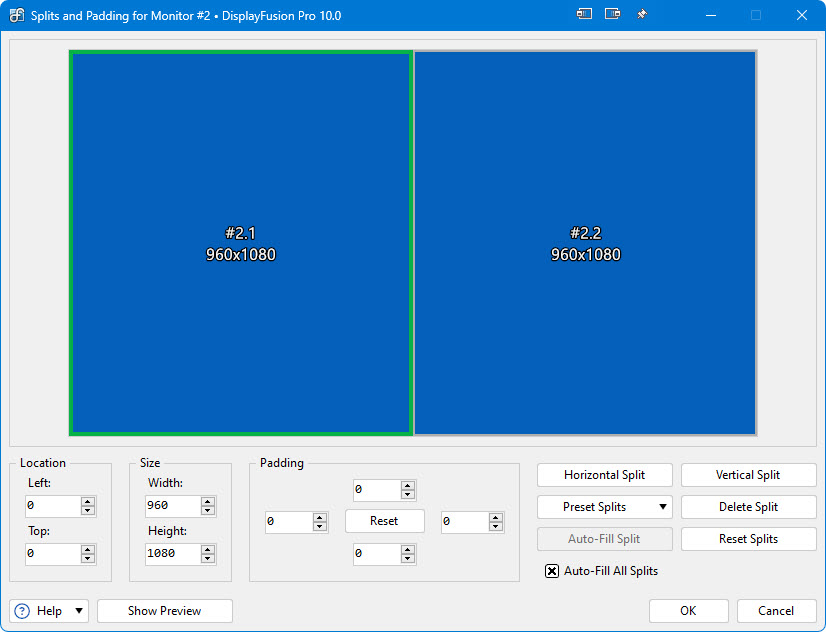
- Location: The Left and Top options in the Location group allow you to set the location of the selected split. This is generally only used when setting up asymmetrical splits, or when setting up splits for bezel corrected Surround/Eyefinity resolutions.
- Left: Sets the X offset (in pixels) of the selected split. For example, 0 would be the left edge of the physical monitor.
- Top: Sets the Y offset (in pixels) of the selected split. For example, 0 would be the top edge of the physical monitor.
- Size: The Width and Height options in the Size group are used for setting the size of the selected split.
- Width: Sets the width (in pixels) of the selected split.
- Height: Sets the height (in pixels) of the selected split.
- Padding: The four options in the Padding group are for setting the top, left, right, and bottom padding values of the selected split. Maximized windows and the taskbars will respect the padding values, but the desktop wallpaper will use the full size of the split.
- Reset: Sets all padding values back to 0 for the selected split.
- Horizontal Split: Splits the currently selected split in half, horizontally, giving you a split on the left, and a split on the right.
- Vertical Split: Splits the currently selected split in half, vertically, giving you a split on the top, and a split on the bottom.
- Preset Splits: Allows you to select from various standard split layouts.
- Delete Split: Deletes the currently selected split.
- Auto-Fill Split: Expands the current split horizontally and vertically to fill any available space.
- Reset Splits: Removes all splits for the monitor that you're currently editing.
- Auto-Fill All Splits: When this setting is enabled, other splits adjacent to the selected split will be resized automatically when resizing the selected split.
- Show Preview: Toggles a preview that overlays your monitors, so that you can see the effect your changes to the split configuration in real-time. This is especially handy when setting up splits for bezel corrected NVIDIA Surround and AMD Eyefinity setups.
This window allows you to rename, delete, and assign Wallpaper Profiles and HotKey combinations to your saved Monitor Profiles.
Upgrade to DisplayFusion Pro to create Monitor Profiles.
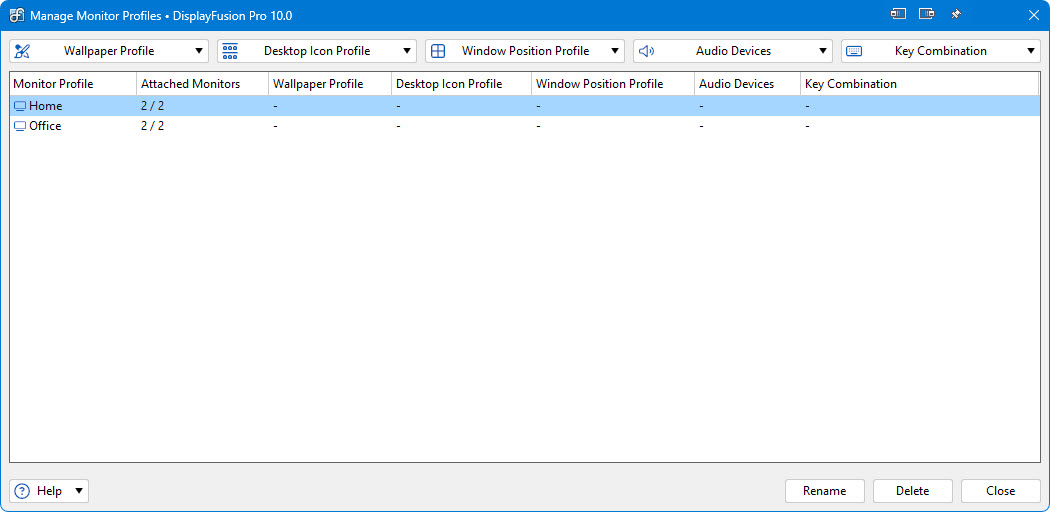
- Wallpaper Profile: Allows you to assign a Wallpaper Profile to be automatically loaded when the selected Monitor Profile is detected or loaded.
- Desktop Icon Profile: Allows you to assign a Desktop Icon Profile to be automatically loaded when the selected Monitor Profile is detected or loaded.
- Window Position Profile: This button will open a drop-down menu allowing you to assign a Window Position Profile to the selected Monitor Profile. When the Monitor Profile is loaded or detected, the Window Position Profile will be loaded automatically.
- Audio Devices: Allows you to assign an audio device to set as default when the selected Monitor Profile is detected or loaded.
- Key Combination: Allows you to set or clear a HotKey combination for the selected Monitor Profile.
- Rename: Allows you to rename the selected Monitor Profile.
- Delete: Deletes the selected Monitor Profile.
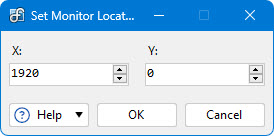
This window allows you to manually specify the X and Y location values for the selected monitor. You can access this window by right-clicking the monitor you want to edit the location for. Note that it is not possible to set the location to something that would not share at least part of an edge with another monitor.
- X: This value sets the horizontal location of the monitor, relative to the top-left corner of the primary monitor.
- Y: This value sets the vertical location of the monitor, relative to the top-left corner of the primary monitor.
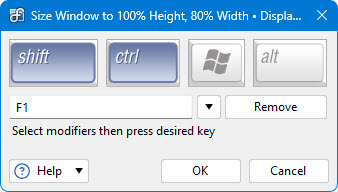
This window allows you to set or edit the key combination that is assigned to a Function. This window can be accessed from the Functions tab in the DisplayFusion Settings, as well as from the Manage Monitor Profiles window.
You can use the Settings window to control all the different functions of DisplayFusion. You can create your own Functions or TitleBar Buttons, configure your proxy settings, adjust how your multi-monitor taskbar looks and much more.
To open the Settings window:
- Right-click on the DisplayFusion System Tray icon and select Settings
- Right-click on any DisplayFusion Taskbar and select Settings
- Right-click on any DisplayFusion TitleBar Buttons and select Settings
- Right-click on the Desktop and select DisplayFusion > Settings
- Navigate to Start > All Programs > DisplayFusion > DisplayFusion Settings
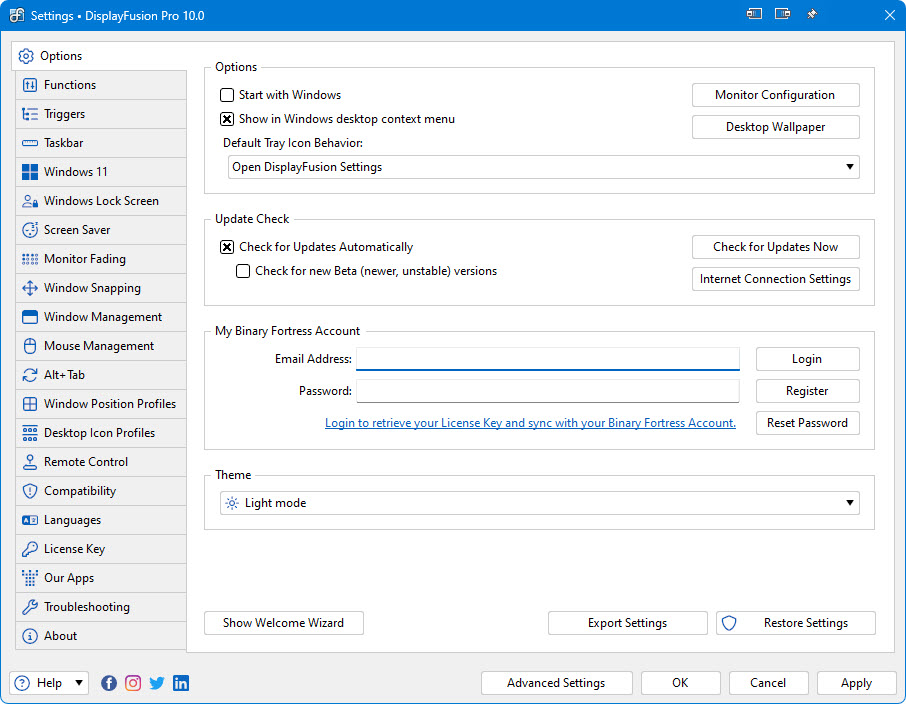
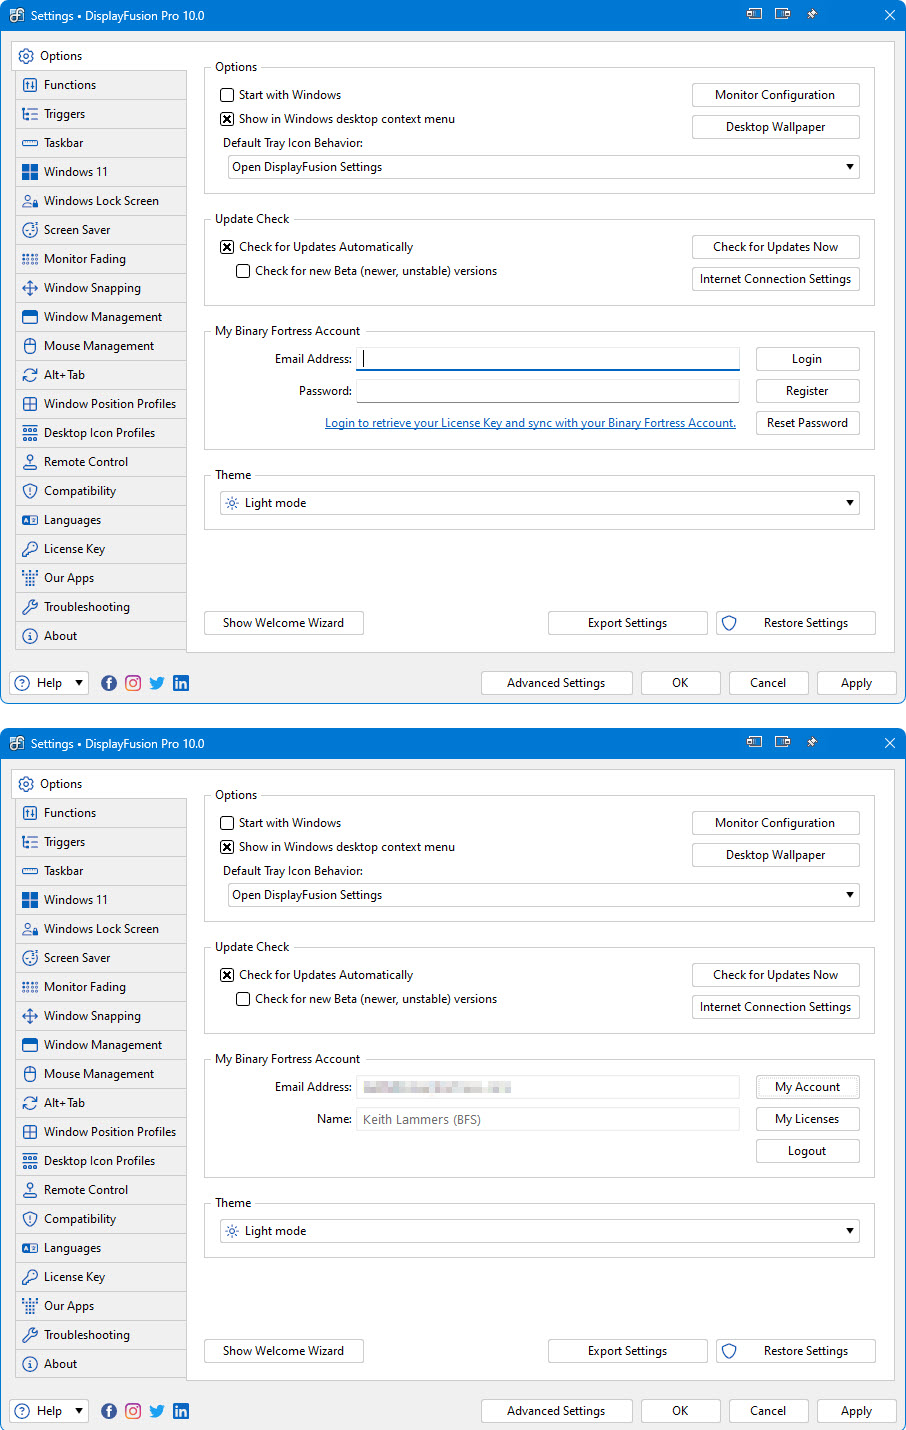
This tab in the Settings window allows you to log onto your Binary Fortress account, check for program updates, and modify application settings.

- Start with Windows: Enable this to have DisplayFusion start when you turn your computer on.
- Show in Windows desktop context menu: Enables the DisplayFusion Desktop Wallpaper, DisplayFusion Monitor Configuration, and DisplayFusion Settings items to be shown in the right-click context menu for the Desktop.
- Default Tray Icon Behaviour: This drop-down allows you to choose what will happen when you left-click the DisplayFusion tray icon. All of the Functions from the Settings > Functions tab are available, including ones like "Open DisplayFusion Settings," found in the "DisplayFusion Functions" section of the drop-down.
- Monitor Configuration: Opens the Monitor Configuration window.
- Desktop Wallpaper: Opens the Desktop Wallpaper window.
- Show Welcome Wizard: Opens the Welcome Wizard that normally only shows after the first installation. The Welcome Wizard gives you a quick overview of DisplayFusion's popular features.
- Restore nVidia Files: If you've previously enabled Monitor Splitting and answered "Yes" to the prompt for disabling conflicting nVidia processes, you can restore the nVidia processes by clicking this button.
- Check for Updates Automatically: Enable this to let this application periodically check for updates.
- Check for new Beta (newer, unstable) versions: Enable this to let this application check for new Beta versions. This setting is not recommended unless you are interested in testing new software.
- Check for Updates Now: Perform an update check right now.
- Internet Connection Settings: Click this button to open the proxy settings window.
- Export Settings: Click this button to export your current application settings to a .REG file. You can use this backup file to import your settings to another machine, or use it to restore your settings if you are re-installing your machine.
- Restore Settings: Allows you to restore your settings from a previously created backup.
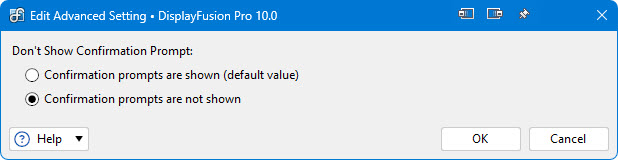
- Advanced Settings: Click this button to open the Advanced Settings window.
In the "My Binary Fortress Account" section, you can enter your email address and password to enable easy retrieval of your license key.
- Email Address: Enter the email address for your Binary Fortress Account here.
- Password: Enter the password for your Binary Fortress Account here.
- Login: Enter your email address and password, then click this button to login to your Binary Fortress Account. Once logged in, you can retrieve your license key if needed.
- Register: If you don't already have a Binary Fortress Account, click this button to open the registration page.
- Reset Password: If you've forgotten your password, click this button to open the password reset page.
- Name: When logged in, the name on your account shows here.
- My Account: Click this button to access your account page on the our website.
- My Licenses: Click this button to view and apply your license key.
- Logout: Click this button to logout of your Binary Fortress Account. No items will be synced while logged out.
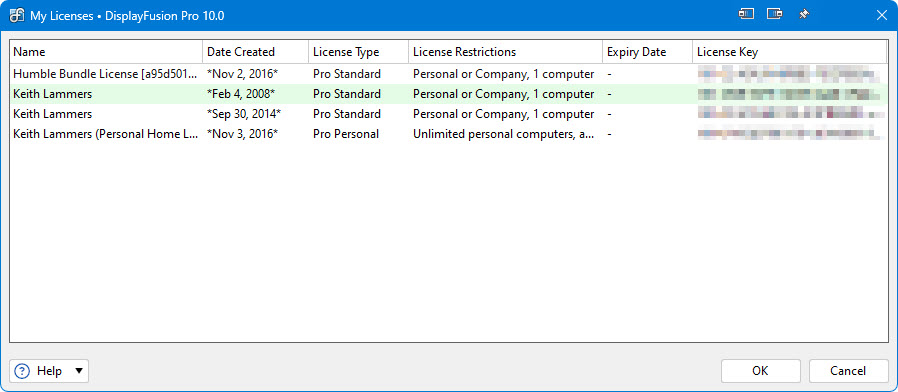
The My Licenses dialog allows you to view and load any license keys that are applicable for this product. If you don't see your purchased license listed, please contact us and we'll help track it down. This dialog can be accessed via the My Licenses button on the Settings > Options tab (when logged in).
- Name: This column displays the name of the user associated with the license.
- Date Created: This column lists the date that each of your licenses was created.
- License Type: This column lists the license type for each of your licenses.
- License Restrictions: This column explains the restrictions for the license type of each of your licenses.
- Expiry Date: This column lists the expiry date (if applicable) for each of your licenses.
- License Key: This column displays the license key.
The Functions tab allows you to add, modify, or remove Functions. Functions can be run on Windows, toggle DisplayFusion features, or perform system actions, such as starting the screen saver. You can assign key combinations to Functions, add Functions as TitleBar Buttons, and add Functions as entries in the Taskbar Jump Lists. Note: The built-in Functions cannot be deleted.
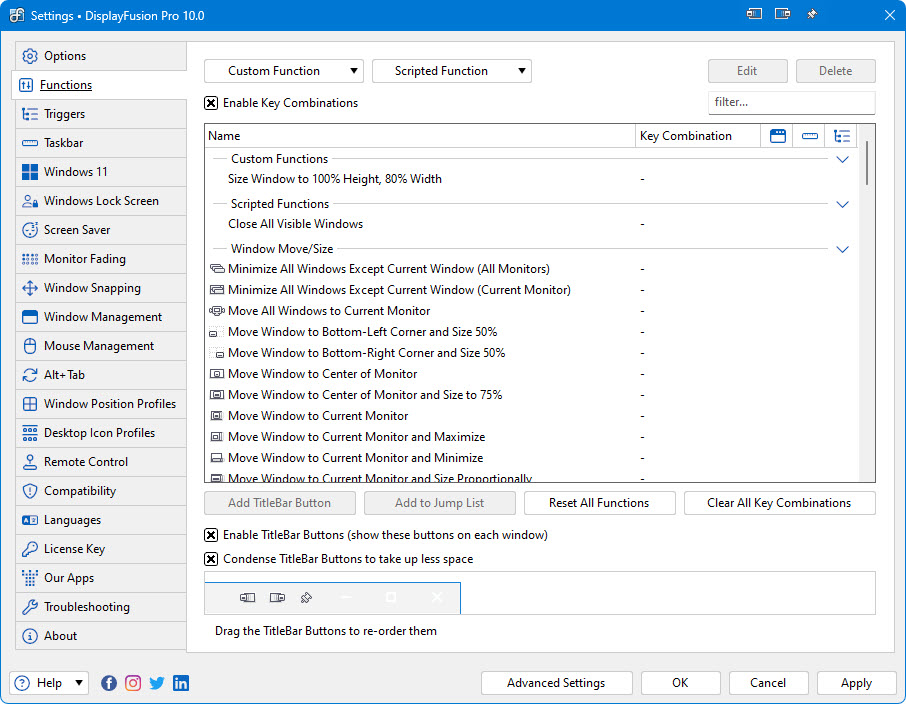
- Custom Function: Click this button to create, export, or import a Custom Function.
- Add Custom Function: Choose this menu item to add a new Custom Function. This will open the Edit Function dialog.
- Export Custom Function: Choose this menu item to export the selected Custom Function to a file. You can copy the file to another computer and import it with the Import Custom Function menu item.
- Import Custom Function: Choose this menu item to import a Custom Function from a file.
- Scripted Function: Click this button to show the menu of options that you can perform on Scripted Functions.
- Add Scripted Function: Click this button to add a new Scripted Function.
- Download Scripted Function: Click this button to open the list of pre-made Scripted Functions that you can download.
- Export Scripted Function: Click this button to export the selected Scripted Function to a file.
- Import Scripted Function: Click this button to import a Scripted Function from a file.
- Edit: Click this button to edit the selected Function.
- Delete: Click this button to delete the selected Function.
- Enable Key Combinations: This setting enables or disables the key combinations associated with each function. This provides an easy way to toggle all key combinations without removing each Function's key combination.
- Name: Shows the Function's name.
- Key Combination: Shows the Function's assigned Key Combination, if assigned.
- Show in TitleBar Buttons: This column shows a green dot if the Function is enabled for TitleBar Buttons.
- Show in Jump Lists: This column shows a green dot if the Function is enabled in the Jump Lists on the DisplayFusion Multi-Monitor Taskbars.
- Used by Triggers: This column shows a green dot if the Function is selected as an Action in any Trigger rules.
- Add TitleBar Button: If the selected function is not currently enabled as a titlebar button, click this button to enable it.
- Remove TitleBar Button: If the selected function is currently enabled as a titlebar button, click this button to disable it.
- Add to Jump List: If the selected function is not currently enabled for taskbar jump lists, click this button to enable it.
- Remove from Jump List: If the selected function is currently enabled for taskbar jump lists, click this button to disable it.
- Reset All Functions: Resets all Functions to the defaults. Note that any custom Functions will remain intact, they will only have their key combinations, TitleBar Button assignment, and Jump List assignment removed.
- Clear All Key Combinations: Removes the key combinations from all Functions on the Settings > Functions tab.
- Enable TitleBar Buttons (show these buttons on each window): Toggle the TitleBar Buttons feature on and off.
- Condense TitleBar Buttons to take up less space: This forces the TitleBar Buttons to be narrower on some versions of Windows to save space.
- Edit TitleBar Button: This button shows up when a TitleBar Button is clicked in the editor below the Functions list. Clicking it will allow you to edit the TitleBar Button Image.
- Delete TitleBar Button: This button shows up when a TitleBar Button is clicked in the editor below the Functions list. Clicking it will remove the TitleBar Button.
- Add Separator (right-side): This button shows up when a TitleBar Button is clicked in the editor below the Functions list. Clicking it will add a space to the right side of the selected TitleBar Button.
- Delete Separator (right-side): This button shows up when a TitleBar Button is clicked in the editor below the Functions list. Clicking it will remove the space from the right side of the selected TitleBar Button.
If you are editing a default Function, most of these fields will be unavailable.
Upgrade to DisplayFusion Pro to create your own custom Function to use all of these fields.
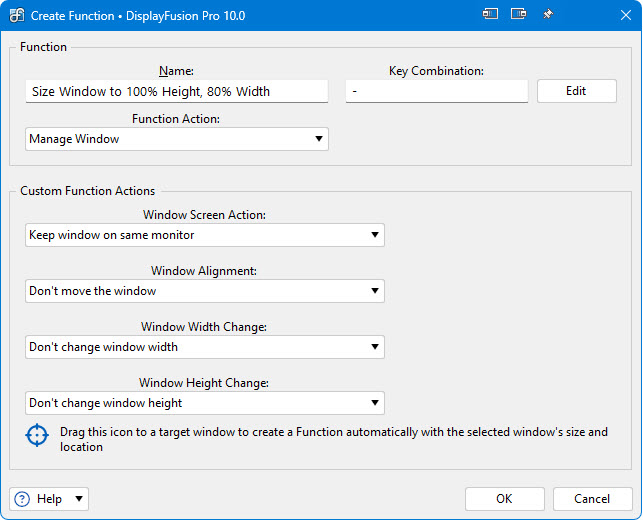
- Name: Give your Function a name.
- Key Combination: Shows the currently assigned key combination for this Function. Click the Edit button to add or modify the key combination.
- Edit: Allows you to set a key combination that will trigger the Function when pressed.
- Function Action: This controls what type of Function this will be. You can manage windows, load wallpaper profiles, toggle window transparency, move the mouse cursor, or launch an application.
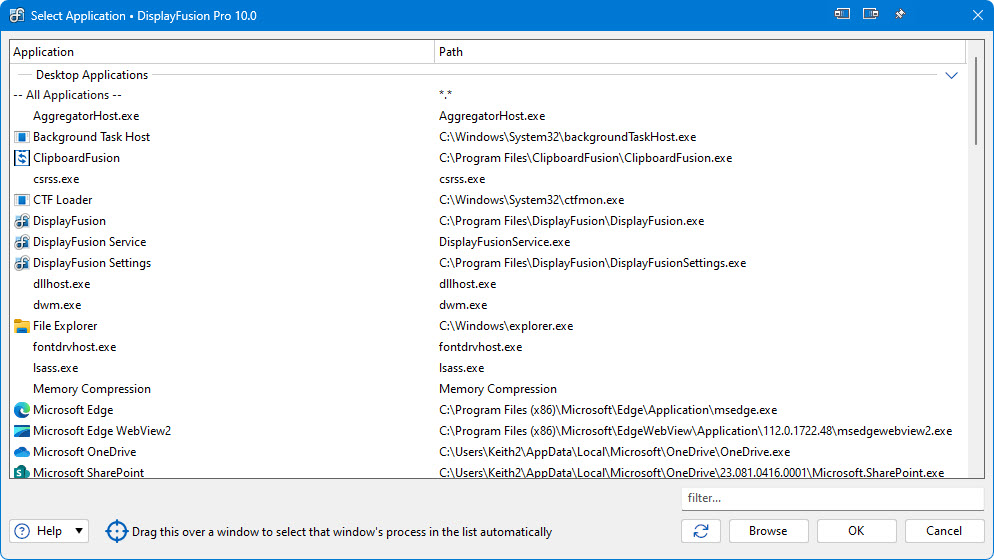
- Application: Enter the full path to your application in this text box. Alternatively, you can use the Select Application button to have this box automatically populated by choosing a running application.
- Select Application: Allows you to select a currently running application, or browse for an installed application.
- Application Parameters: Enter the command line parameters that should be added when running this application. This text box is optional.
- Transparency (100=solid): If you selected "Toggle Window Transparency" from the "Function Action" list, enter a value to use for the transparency. 0% is completely see-through, and 100% is completely solid (opaque).
- Window Screen Action: This setting tells DisplayFusion what to do with the window (move it to the next monitor, previous monitor, span it… etc).
- Monitor: Select the monitor you wish to apply this Function to (if applicable). The currently selected monitor will appear in green.
- Position X: If you select "Move window to specified location" from the "Windows Position Change" list, enter the X (horizontal) position you would like this Function to use when moving windows. You can specify negative values if you have a monitor that is to the left of your primary monitor.
- Position Y: If you select "Move window to specified location" from the "Windows Position Change" list, enter the Y (vertical) position you would like this Function to use when moving windows. You can specify negative values if you have a monitor that is above your primary monitor.
- Window Alignment: This setting tells DisplayFusion where to move the window on the monitor (top-left corner, middle… etc).
- Window Width Change: This setting can adjust a window's width by a percentage of the monitor's width (50%, for example) or by a specific pixel amount.
- Width Value: If you selected "percentage" in the above setting, specify a value from 1 to 100. If you selected "pixel" in the above setting, specify any width.
- Window Height Change: This setting can adjust a window's height by a percentage of the monitor's height (50%, for example) or by a specific pixel amount.
- Height Value: If you selected "percentage" in the above setting, specify a value from 1 to 100. If you selected "pixel" in the above setting, specify any width.
- Drag this icon to a target window to create a Function automatically with the selected window's size and location: Allows you to set the Function's size and position properties based on the window you drag and drop the target on.
This window is used to download scripted functions that have been created by the community.
- Download Function: Click this button to download the selected function. The Scripted Function edit window will open so that you can review the code and set a key combination.
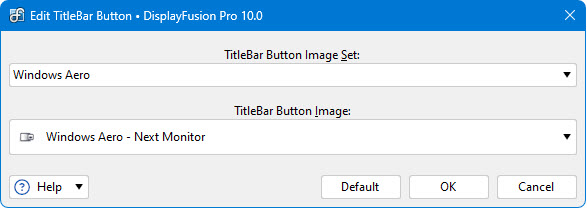
You can create your own custom Image Sets and Button Images. Just create a folder in your DisplayFusion installation folder under "Program Files\DisplayFusion\TitleBar Buttons\Buttons\{your folder name}" and drop your images into this folder. Just select your folder from the "Image Set" list and you can use your custom images.
- TitleBar Button Image Set: This is the image set (or folder) that contains the images you would like to use.
- TitleBar Button Image: Select an image to represent the selected Function.
- Default: Clicking this button will set the TitleBar Button Image back to the default.
The code editor window allows you to write function code in C# or VB .net. There are scripting API functions available in VoiceBot, DisplayFusion, and ClipboardFusion. If you start typing "BFS." the auto-complete will pop up a list of scripting functions that you can use. You can also use any regular C# or VB .NET code.
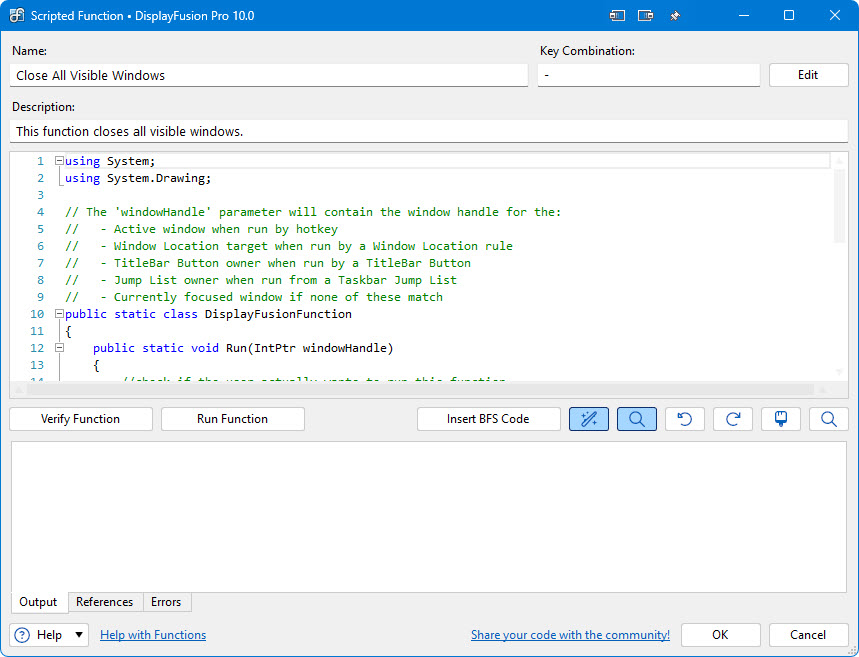
- Name: Enter a name for your macro here.
- Language: This drop-down lets you choose between using C# and VB.NET for your Scripted Function code.
- Key Combination: This box shows the currently assigned key combination. If it's blank, there's no key combination currently set.
- Edit: Click this button to set or edit the key combination assigned to this macro.
- References: Any DLLs that your Scripted Function code requires need to be listed here. For custom DLLs (that aren't in system folders) you'll need to specify the full path to the DLL. To add or remove references, right-click any entry in this pane.
- Undo (Ctrl + Z): Click this button to undo the last code change you made.
- Redo (Ctrl + Y): Click this button to re-do a change that you have just undone.
- Insert BFS Code: Click this button to insert a built-in code function at the cursor location.
- Verify Function: Click this button to verify that the code in the Scripted Function will compile, without running the Function.
- Run Function: Click this button to run the Scripted Function code as-is.
- Share your code with the community: Click this button to submit your Scripted Function to Binary Fortress. We will review the code and post it to the online repository so that other customers can download it.
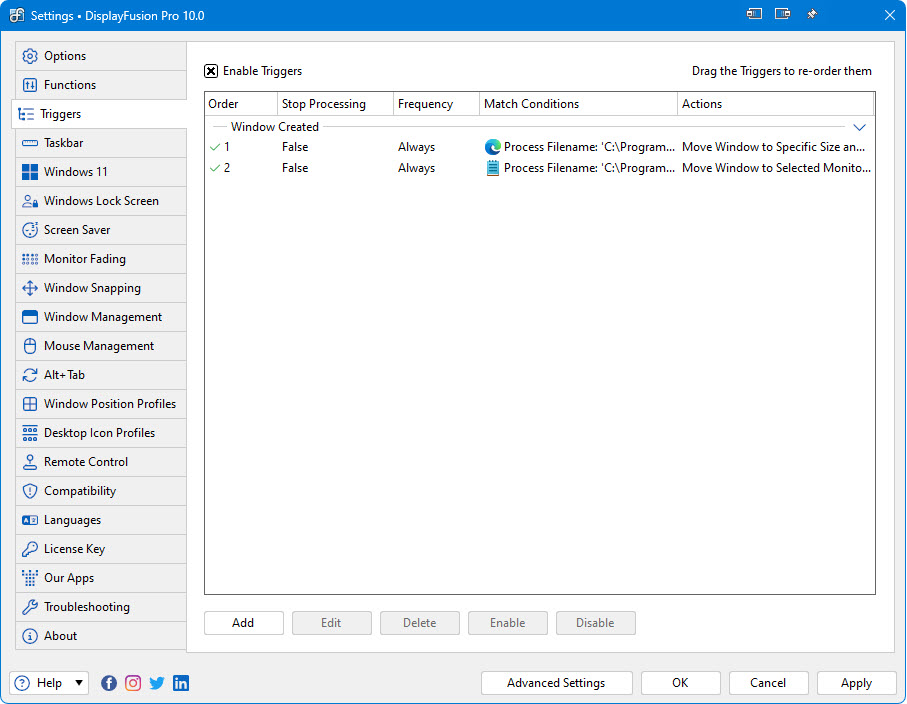
The Triggers tab allows you to configure rules that run on certain conditions, and perform actions as specified in the rules. This feature replaces the old Window Location feature that was present in DisplayFusion 7.3.4 and lower.
- Enable Triggers: Enables or disables the Triggers feature (without deleting your settings).
- Add: Click this button to add a new Trigger rule.
- Edit: Click this button to edit the selected Trigger rule.
- Delete: Click this button to remove the selected Trigger rule.
- Enable: Click this button to enable the selected Trigger rule.
- Disable: Click this button to disable the selected Trigger rule.
The Trigger edit window appears when you click the Add or Edit buttons on the Triggers tab.
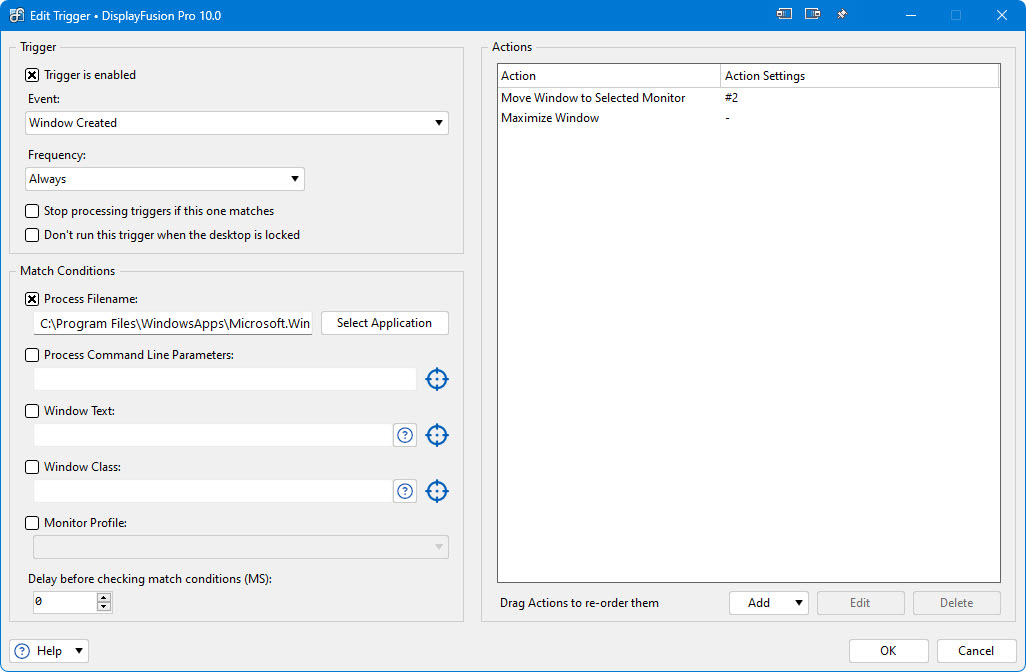
- Trigger is enabled: Enables or disables the Trigger rule.
- Event: Allows you to select from many different event types that can cause this Trigger to be evaluated.
- Frequency: Allows you to choose whether the Trigger will run every time it matches, only the first time per process ID, first time per process name, or first time per window (uses window handle).
- Idle Timeout (sec): When the "System Idle" Event is selected, this option allows you to specify how long the system has to be idle before the Trigger will run.
- Interval (sec): When the "Timer Interval" Event is selected, this option allows you to specify how often (in seconds) the Trigger will run.
- Stop processing triggers if this one matches: When this option is enabled, DisplayFusion won't try to evaluate any rules below this rule if the window matches this rule.
- Don't run this trigger when the desktop is locked: This will prevent the trigger from running when your desktop is locked.
- Process Filename: The path to the process name that you want the Trigger rule to match. You can use asterisks as a wildcard here. *.* will match all applications.
- Delay before checking match conditions (MS): This option will force DisplayFusion to wait for the specified time before checking the Trigger rule's Match Conditions against the window that caused the Trigger to fire. For example, if you set this option to 2000 on a "Window Created" rule, when a new window is detected, the rule will wait 2 seconds before checking the conditions (Window Text, Window Class, etc).
- Process Command Line Parameters: If the application has specific command line parameters, you can enter them here so that the Trigger rule will only match the window if the process name and parameters match. Note that it can only match the parameters if the parameters are saved after the application starts. You can check this by adding the "Command Line" column to the Windows Task Manager > Details tab.
- Window Text: The window title of the window you want the Trigger rule to match. You can use this to match only certain windows of an application. You can drag the "target" icon and drop it on an open window to automatically get the window title.
- Window Class: The window class of the window you want the Trigger rule to match. You can use this to match only certain windows of an application. You can drag the "target" icon and drop it on an open window to automatically get the window class.
- Monitor Profile: Allows you to select a Monitor Profile. If a Monitor Profile is selected here, the Trigger rule will only run when that Monitor Profile is active.
- Action: This column lists the actions that the rule will perform when the Trigger rule runs.
- Action Settings: This column lists the details of each action that will be performed when the Trigger rule runs.
- Add: Click this button to add a new Action to the Trigger rule.
- Edit: Click this button to edit the selected Action.
- Delete: Click this button to remove the selected Action.
This window appears when you add the "Move window to specific size and location" Action to a Trigger rule.
- Left: The X pixel location of the top-left corner of the selected window.
- Top: The Y pixel location of the top-left corner of the selected window.
- Width: The width of the selected window in pixels.
- Height: The height of the selected window in pixels.
- Maximize Window: Enabling this checkbox will cause the Trigger rule to maximize the window that it runs on.
- Drag this over a window to use its size and location: The "target" window picker icon can be dragged and dropped on an open window automatically get its size and location for the Trigger rule.
Use the Taskbar tab to configure the global DisplayFusion Multi-Monitor Taskbar settings.
To configure individual per-taskbar settings, just right-click on the Taskbar you want to configure. Upgrade to DisplayFusion Pro to use the Multi-Monitor Taskbars feature.
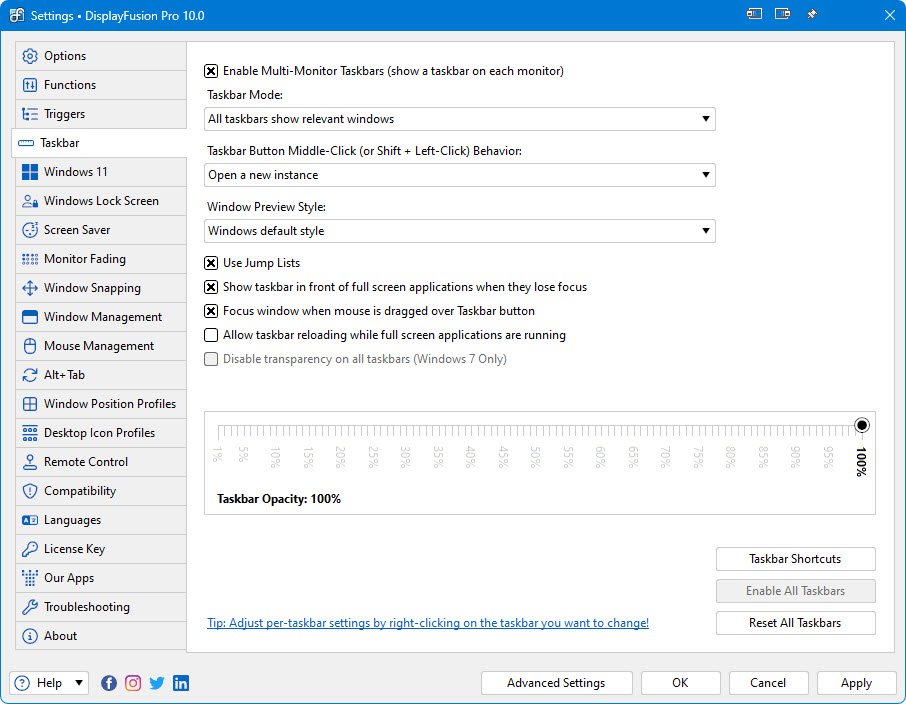
- Enable Multi-Monitor Taskbars (show a taskbar on each monitor): Toggle the Multi-Monitor Taskbar feature on and off.
- Taskbar Mode:
- All taskbars show relevant windows: Each taskbar (DisplayFusion and Windows) will only show applications which are open on that monitor
- Windows taskbar shows all windows, DisplayFusion taskbar shows relevant windows: The Windows taskbar will show all applications, but the DisplayFusion taskbars will only show applications that are open on that monitor
- All taskbars show all windows: Each (DisplayFusion and Windows) taskbar will show all applications
- Windows taskbar shows no windows, DisplayFusion taskbar shows all windows: The Windows taskbar will show no windows (you can use it for pinned items if you want) and each DisplayFusion taskbar will show all windows
- Taskbar Button Middle-Click (or Shift + Left-Click) Behaviour:
- Do nothing: Do nothing when the button is middle-clicked
- Open a new instance: Open a new instance of the middle-clicked application button
- Close application: Close the middle-clicked instance of the application
- Move to next monitor: Move the application to the next monitor
- Move to previous monitor: Move the application to the previous monitor
- Window Preview Style:
- Preview Disabled: Don't show any Taskbar previews.
- Windows Default Style: Show Windows default style previews, with multiple tabs.
- Windows Vista Style: Show Windows Vista style previews, with 1 tab per Taskbar button.
- Use Jump Lists: Enable this option to have DisplayFusion show Jump List style menus when right-clicking a taskbar button. Functions can be assigned to the Jump Lists for easier access.
- Show taskbar in front of full screen applications when they lose focus: By default, DisplayFusion will force the multi-monitor taskbars behind any full screen application – use this setting to all the DisplayFusion taskbar to appear in front of a full screen application when that application loses focus.
- Focus window when mouse is dragged over Taskbar button: Whenever the mouse is moved over a DisplayFusion Taskbar button while the left mouse button is held down, DisplayFusion will focus that window so you can drop the dragged item into that window.
- Allow taskbar reloading while full screen applications are running: Enable this option to allow the DisplayFusion Multi-Monitor Taskbars to reload when necessary, even if a full screen application is running.
- Disable transparency on all taskbars (Windows 7 Only): Enable this option to have DisplayFusion disable the transparency for all taskbars in Windows 7 only.
- Taskbar Opacity: This setting controls the taskbar opacity when the mouse isn't hovering over it – 100% is full opaque and 1% is fully translucent.
- Taskbar Shortcuts: Opens the Taskbar Shortcuts window so you can manage your Taskbar Shortcuts.
- Enable All Taskbars: Enables all previously disabled DisplayFusion Taskbars.
- Reset All Taskbars: Resets all of your Taskbars to their default settings, position and size. Use this if you've disabled a Taskbar on a specific monitor and you want to get it back.
The Taskbar Shortcuts window allows you to add shortcuts to your Taskbars. You can add applications, files, folders or website URL shortcuts.
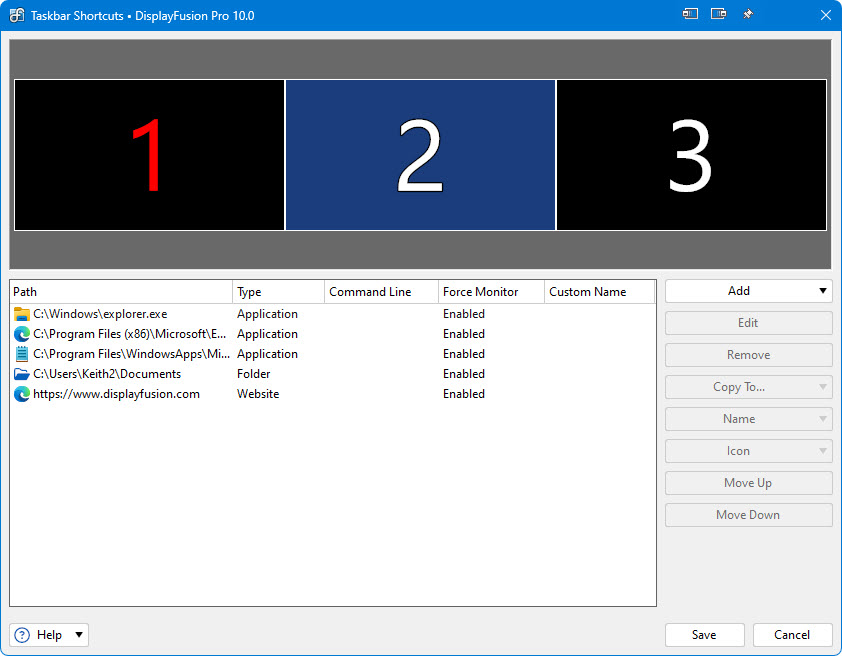
- Add Website: Allows you to create a shortcut to a website address (URL). The shortcut will have the same icon as your default web browser, with the favicon of the selected website address overlayed.
- Copy To: Allows you to copy the selected shortcuts to another monitor.
- Name: Allows you set or clear a custom name for the selected shortcut. The custom name will show up in the tooltip for the shortcut.
- Icon: Opens the menu containing the Custom Icon options.
- Move Up: Moves the selected shortcut up in the list.
- Move Down: Moves the selected shortcut down in the list.
- Path: Shows the shortcut's path or website address.
- Type: Shows the type of shortcut: Application, File, Folder or Website.
- Command Line: Shows the command line being used with this application. This setting is only used with Application shortcuts.
- Force Monitor: Shows if the selected shortcut is being forced to open on the shortcut's monitor. This setting is not available for File shortcuts.
- Custom Name: Shows the shortcut's Custom Name, if one has been set.
You can use this window to create or edit an Application shortcut. Just select the application's executable and set the other options as desired.
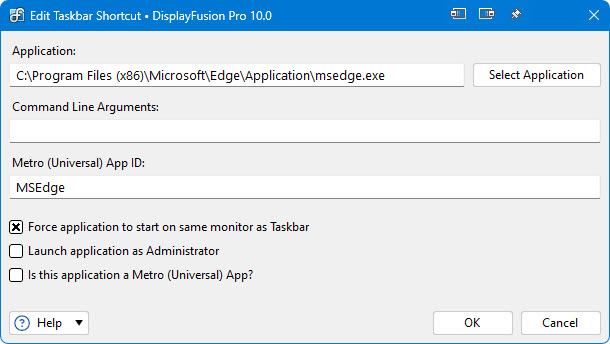
- Application: Shows the currently selected application.
- Select Application: Allows you to select a currently running application, or browse for an installed application.
- Command Line Arguments: You can specify any command line arguments to use with this application. Typically you will want to leave this blank.
- Metro (Universal) App ID: If you choose a Universal app using the Select Application dialog, this box will contain its App ID.
- Force application to start on same monitor as Taskbar: Selecting this will force the application to open on the same monitor the shortcut is located on.
- Launch application as Administrator: Enable this checkbox to have DisplayFusion always start this program elevated. This will cause a UAC prompt to be shown each time the program is launched from the shortcut.
- Is this application a Metro (Universal) App?: Enable this checkbox if the shortcut is for a Universal app. It will be automatically enabled if you chose a Universal app using the Select Application dialog.
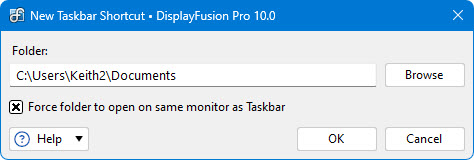
You can use this folder to create or edit a Folder shortcut. Just browse to the folder and select whether you would like the folder to be forced to the same monitor that the shortcut is located on.
- Folder: Shows the currently selected folder.
- Browse: Allows you to browse to the folder on your computer that you would like the shortcut to point to.
- Force folder to open on same monitor as Taskbar: Selecting this will force the folder to open on the same monitor the shortcut is located on.
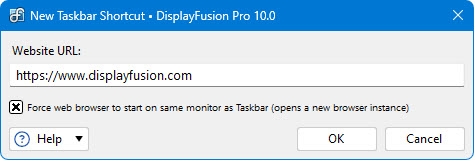
You can use this window to create or edit a Website shortcut. Just enter the website's address (URL) and select whether you would like it to open in a new window on the same monitor that the shortcut is located on.
- Website URL: The full website address (URL). Example: https://www.yahoo.com or https://facebook.com
- Force web browser to start on same monitor as Taskbar (opens a new browser instance): Selecting this will force the web browser to open on the same monitor the shortcut is located on.
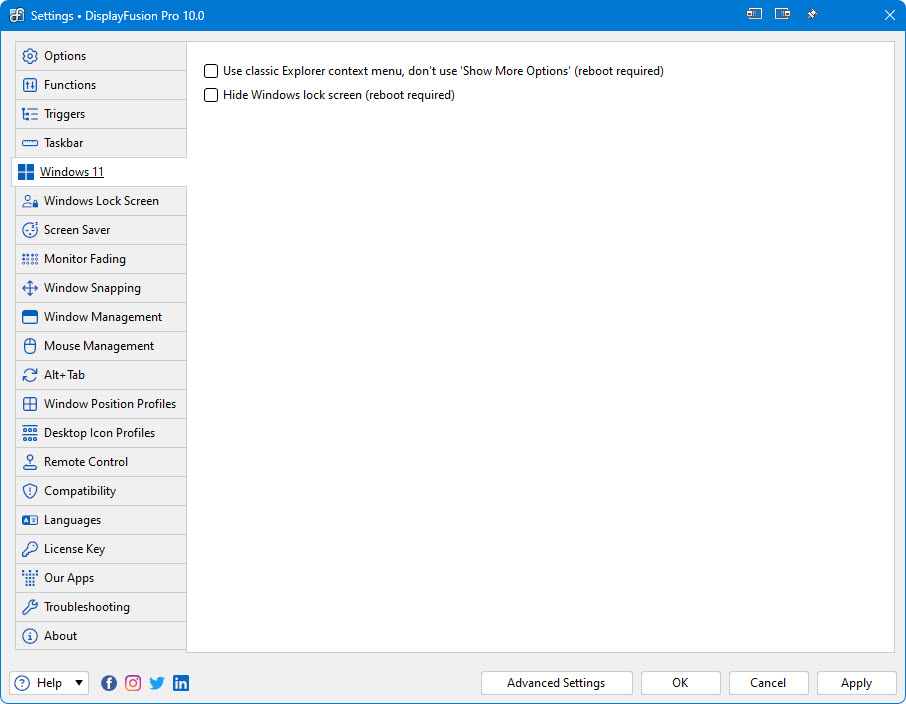
The options on this tab enable and disable the various Windows 11 specific tweaks.
- Use classic Explorer context menu, don't use 'Show More Options' (reboot required): This disables the new Explorer context menu (with 'Show More Options') and restores the classic context menu.
- Hide Windows lock screen (reboot required): This option disables the lock screen that is shown before the login screen on startup.
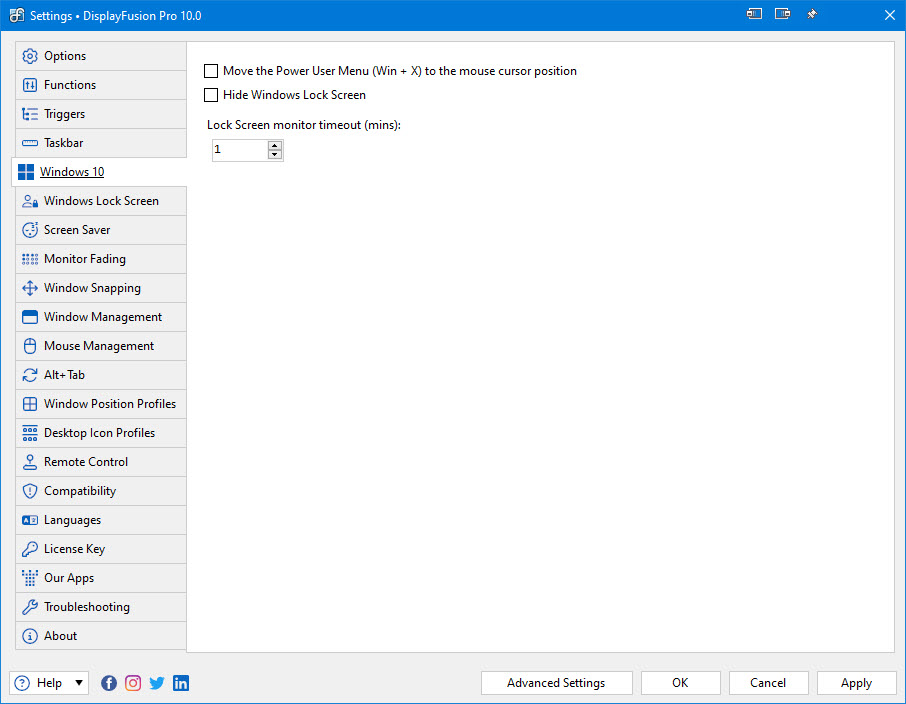
The options on this tab enable and disable the various Windows 10 specific tweaks.
- Move the Power User Menu (Win + X) to the mouse cursor position: Enabling this setting will force the Windows 10 Power User Menu (Win + X) to open next to the current mouse cursor position.
- Hide Windows Lock Screen: Enabling this setting will prevent Windows from showing the lock screen wallpaper. On bootup, or when locking the computer, the user selection/password screen will show instead.
- Lock Screen monitor timeout (mins): This value controls the amount of time before the monitors enter sleep mode when at the Windows 10 lock screen. The default setting in Windows 10 is 1 minute.
On the Windows Lock Screen tab, you can customize your Windows Lock Screen image. You can use any of the available wallpaper sources (Flickr, Vladstudio, Google Image Search, deviantArt, and other online providers), or you can use any image from your local computer. The settings here behave the same as in the Desktop Wallpaper window. Upgrade to DisplayFusion Pro to use the Windows Lock Screen feature.
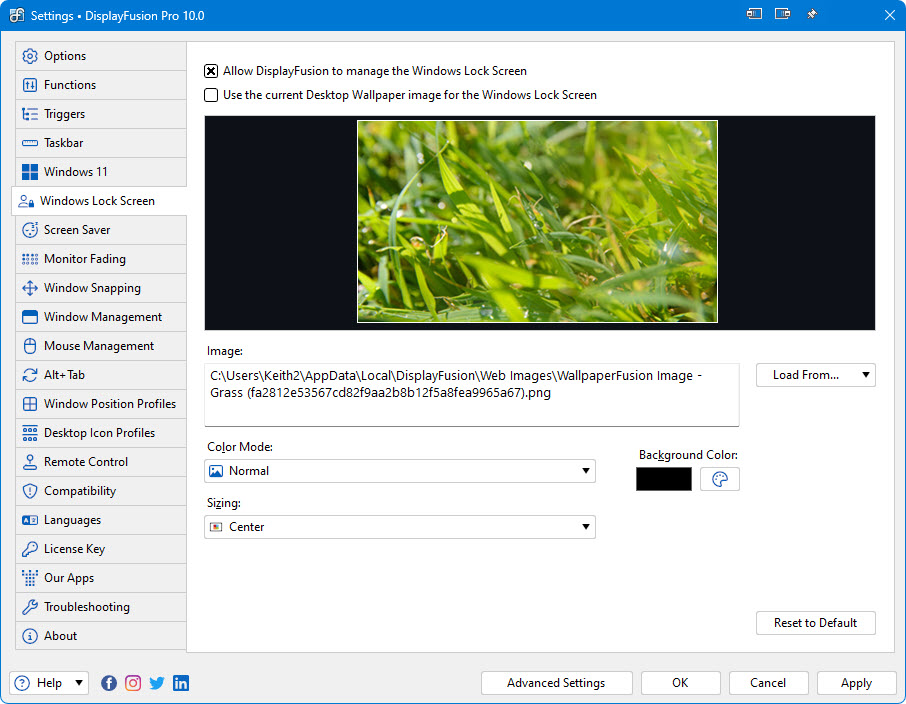
- Allow DisplayFusion to manage the Windows Lock Screen: Enabling this setting allows DisplayFusion to manage your Windows Lock Screen settings.
- Use the current Desktop Wallpaper image for the Windows Lock Screen: Enabling this setting allows DisplayFusion to set the Windows Lock Screen to match the current Desktop Wallpaper.
- Load From: Click this button to choose an image source to use for the Windows Lock Screen. After you select a source, a new dialog box will open to allow you to choose an image from that source.
- Reset to Default: Resets all Windows Lock Screen settings, and if the restored settings are applied, DisplayFusion will reset your Windows Lock Screen image to the default Windows settings.
- Sorry, this feature isn't currently supported for your version of Windows: If you see this message, it means that DisplayFusion isn't able to manage your Windows Lock Screen settings.
Use the Screen Saver tab to configure the DisplayFusion multi-monitor Screen Savers. From here you can span a single Screen Saver across all of your monitors, or load a different Screen Saver on each monitor.
Upgrade to DisplayFusion Pro to use the Screen Saver feature.
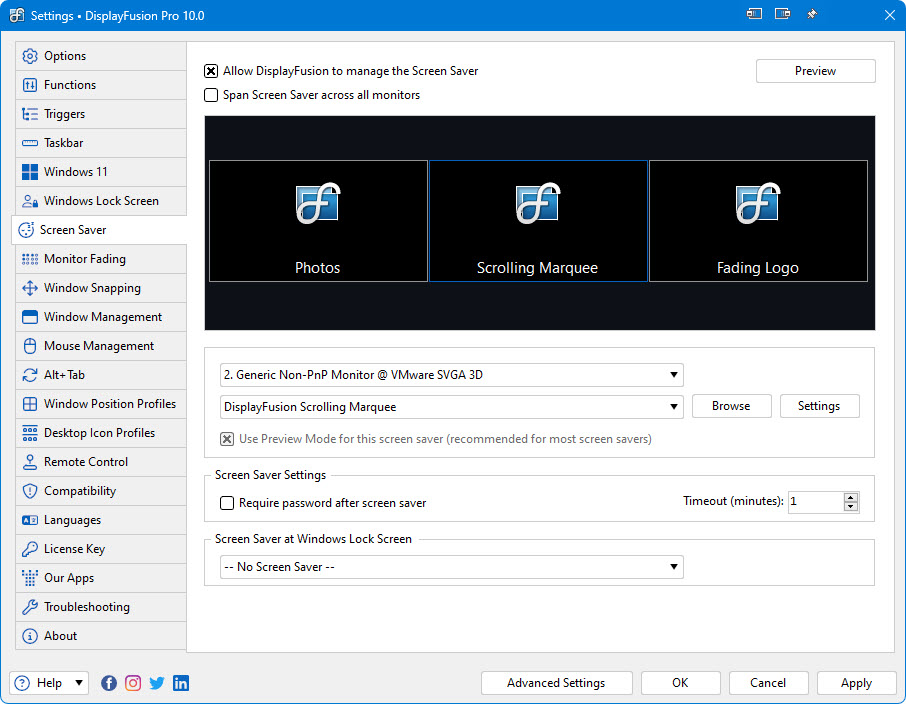
- Allow DisplayFusion to manage the Screen Saver: Enables or disables the DisplayFusion Multi-Monitor Screen Savers feature.
- Preview: Shows a preview using your current settings. Your settings must be saved before you can view the preview. You will be prompted to save your settings when you click the Preview button.
- Span Screen Saver across all monitors: Allows your selected Screen Saver to be spanned across all monitors, instead of having a different Screen Saver on each monitor. Not all Screen Savers fully support this option.
- Browse: Opens the Browse dialog to allow you to manually locate a .scr screen saver on your system.
- Settings: Click this button to adjust the Screen Saver's settings for the currently selected monitor.
- Use Preview Mode for this screen saver (recommended for most screen savers): In most cases, this checkbox must be enabled if you've set your screen saver to span all monitors, or specified a separate screen saver for each monitor. If your screen saver natively supports multiple monitors, set it to span, and disable this checkbox.
- Require password after screen saver: Checking this will force Windows to prompt you for a password after the Screen Saver exits.
- Timeout (minutes): The number of minutes of inactivity before a Screen Saver will start.
- Screen Saver at Windows Lock Screen: This option allows you to select the screen saver that will be shown at the Windows Lock Screen. Screen savers that use Direct3D do not work on the Windows Lock Screen, so the list is limited to the "Blank" and "DisplayFusion Photos" screen savers.
The Monitor Fading feature allows you to have certain monitors faded when enabled. It also has the ability to automatically fade and unfade based on which monitor or application window is currently active. You can also customize the level of opacity from 1 to 100%.
Upgrade to DisplayFusion Pro to use the Desktop Icon Profiles feature.
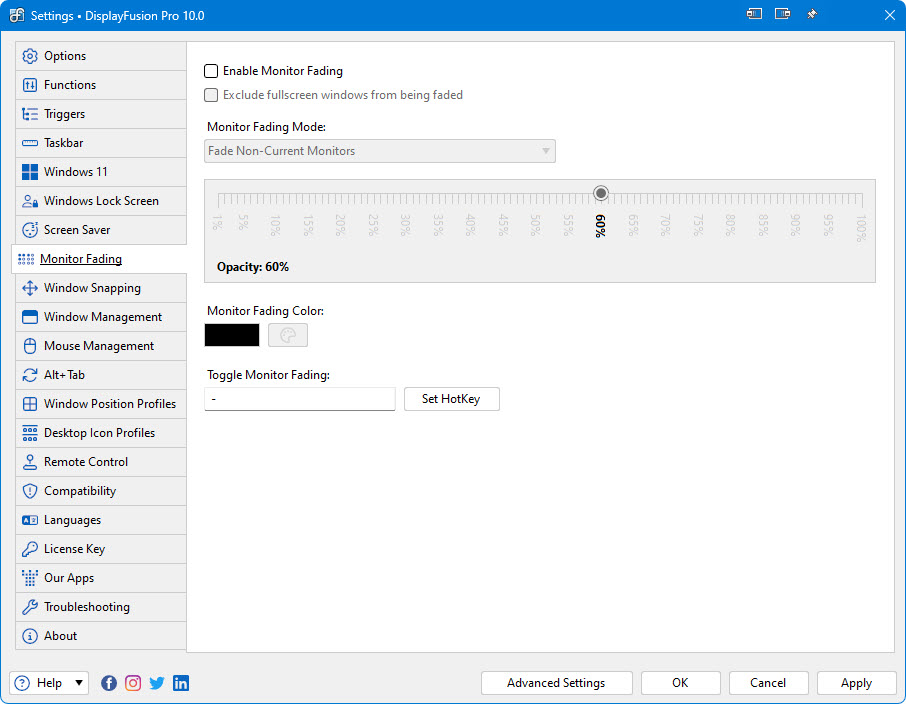
- Enable Monitor Fading: Enable this checkbox to have the selected Monitor Fading Mode applied.
- Exclude fullscreen windows from being faded: Enable this option to have the Monitor Fading feature ignore any monitors that have a full screen window on them. When the full screen window is closed, that monitor can fade again if the Monitor Fading Mode allows it.
- Monitor Fading Mode: This drop-down list lets you choose the behaviour of the Monitor Fading feature. You can have it fade a specific monitor, non-Primary monitors, or automatically fade monitors or windows based on which one is currently active.
- Fade All Monitors: This mode will fade all monitors.
- Fade Non-Primary Monitors: This mode will fade all monitors except for the Primary monitor.
- Fade Non-Current Monitors: This mode will fade all monitors except for the monitor that has the currently focused window.
- Fade Everything Except Current Window: This mode will fade everything except for the window that currently has focus.
- Fade Monitor #: This mode will fade only the monitor that has the selected monitor ID.
- Opacity: This slider allows you to choose how dark the fade should be. 1% is the lightest, 100% is the darkest.
- Monitor Fading Colour: This option allows you to choose what colour the Monitor Fading overlay will be.
- Toggle Monitor Fading: Set this option to the key combination you'd like to use for quickly enabling and disabling the Monitor Fading feature.
Window snapping allows application windows to be snapped to the edges of the monitors. Just enable this setting, then drag and drop an application's window within a preset number of pixels (shown below) from a monitor's edge and it will be moved or "snapped" over to the edge. If you are using DisplayFusion Pro, you can also snap window edges to other window's edges. Just drag a window near a monitor edge or another window and release the mouse button to let DisplayFusion snap the window into place.
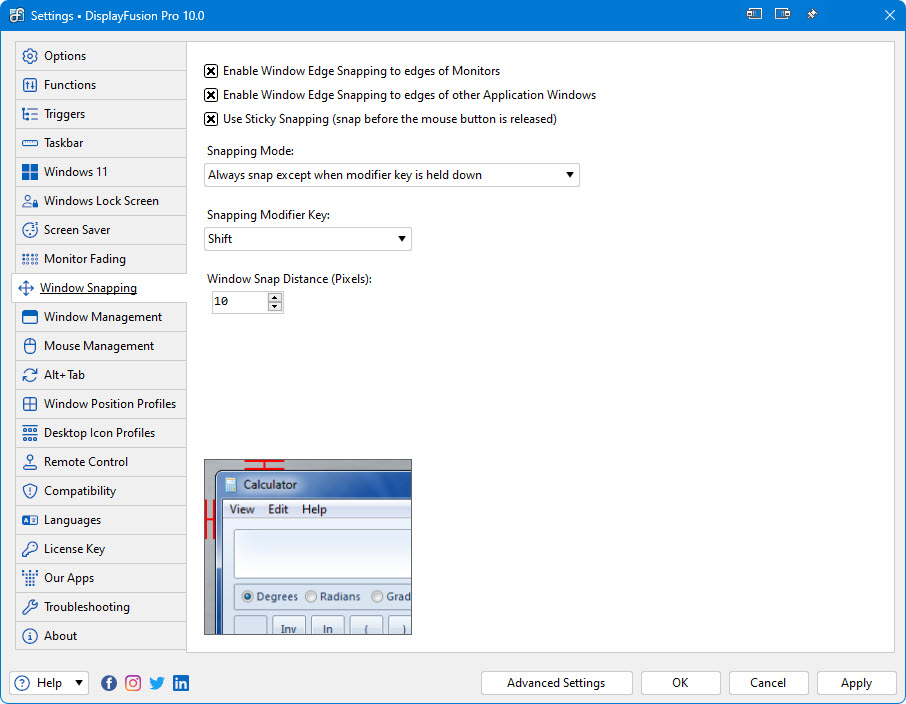
- Enable Window Edge Snapping to edges of Monitors: Snaps window edges to the sides of the monitors.
- Enable Window Edge Snapping to edges of other Application Windows: Snaps window edges to the edges of other application's, not just monitor edges. (DisplayFusion Pro only)
- Use Sticky Snapping (snap before the mouse button is released): Snaps the window to the monitor or application edge while the window is still being dragged.
- Snapping Mode: Select how you would like the Window Snapping feature to work: "Always snap windows", "Only snap when modifier key is held down" or "Always snap except when modifier key is held down". These different modes allow you to enable the Window Snapping feature, but toggle it when needed.
- Snapping Modifier Key: Select the key you would like to use as the modifier when using the different snapping modes (above).
- Window Snap Distance (Pixels): This setting controls how close a window needs to be in order to snap. You can preview the distance by using the diagram provided.
On this tab, you can configure how DisplayFusion handles application windows. You can have DisplayFusion drag maximized windows between monitors, or just have DisplayFusion move a window to the next monitor by middle-clicking in the window's caption bar at the top of the window.
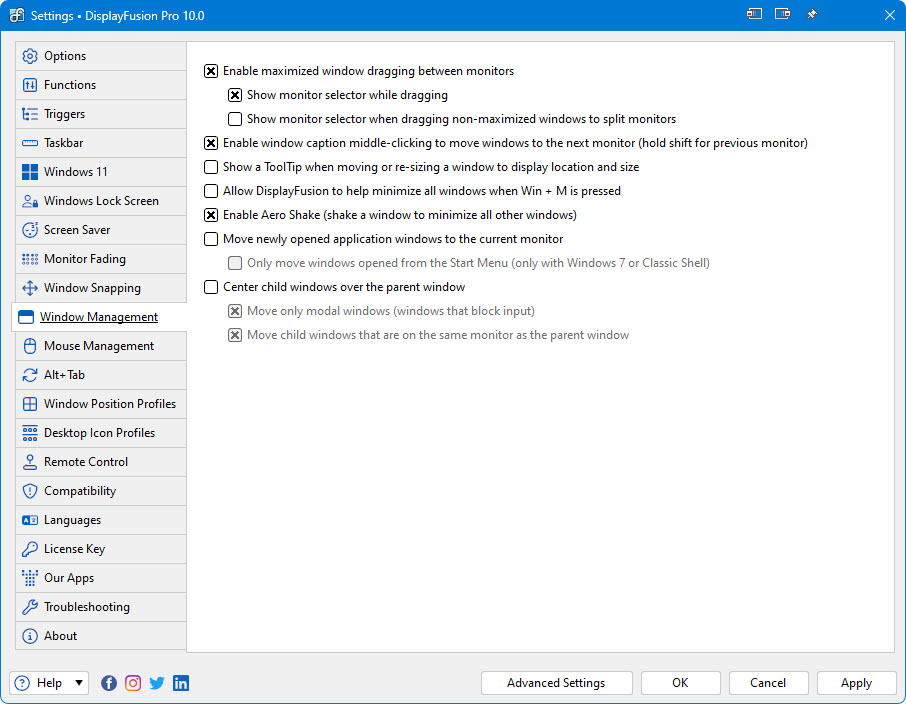
- Enable maximized window dragging between monitors: This setting allows you to click on a maximized window's TitleBar (see image below) and drag it to a new monitor, without having to restore the window, drag it to the new monitor and re-maximize it.
- Show monitor selector while dragging: This setting allows DisplayFusion to display an overlay with the monitor number when dragging a maximized window.
- Show monitor selector when dragging non-maximized windows to split monitors: Enable this option to have DisplayFusion always maximize windows that are dragged over a monitor split, even if it was not maximized previously. You can hold the Shift key on your keyboard to override this behaviour.
- Enable window caption middle-clicking to move windows to the next monitor (hold shift for previous monitor): This setting allows you to middle-click any application window's TitleBar (see below) to quickly move it to the next monitor.
- Show a ToolTip when moving or re-sizing a window to display location and size: This setting allows DisplayFusion to show a ToolTip overlay on the window currently being dragged. The ToolTip will show the size (in pixels) of the window and the pixel locations of the top-left and bottom-right corners of the window. (DisplayFusion Pro only)
- Allow DisplayFusion to help minimize all windows when Win + M is pressed: This setting allows DisplayFusion to minimize all windows across all screens when the Win + M keyboard shortcut is pressed.
- Enable Aero Shake (shake a window to minimize all other windows): Disable this setting to prevent Windows from minimizing all windows when shaking a window with the mouse.
- Move newly opened application windows to the current monitor: Enabling this option will force any newly opened application to move to the monitor that the mouse cursor is currently on.
- Only move windows opened from the Start Menu (only with Windows 7 or Classic Shell): Enabling this option will force only applications launched from the Start menu to move to the monitor that the mouse cursor is currently on.
- Centre child windows over the parent window: This setting allows DisplayFusion to automatically move any child dialogs or windows to the same monitor that the parent window is on.
- Move only modal windows (windows that block input): This setting will force DisplayFusion to only move modal windows, instead of all child windows.
- Move child windows that are on the same monitor as the parent window: This setting will force the child dialog or window to be centred over the parent window when DisplayFusion moves it.
The Mouse Management tab in the Settings window allows you to configure the various mouse enhancements. These include allowing the mouse wheel to scroll windows that are not focused, mouse wrapping, and preventing the mouse cursor from snagging on the edges between monitors of different sizes.
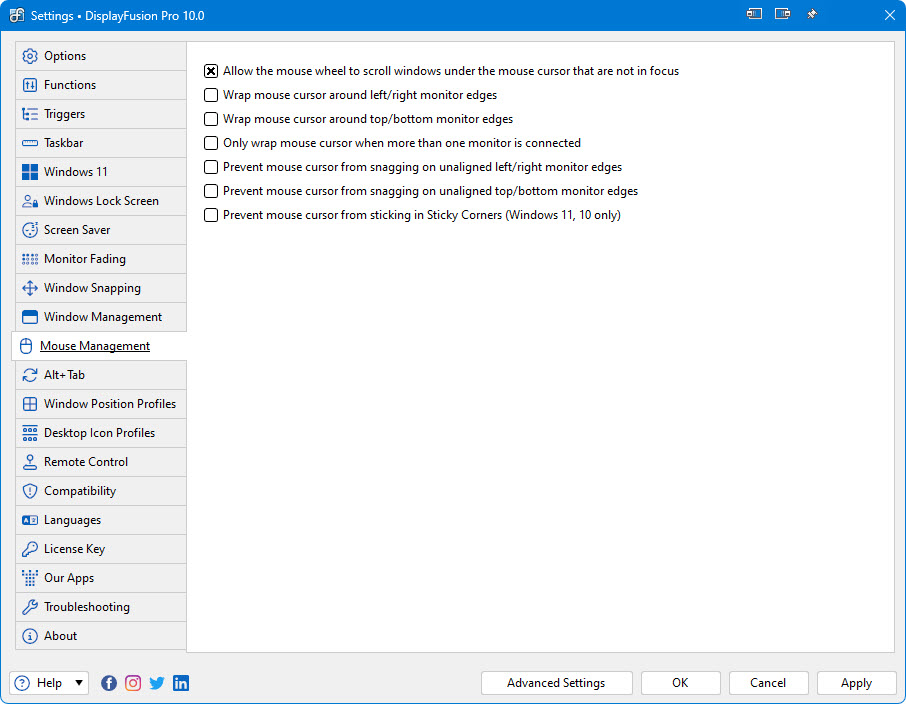
- Allow the mouse wheel to scroll windows under the mouse cursor that are not in focus: This setting allows you to use the scroll wheel on your mouse to scroll any window, regardless of whether or not it is the currently active window.
- Wrap mouse cursor around left/right monitor edges: This setting allows DisplayFusion to move the mouse to the opposite side when moving the mouse off the left or right monitor edge.
- Wrap mouse cursor around top/bottom monitor edges: This setting allows DisplayFusion to move the mouse to the opposite side when moving the mouse off the top or bottom monitor edge.
- Only wrap mouse cursor when more than one monitor is connected: Enable this option to have DisplayFusion ignore the mouse wrapping settings when only one monitor is connected to the system. This is a great option for laptop users.
- Prevent mouse cursor from snagging on unaligned left/right monitor edges: The mouse cursor will never snag on the left or right monitor edges where monitors don't line up.
- Prevent mouse cursor from snagging on unaligned top/bottom monitor edges: The mouse cursor will never snag on the top or bottom monitor edges where monitors don't line up.
- Prevent mouse cursor from sticking in Sticky Corners (Windows 11, 10 only): Enable this option to prevent the mouse cursor from getting caught on the corners between monitors in Windows 11 and 10.
The Alt+Tab tab in the Settings window allows you to configure DisplayFusion's Alt+Tab Handler. This handler can replace the default Windows Alt+Tab functionality, and gives you more options, such as showing Alt+Tab on the current monitor, instead of only the primary.
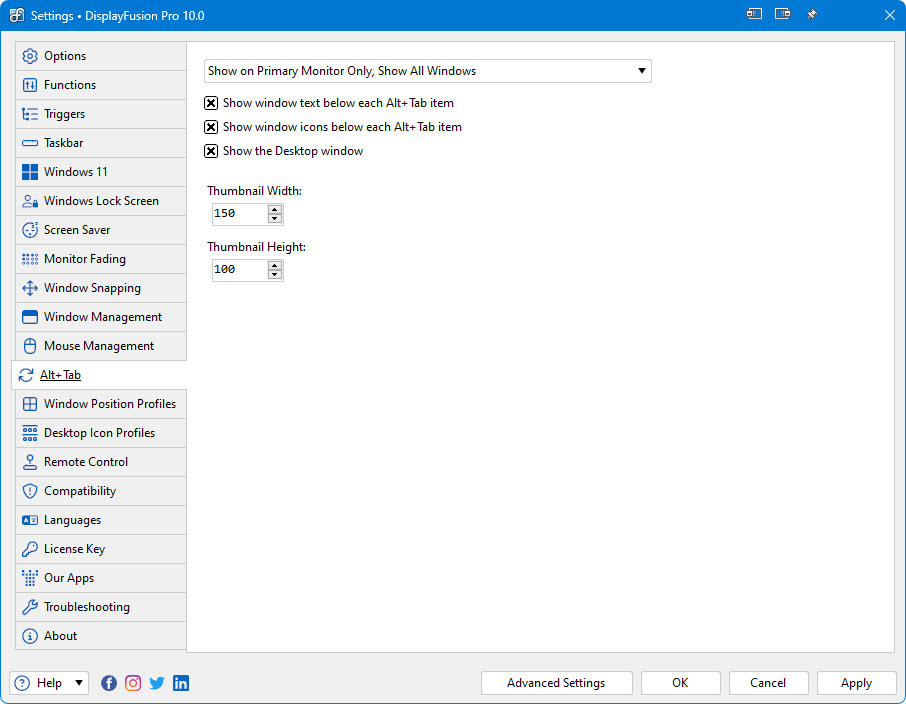
- Show on Primary Monitor Only, Show All Windows: Shows the Alt+Tab window on the primary monitor only, and shows all desktop windows.
- Show on All Monitors, Show All Windows: Shows the Alt+Tab window on all monitors, with each Alt+Tab window showing all desktop windows.
- Show on Current Monitor Only, Show All Windows: Shows the Alt+Tab window on the current monitor (where the mouse cursor is), and shows all desktop windows.
- Show on Current Monitor Only, Show Current Windows Only: Shows the Alt+Tab window on the current monitor (where the mouse cursor is), and only shows windows on that monitor.
- Disabled: Disables the DisplayFusion Alt+Tab Handler. Windows will handle Alt+Tab functionality if this mode is disabled.
- Show window text below each Alt+Tab item: Enable this setting to have the window title listed below each window preview in the DisplayFusion Alt+Tab handler.
- Show the Desktop window: Enable this setting to have the Desktop entry to shown in the DisplayFusion Alt+Tab handler.
- Thumbnail Width: Set the width of the Alt+Tab windows thumbnails.
- Thumbnail Height: Set the height of the Alt+Tab windows thumbnails.
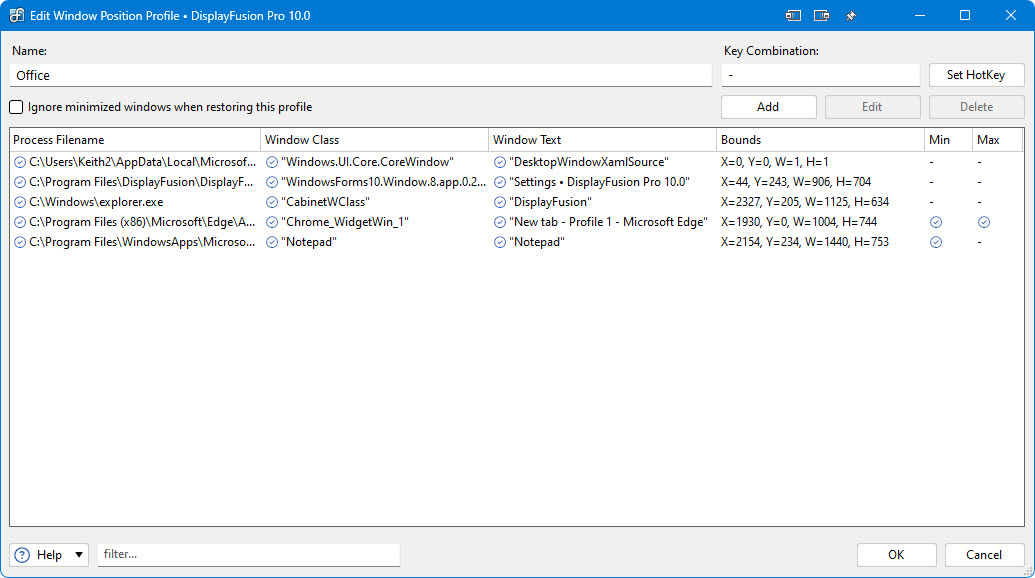
The Window Position Profiles tab allows you to save or load positions for the currently opened windows. Selecting an existing Profile before clicking the Save button will overwrite that Profile with the current window positions.
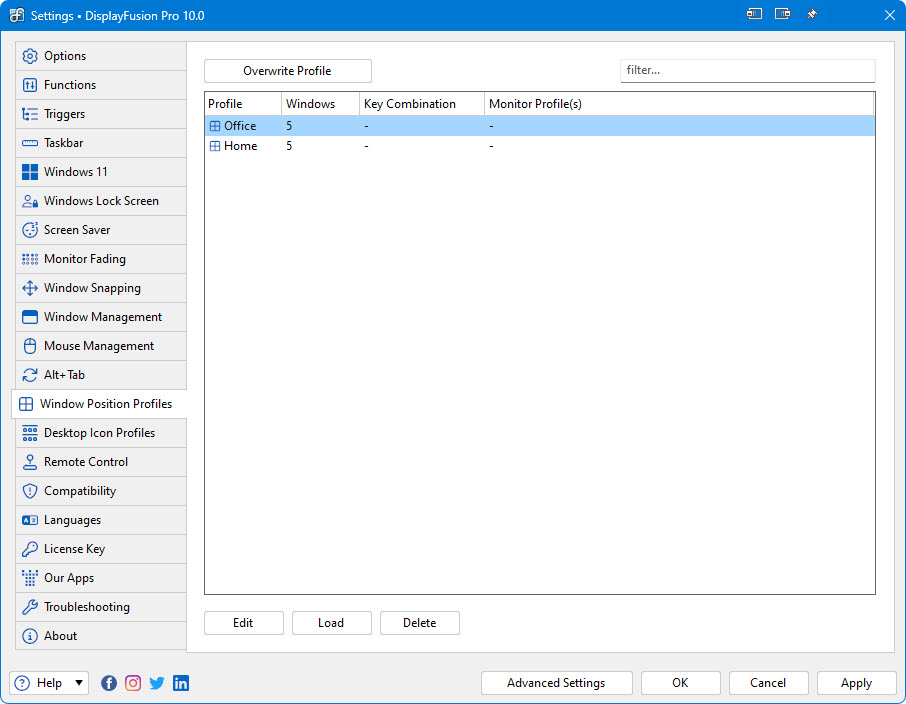
- Profile: This column shows the name of the Window Position Profile.
- Windows: This column shows the number of window positions that were saved with the Window Position Profile.
- Key Combination: This column shows the key combinations that you have assigned to each Window Position Profile.
- Monitor Profile(s): This column shows the Monitor Profiles that each Window Position Profile is assigned to. When a Window Position Profile is assigned to a Monitor Profile, it will be automatically loaded whenever the Monitor Profile is loaded or detected.
- Edit: Click this button to edit the selected Window Position Profile.
- Load: Clicking this button will load the selected Window Position Profile, restoring the positions of open windows that were saved with the profile.
- Delete: Clicking this button will delete the selected Window Position Profile.
- New Profile: Click this button to save a new Window Position Profile. It will be pre-populated with the details for all of the currently opened windows. You can also edit, add, or delete entries before saving it.
- Overwrite Profile: Click this button to overwrite the selected Window Position profile with the details of the currently opened windows. All previously saved data in the selected Profile will be lost.
This window shows you all of the details for the windows that are saved in the Profile. You can also edit each entry, add new entries, or remove entries.
- Name: This box shows the name of the Profile.
- Ignore minimized windows when restoring this profile: Enable this checkbox to have DisplayFusion ignore windows that have the "Min" flag enabled and are already minimized.
- Add: Click this button to add a new window entry to this Profile.
- Edit: Click this button to edit the selected window entry.
- Delete: Click this button to delete the selected window entry from this Profile.
- Key Combination: This box shows the key combination that's set for loading the Profile.
- Process Filename: This column shows the full path to the filename of the windows saved in the Profile.
- Window Class: This column shows the window class of the windows saved in the Profile.
- Window Text: This column shows the window text (window title) of the windows saved in the Profile.
- Bounds: This column shows the saved X, Y, width, and height values for the window.
- Min: This column shows whether the window will be minimized when the Profile is loaded.
- Max: This column shows whether the window will be maximized when the Profile is loaded.
This window allows you to edit or add a window in the Profile. You can specify which criteria you want to match on, and specify the size and location of the window when the Profile is loaded.
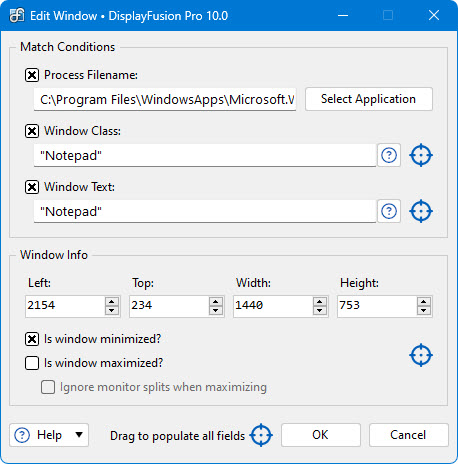
- Process Filename: This box contains the full path to the program to be matched when loading the Profile.
- Select Application: Click this button to show a list of currently opened applications. Choosing an application from the list will automatically populate the Process Filename box.
- Window Class: This box contains the full or partial window class for the window to be matched when loading the profile.
- Window Text: This box contains the full or partial window text for the window to be matched when loading the profile. When a Profile is saved, some applications have the file name or website title saved in the Window Text. If you want this entry in the Profile to apply to all windows of that program, remove the file name or page title so that only the program name remains (e.g. remove everything except for "Google Chrome" from the Window Text box).
- Left: This box contains the X position value that will be set on the window when the Profile is loaded.
- Top: This box contains the Y position value that will be set on the window when the Profile is loaded.
- Width: This box contains the width in pixels that will be set on the window when the Profile is loaded. This is ignored if the "Is window maximized/minimized?" option is enabled.
- Height: This box contains the height in pixels that will be set on the window when the Profile is loaded. This is ignored if the "Is window maximized/minimized?" option is enabled.
- Is window minimized?: When this checkbox is enabled, the window will be minimized when the Window Position Profile is loaded.
- Is window maximized?: When this checkbox is enabled, the window will be maximized when the Window Position Profile is loaded.
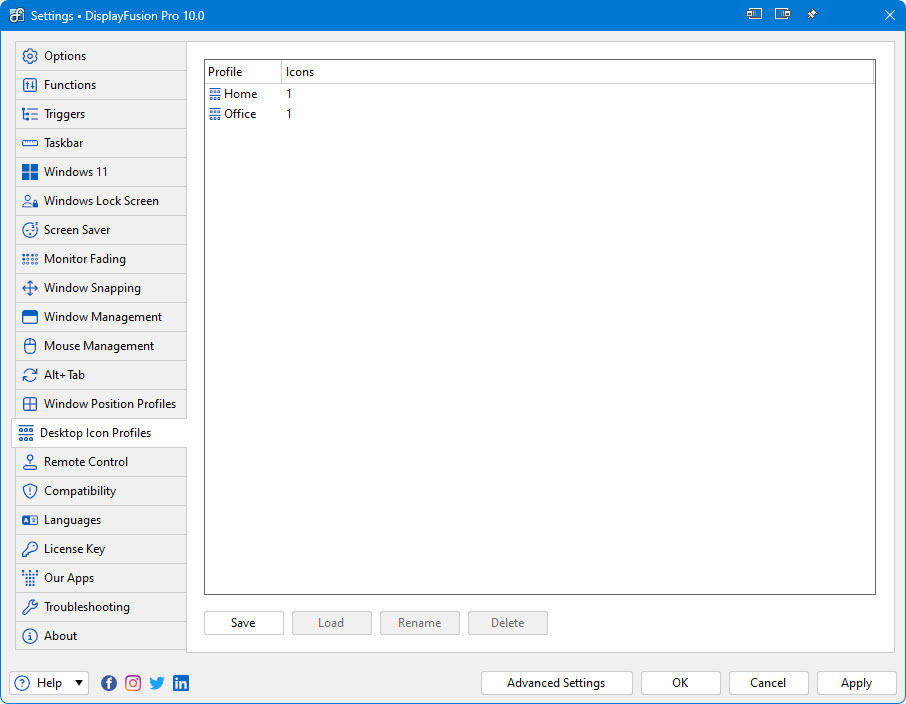
The Desktop Icon Profiles tab allows you to save or load your Desktop Icon Profiles. Selecting an existing Profile before clicking the Save button will overwrite that Profile with the current desktop icon positions.
- Save: Click this button to save the current desktop icon layout as a new Desktop Icon Profile. If you select an existing Desktop Icon Profile in the list before clicking Save, it will overwrite that profile.
- Load: Loads the selected Desktop Icon Profile.
- Rename: Allows you to edit the name of the selected Desktop Icon Profile.
- Delete: Deletes the selected Desktop Icon Profile.
- Profile: This column shows the name of the Desktop Icon Profile.
- Icons: This column lists the number of desktop icons that exist in the Desktop Icon Profile. Note that Desktop Icon Profiles do not save the icons themselves, only their positions. If an icon or file is deleted from the desktop, DisplayFusion cannot restore it.
The DisplayFusion Remote Control feature allows you to run any Function listed on the Settings > Functions tab from the DisplayFusion Remote mobile application on your mobile device. For the full list of available platforms for the mobile app, please see the following page:
https://www.displayfusion.com/Features/RemoteControl/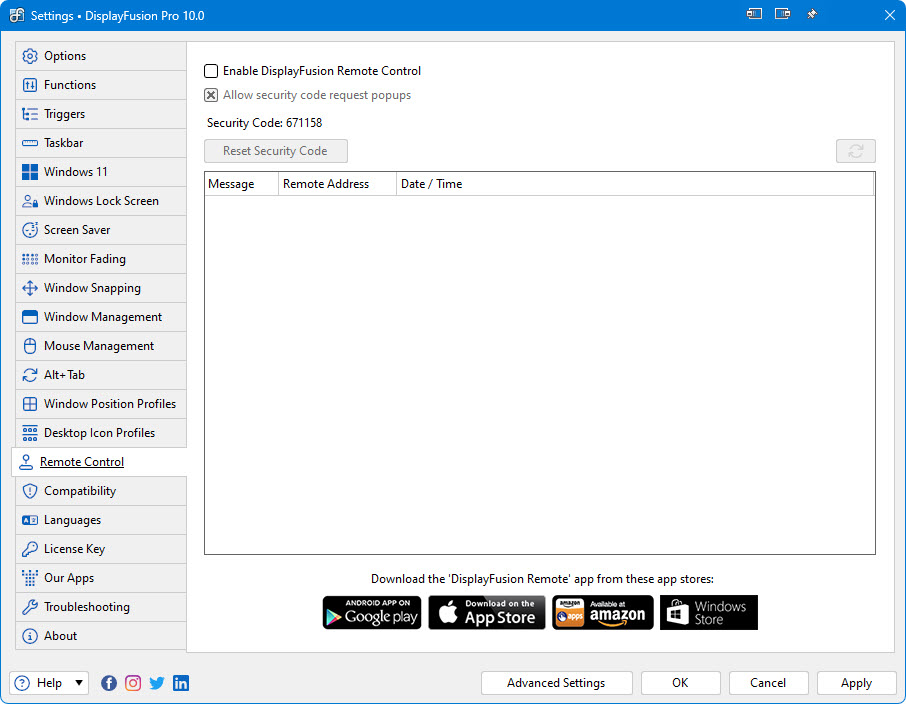
- Enable DisplayFusion Remote Control: Enable this checkbox to allow DisplayFusion Remote mobile apps on the local network to discover and connect to your machine. You can allow connections from the Internet as well, if you forward TCP port 21452 on your router, to the computer that's running DisplayFusion.
- Allow security code request popups: Enable this option to have DisplayFusion pop-up a dialog box showing the six digit security code when requested by a DisplayFusion Remote mobile app. This allows you to see the code easily without having to open the Settings window.
- Reset Security Code: Changes the six digit security code that is required when connecting from a DisplayFusion Remote mobile app.
- Message: This column shows the action that was taken by the remote computer or device. It will show if a Security Code was requested, if the Functions list was loaded, and what Functions were run.
- Remote Address: This column shows the IP address of the computer or device that connected to the DisplayFusion Remote API on this computer.
- Date / Time: This column shows the date and time that the remote computer or device connected to the DisplayFusion Remote API on this computer.
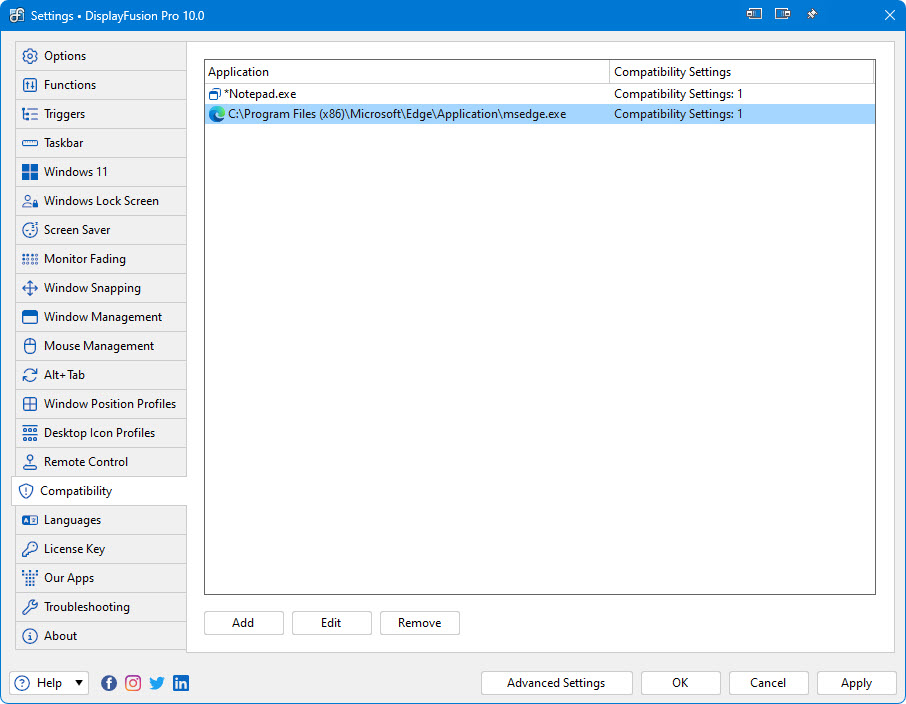
If you are having a problem with one of DisplayFusion's features with a certain application, just add it to this list and exclude it from that feature.
- Application: Shows the application the Compatibility setting is for.
- Compatibility Settings: This shows any compatibility settings that are currently configured for this application or wildcard.
This window allows you to configure special compatibility options for an application.
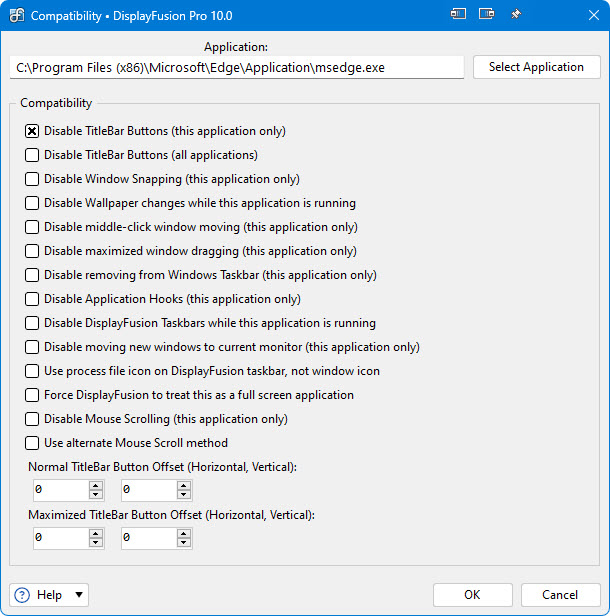
- Application: Shows the selected application's executable that these Compatibility settings will be applied to.
- Select Application: Allows you to select a running application from a list, or browse for the main executable file for the application you need to configure.
- Disable TitleBar Buttons (this application only): If this is selected TitleBar Buttons will not be added to this application.
- Disable TitleBar Buttons (all applications): Pauses (and unloads) the TitleBar Buttons when the specified application is running.
- Disable Window Snapping (this application only): If this is selected, this application's windows will not snap to monitor/application window edges.
- Disable Wallpaper changes while this application is running: If this is selected DisplayFusion will not allow the random wallpaper changer to change the wallpaper while this application is running.
- Disable middle-click window moving (this application only): If this is selected you will not be able to middle-click the titlebar to move the window to the next monitor.
- Disable maximized window dragging (this application only): If this is selected you will not be able to drag this application's maximized windows to new monitors.
- Disable removing from Windows Taskbar (this application only): If this is selected, when an application's taskbar button is added to a DisplayFusion taskbar, it will not be removed from the Windows taskbar (if setup to do this). If this is un-checked, the application's taskbar button will be removed from the Windows taskbar when it gets added to the DisplayFusion taskbar.
- Disable Application Hooks (this application only): Enable this to prevent the application from loading DisplayFusion Hooks. This is useful in some scenarios where applications behave strangely when hooked. Note that some functionality, such as middle-click window moving, for that application will be lost.
- Disable DisplayFusion Taskbars while this application is running: Pauses (and unloads) the Multi-Monitor Taskbars when the specified application is detected.
- Disable moving new windows to current monitor (this application only): When enabled, DisplayFusion won't move the application to the current monitor when it is launched, even if the "Move newly opened windows to current monitor" option is enabled on the Window Management tab.
- Use process file icon on DisplayFusion taskbar, not window icon: If this is selected, DisplayFusion will use the icon in the process for the taskbar button, instead of the icon specified for the particular window of that application. This setting will only have a noticeable affect if the application is coded to use a different icon for the window than the process.
- Force DisplayFusion to treat this as a full screen application: If this is enabled, DisplayFusion will treat this application as full screen any time it's running. This will cause wallpaper changes to be paused, and prevent DisplayFusion from bringing the DisplayFusion taskbar to the front. This setting is most useful for borderless windowed games that aren't automatically detected as full screen.
- Disable Mouse Scrolling (this application only): If this is selected, DisplayFusion will not allow this application to be scrolled with the mouse wheel unless it is the active window. (Default Windows behaviour)
- Use alternate Mouse Scroll method: If this is selected, DisplayFusion will use a different method for scrolling this application when it is not the active window.
- Normal TitleBar Button Offset (Horizontal, Vertical): These are the amounts that the TitleBar Buttons will be moved for this application when not maximized. Specify a negative value to shift the TitleBar Buttons left or up, and a positive value to shift them right or down.
- Maximized TitleBar Button Offset (Horizontal, Vertical): These are the amounts that the TitleBar Buttons will be moved for this application when maximized. Specify a negative value to shift the TitleBar Buttons left or up, and a positive value to shift them right or down.
This tab in the Settings window contains a list of all the languages currently installed on your system for use.
- Name: This column shows the name of the language.
- Version: Shows the version for the Language file. This version should match the program version for best compatibility.
- Translators: Shows the contributors for the Language file.
- Complete: What percent complete the language file is.
- Help Finish a Translation: Help us finish a translation and receive a free Pro Standard license in return.
This tab in the Settings window displays your current License key, and allows you to update the License Key or revert to the free version.
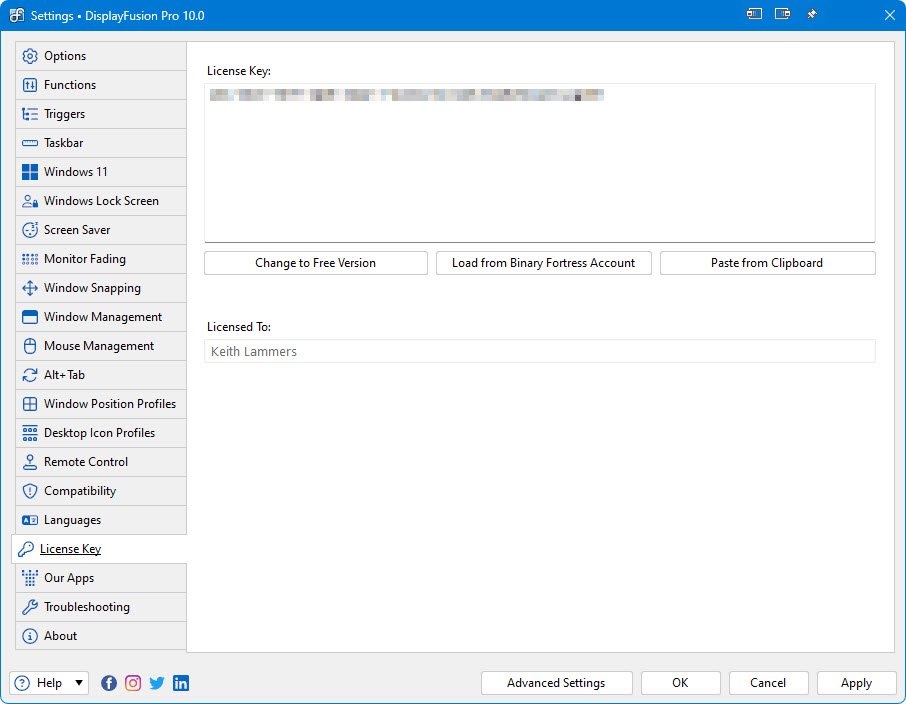
- License Key: The License Key that this application is currently using.
- Change to Free Version: At any time during the free 30-day Pro trial, you can click this button to revert back to the Free version of this application.
- Restore Trial License Key: This allows you to restore a trial license key if it was removed in error and is still valid (within 30 days).
- Load from Binary Fortress Account: Click this button to retrieve and select a license key from a list of license keys tied to your Binary Fortress account.
- Paste from Clipboard: If you have copied your license key from your email, just click this button to automatically paste it into the License Key box.
- Buy a License Key: If you're currently on the Free or Trial version, and you'd like to purchase a lifetime Pro license, click this button to be taken to the purchase page.
- Licensed To: Shows who the license key is registered to, and if it is a Site License key.
- License Expiry Date: If you are using a Trial license, this will show when it will expire.
- Request New Trial License: Click this button to submit a request to the Binary Fortress Software support team for a new 30-day trial license key.
The Our Apps tab lists some of our other popular applications. If you enjoy using this application, feel free to check out our other applications as well!
The troubleshooting tab contains information and options that are only useful for troubleshooting when something isn't working correctly. The text area contains all the information required by Binary Fortress Support when submitting a help request. The button with the blue arrows allows you to refresh the information listed here.
The Logging drop-down list allows you to set the Debug Logging Level. This typically only needs to be enabled when requested by the Binary Fortress support team.
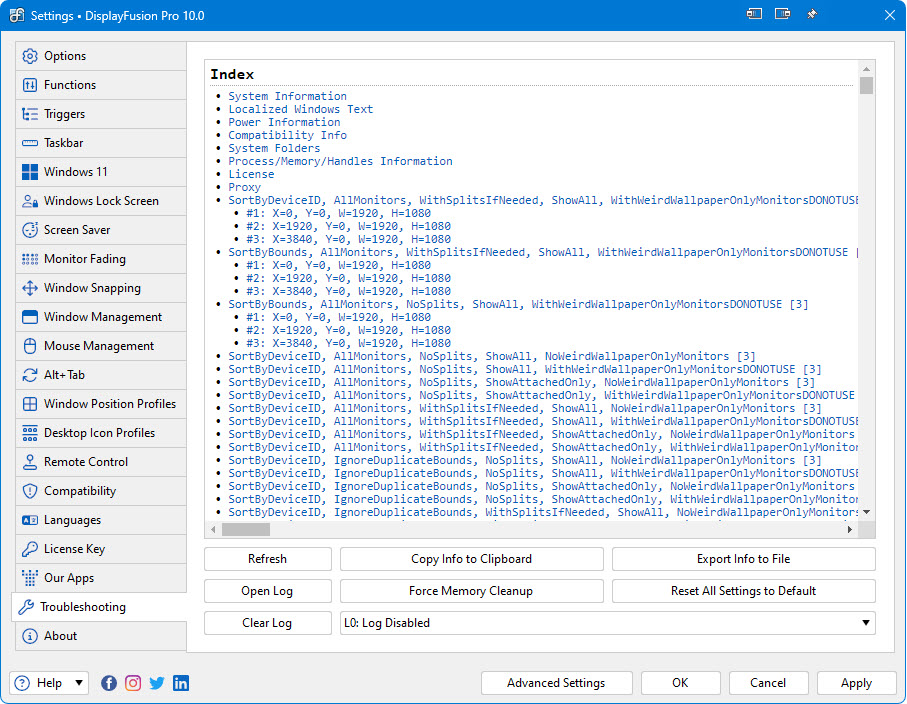
- Open Log: Opens an explorer window to the debug log file's location so you can attach it to an email, or upload it to the support forum.
- Clear Log: Clears the application debug log
- Refresh: Click this button to refresh the troubleshooting info.
- Force Memory Cleanup: This forces the application to pause and do a memory cleanup (a garbage collection) to try and free up any unneeded memory.
- Copy Info to Clipboard: Copies the information from the text area to the clipboard – you can paste this information into an email or forum post by pressing Ctrl + V.
- Log Level: This drop-down menu allows you to choose the logging level for debug logs. L0: Log Disabled is recommended for normal usage. You'll typically only want to enable debug logging to capture a log of a reproduceable issue when submitting a support request.
- Export Info to File: This will open a Save File dialog that will let you save your troubleshooting info to a file.
This dialog allows you to customize to connect to the internet to search for updates or to sync settings and profiles with your Binary Fortress account. This dialog can be accessed via the Internet Connection Settings button on the Options tab.
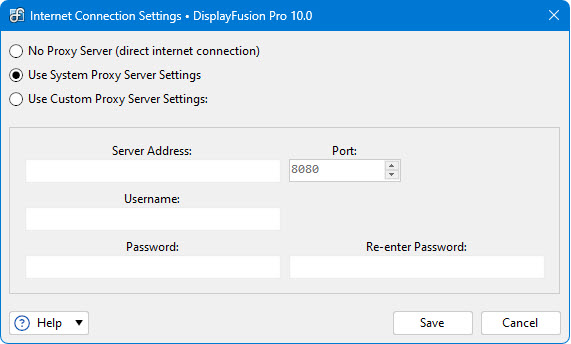
- No Proxy Server (direct internet connection): Select this option if you do not want this application to use a proxy server when accessing the Internet.
- Use System Proxy Server Settings: Select this option to have this application use the proxy settings that are configured in Internet Explorer.
- Use Custom Proxy Server Settings: Select this option if you would like to manually enter your proxy server information.
- Server Address: Enter the proxy server IP address or host name in this text box.
- Port: Enter the proxy server port in this text box.
- Username: Enter the username for your proxy server in this text box.
- Password: Enter the password for your proxy server in this text box.
- Re-enter Password: Re-enter the password (if required) for your proxy server in this text field.
- Save: Save the current proxy settings.
You can use these Advanced Settings to control hidden options. This window is accessed via the Advanced Settings button at the bottom of the main Settings window. For more information on what these settings control, please visit the
Advanced Settings guide.
- Only show modified values: Only show advanced settings that have a value assigned.
- Filter: The filter box allows you to search for advanced setting names. It uses the Binary Fortress Text Query syntax.
- Setting: Shows the category and name of the hidden setting that you can edit.
- Value: Shows the current value, and highlights the setting in red if there is a value set.
- Default Value: Restores the selected setting to its default value.
This window is used to edit your advanced settings. There are different types of advanced settings: true/false settings or string value settings.
This window allows you to select from a list of currently running applications, or browse for an application on your computer. This window can be accessed via the Browse button on the Settings > Other Application tab.
- Application: Shows the application's name.
- Path: Shows the application's path.
- Filter: The filter box allows you to search for application paths. It uses the Binary Fortress Text Query syntax.
- Refresh: Click this button to refresh the list of open applications.
- Browse: Allows you to browse and select an application that isn't currently listed.
- Drag this over a window to select that window's process in the list automatically: When you drag this target icon over a window, any information about that window will be filled out automatically, like it's title, or class.
This window is displayed when a new version of the application is available.
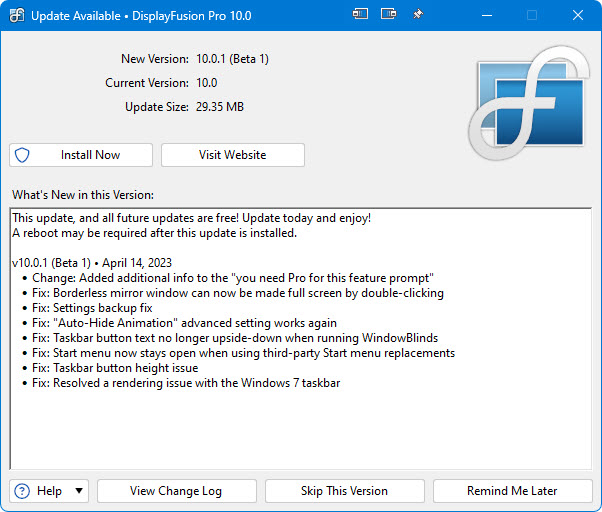
- New Version: Shows the version number of the new version, and whether or not it is a beta release.
- Current Version: Shows the version you are currently using.
- Update Size: Shows the download size of the update.
- What's New in this Version: This shows the changes that have been made to this application since the last time you installed an update. It is a helpful guide to see what new features will be available in the new version.
- Install Now: Automatically downloads and installs the update with only 1 click. (Pro only)
- Install on Exit: Automatically downloads and installs the update after you exit the program, as long as the computer isn't shutting down. (Pro only)
- Visit Website: Opens your default web browser to the application download page so you can download the latest version.
- View Change Log: Opens your default web browser and shows the Change Log. This will allow you to see what has changed since the previous version.
- Skip This Version: Closes the update window, and tells this application to never remind you about this version. Newer versions, and forcing the update check manually using the "Check Now" button will still cause the update window to appear later.
- Remind Me Later: Closes the update window, and allows this application to remind you about the update later.
This window allows you to submit a support request, along with your Troubleshooting information and debug log (if debug logging is enabled on the Troubleshooting tab in the settings window). This window can be accessed via the Help dropdown at the bottom left of the Settings window.
- Name: Enter your email address in this text box.
- Email Address: Enter your name in this text box.
- Subject: Enter a quick one line description of your issue in this text box.
- Message: Enter a message explaining the issue that you're running into. If you clicked the Support Request button on an error message window, the error text will also show in this text box.
- Attach File: This will add an attachment to your support request.
- Clear Attachments: This will clear all attachments from your support request.
- Include a settings backup with this support request: Enable this checkbox to send a backup of your product registry Settings along with the support request.